Correct- On the Friday of trick or treat at work I was working on the pack pretty much to the point where we were pulling out the driveway to go to the event! I didn’t even have time to review the hero photos of the movie packs.
Since then it has been moved to the correct location on the alice frame.
I never did find the plates but one day this week while chatting with the head of our dietary dept I spotted a plastic clipboard sitting on the shelf behind his desk.
Yup you guessed it, the exact shade of blue I needed and now I have enough for dozens of proton packs!!
Found some EDA disks out in the garage (flat wheels from a plastic chest set they were not used!) and some green hose at work (broken stethoscope) and a broken overhead light lens that will make a perfect defuser for the red led lights in the pack.
Instead of running seperate packs of batteries I have a single 12V gel-cell that will run the MP3 board and Amp and use the DC regulator to drop down to 3.5 volts for the lights.
Dissassembled the pack last night to basic parts for a redo, sanded a lot of paint off the booster/EDA area so I could seal and sand all the woodgrain off. Thinking about replacing the spacer and generator with scratchbuilt plastic pieces.
Was going to go aluminum but the price has gone up A LOT since I last purchased any!
Dropping pieces on the scale to fingure out what can be replaced with lighter units, surprised the 3/8 thick motherboard was only 2.5 pounds..
So I’m home today and have to do something with low effort.
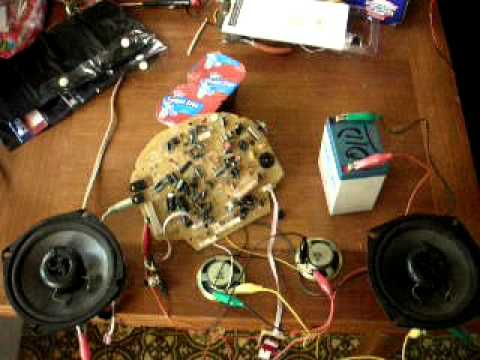
I had this boom box from work, we get lots that get tossed in the trash due to bad drives and I had the idea I could salvage the main circuit board to use as an amp. The unit already had an AUX IN jack so this would be easy to test by unplugging one section after another till there was only the board left or the unit would stop functioning.
Aside from the volume control and one little PCB with a power LED (which I’m keeping to use as an indicator the amp is powered) it was complete success! The board will stand alone and work fine powered up by a 12V.
The large speakers shown are some blaupunkts I stripped from a car like 15-20 years ago and have just been hanging from the garage wall. They sould great and are LOUD, I’m going to have a rocking pack once it is back together and I get the sound board up and running.
Low budget? You bet.
Youtube video below-
(Sorry I forgot to turn off the radio in the kitchen before filming)
Death by stereo! (ha, ha… I know… quote from another movie…)
That is totally boss! I admire that you have the access to parts an’ things and the moxy to get your build so off the ground… really inspired me to do better on mine’s… I just neeed the discipline to get my butt going on it!
Cool beads to see a homemade scratch build come to bloom… my props to you, sir!
Working with Modge Podge tonight- What a pain in the behind! Stuff dries like cement, had to bust out the electric sander to make a dent in it.
Lesson learned!
I don’t mind spending cash for a needed part but something as common as an amp there is always alternatives :-o
We toss out a few of these CD players a year and I really wanted two speakers to make the pack boom but didn’t want to spend $50-$60 bucks for a pair of mono amps. This will work out very nice as it (the CD box guts) works at the batterys base voltage (12v) and if I want can always rig a switch to swap from one input device to another.
It even has an output jack, I might even wire that up somewhere so I can always output to someone’s sound system =)
I’m planning to wire the volume control up on the wand using one of the wands dials.
MT500 radios anyone? I’m going to gut one and add a sound module to playback movie clips! I may sell off a few to get a few bucks back.
Decided I’m going to build two packs- The first pack which is being reworked now is going to be a GBII pack and the “heavy” version with big speakers, amps and some other gizmos I have up my sleeve
I have a few surprises I’m working on, might even have some motor driven pieces by the time I’m done!
The second pack is going to be based on the GB I pack and is going to be a light pack. I’m going to try and build it out of styrene which I never worked with before but looks interesting and will have minimal lights and sound to keep the weight down.
The primary difference between the two movies is the ion arm, the ribbon cable and the color of the crank handle correct? Some other small details I’m vaugely aware of too like welding around the booster tube as well, please feel free to chime in!
Cool, cool, my thoughts exact. It is really a good idea to somehow work out in having the controls for the sound effects, volume, and whatever configured into the wand/ thrower… I’m trying to do that also with my Poltergust 5000 project for my Luigi cosplay, readying up for the** Luigi’s Mansion 2** debut next year.
Keep up on the build, brother! It’s always a delight to see the progress on your pack!
I hope to start on the new spacer assembly this week, was going to start drafting out the wood today but started tinkering with the radios instead =)
I’m really having fun researching and building these Ghostbuster props, wicked fun! Learning lots of new stuff even if the learning curve is steep time to time.
Light & sound kit came in from Crix, nice nice nice! Picked up some tools to make a better pack too. Can’t wait for this weekend to get rolling on the new spacer, drew out the main pieces this week in my spare time.
Made the call this weekend to abandon plans to build a second pack using some parts from the first. While some came out well, they just wont do for my plans of “taking it to the next level” so to speak.
What I’m going to do is reassemble this pack with some improvements and then set it aside for a spare or backup. Still going to build a proper wand for it and have been picking up the odd parts like resin grips and clippards.
When I start a new pack, I’ll start a new thread.
For this pack I have collected the following- cable clamp, GB2 ribbon cable (in route) blue lens for power cell, EDA disks, upgraded fittings, gearbox crank, ion arm resistors, thrower heatsink, thrower grips, clear tubing, a resin clippard and other assorrted odds and ends. I have spent the last week or two picking at the trim pieces doing some sanding and refinishing.
I’d like for this one to have sound (minus the mp3 player) we will see what I come up with.
Made some progress last night but it is slow going with the holidays- Finished repairing the hole where the booster tube goes into the EDA box (was ground offset to clear the ion arm during the build, woops) the gearbox has been reassembled and just needs some final spot putty and sanding. Almost ready to spray paint again on those two pieces! Picked up some 4" speakers from wallyworld last night, will experiment to see if any good for the idea I have in mind.