I’ve been reading ProtonChargers updates on his Rocketeer prop and it got me itching to try something new.
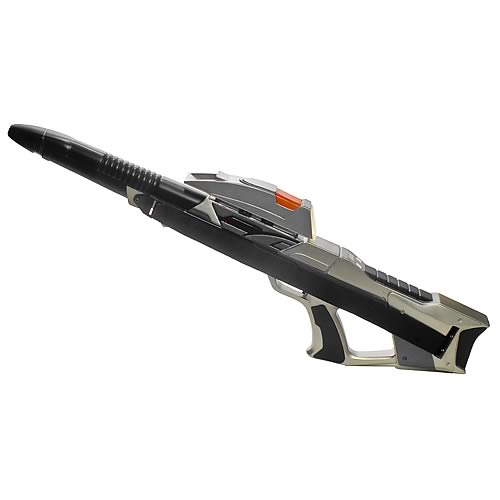
Thought I’d give a shot at creating a full-size replica of the Type 3 Phaser used in Star Trek the Next Generation (the show, not the movies). I can find reference pics on the web, but no blueprints or real dimensions, so I’ve been creating them from scratch. Here’s where things are so far:
I’ve got the profile done, but I still need to do the top and bottom views.
Here’s the main reference picture I’ve been using. I printed it way too small and I’m out of color ink, so its in gray scale. That said, its working for me.
I probably could have done this on my computer, but for these types of projects I do better with real pencil and paper.
I couldn’t resist putting some detailing on the blue print -it looked naked without it.
its good to know i inspire, im lookin forward to watching the updates on this. ive noticed i like drawing my plans out rather than using a computer too, its a little more intimate with the project instead of clicking a mouse around.
From a supplies perspective this is a pretty inexpensive and easy built. The body of the rifle is a 2x4 with the handles made from scrap 1x2. Here’s all the pieces cut -no sanding or shaping yet.
The front assembly. My jig saw doesn’t work great on 2" thick wood, to I grabbed a couple of 1" pieces, cut the same shape twice, then glued and screwed them together.
The handle is made from 3 pieces -the main handle, a small front piece that curves forward, and a small flat rectangle across the top (some scrap fiberboard from pack motherboard).
For the eagle-eyed, I made some modifications to the blueprint, the front handle was too wide and not at the right angle. All corrected now.
I shaped the front piece -it was a bear, but it looks pretty close to the reference photos. I still need to shape the tip -something to do tomorrow with I’ve got sunlight for natural illumination.
Not to get to excited, but its starting to look like something…
I need to do a lot of cleanup on the pieces, including bondo-ing gaps and more sanding, but I ran out of daylight and had to do indoor tasks that don’t make too much of a mess or smell. Thought I’d cut the ribbing for the gun body.
I used a dremel with a router attachment to create an indention for the ribbing. Not ideal, for the flip side I’ll use a real router. I’ll do the same for the gun handles…
Not too bad…
At the end of the evening here’s where we are. I added “plate” lines to the rifle handles and marked the spaces to route out for the ribbing.
No plans for any lights (yet). If I like how it comes out I may mold it and cast (hollow) resin copies that would have room for electronics. I don’t remember the rifle having any light displays in the show -maybe I’ll just put an LED in the tip and connect it to the trigger…
you know you might find that adding another 1/2" piece to the handles the same shape as the handles might be alittle more comfortable. i measured my handles to my colts and my blade runner gun, and both are roughly 1 1/2" wide. before i got these guns, i made some guns out of wood in the past, and i either made the handle too thick or too thin and either way was uncomfortable and unnatural.
The reverse side of the middle section and both grips have been notched for the ribbed inserts (does that sound dirty?)
Attaching the ribs to the grips to a couple of attempts. Wood glue wouldn’t hold and the grip popped off when I bent it around the handle. Attempt 2, with Liquid Nails, did the trick.
In the show, a light could be attached to the top of the gun using a “track” in the center section.
The front piece is the most complicated. If I didn’t shape it correctly (and symmetrically) then the add-on pieces would not fit correctly.
The rear of the gun stock was a challenge. I tried several different spacers before I was satisfied.
I added some modeling putty around the trip pieces to fill in gaps and smooth everything out. It will dry overnight and I’ll sand it down.
I cut notches in the underside of the gun so the grips have a happy home to fit into. Next step -cover the gun in Modge-Podge to remove the woodgrain then prime and paint… (more to come)
Dumb question: should you have painted the gun handles before glueing the grips on? Or do you want them the same texture and color as the rest? You might have problems finding a paint that will stick to the grip material you used…
No, actually a very good question. I’m planning on molding and casting the rifle, so I may not paint this version at all -though I will prime it to help find surface defects.
One of the challenges of this build is that I can’t assemble and hold it because I have to mold it in separate pieces. I may actually attach the parts with Elmers just to see what it looks like assembled before I pull it apart.
Ah.. I didn’t realize you were going to mold and cast the final one. I figured you were doing a one shot version for yourself, using the base materials.
My favorite part of a build is when you finally prime it. All the individual pieces, wood grain, glue, etc. get covered with a consistent surface and you get to see what your hard work is going to look like.
Woodgrain is fairly well hidden with just a bit showing through on the gun stock.
I’m pleased with how the gun body came out. I used some scrap plastic to act as a spacer, then used modeling putty to fill gaps and seams.
The grips are ok. When they’re inserted into the gun I think they’ll look good.
This is the front barrel of the gun. Standing on its end I think it looks like something from Star Wars.
The is the scope mount and was a definite pain in the rear to cut. I’ll make the eye piece once the rest of the gun is complete.
Here we are, assembled and primed. I setup a series of pegs to connect the pieces together. The pegs aren’t really to hold the piece together permanently, but to act as guides for assembly. The next step is to mold and cast a resin copy.
The detailing on the underside of the gun is pretty subtle. I stumbled across a reference shot that was clear enough to determine what need to be included.
The grips look good to me. I’m only planning on creating a mold for one of them, then casting it twice. I haven’t determined which of the two grips came out the best (yet).
The detail in the grip and gun body is carpet runner. Once inserted I think it came out surprisingly well.
Ah, the beautiful site mount. I added a fake button that would, theoretically, raise and lower the sight. For the close observer, the button may look familiar.
Here’s the detailing on the gun barrel. Figuring out the measurements for those tiny plastic pieces was a challenge, but I’m very pleased with the net result.
Thanks, I’d seen that website too. I actually thought about trying to reproduce that gun, but it looks a little more complicated than I wanted to tackle. May for the next project…