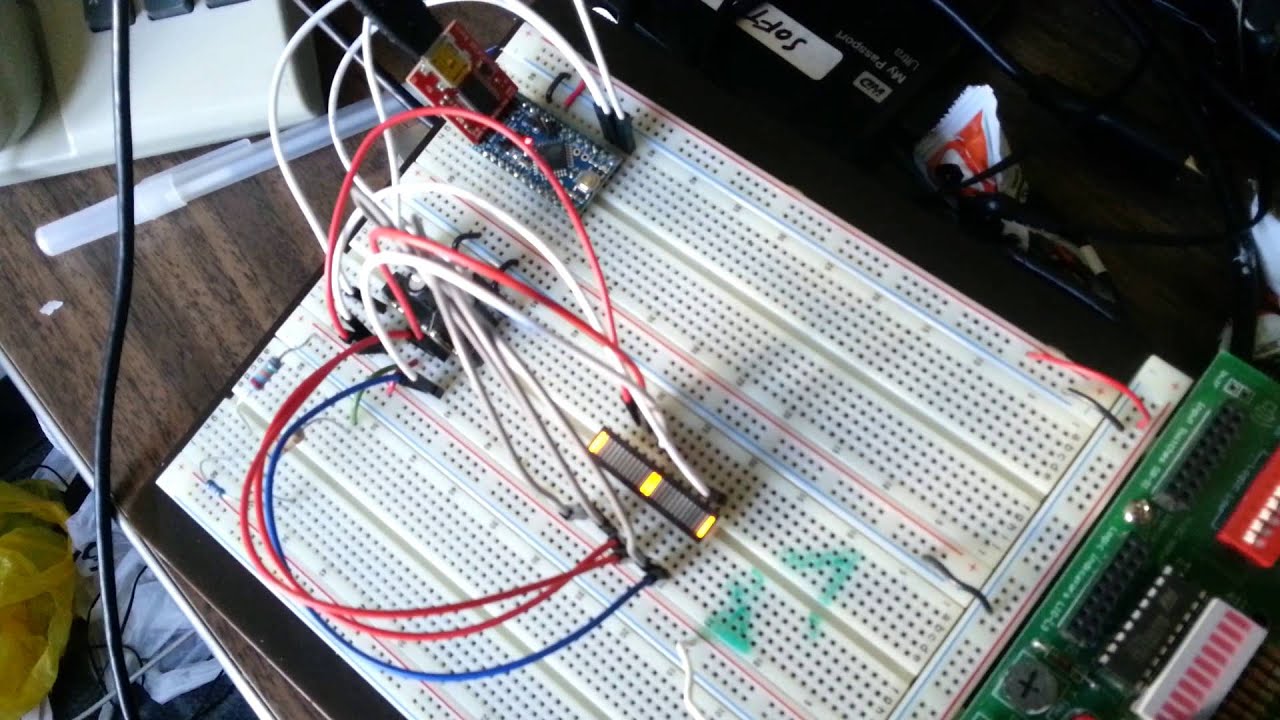
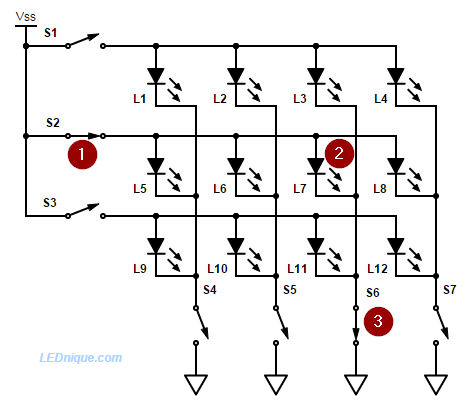
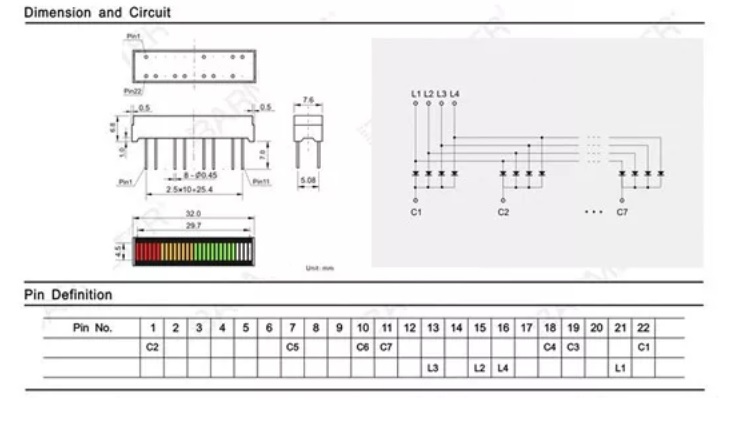
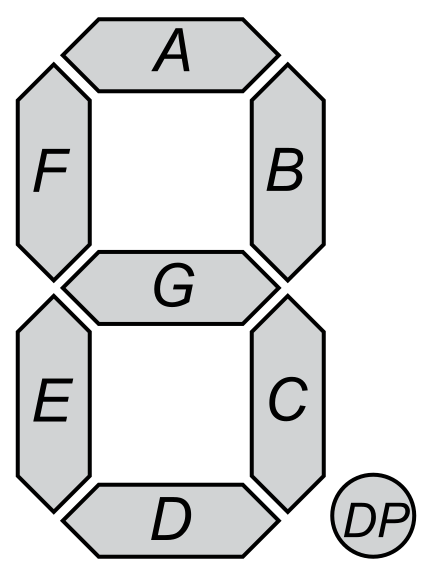
And for anyone curious, here’s my (very incomplete) code:
<i>
</i>//////////////////////////////////////////////////////////////////////////////////////
//This is a work in progress program for a proton pack
//Created by by Berg9987 (KLB)
//Currently using an Arduino Pro Mini 5v, single MAX7219, and a SparkFun Wav Trigger
//Several parts of this code uses examples found online
//Feel free to use it or change it as you wish
//If you do make it better, please post your changes where you found this sketch
//Last updated December 10th, 2015
//////////////////////////////////////////////////////////////////////////////////////

//Include the necessary libraries
#include "LedControl.h"       //MAX7219 library for the bar graph
#include <AltSoftSerial.h>    //Used to create a software serial TX on pin 9 for the wav trigger
#include <wavTrigger.h>       //Wav Trigger Library

#define DEBOUNCE 25  // Button debouncer, how many ms to debounce after button state change

// Define the buttons
byte buttons[] = {14, 15, 16, 17, 2}; // the analog 0-5 pins are also known as 14-19
//  14 = A0 = 0 = INTENSIFY
//  15 = A1 = 1 = ACTIVATE
//  16 = A2 = 2 = POWERON
//  17 = A3 = 3 = EXTRA
//   2 = D2 = 4 = BARREL

// Checks the size of the above button array
#define NUMBUTTONS sizeof(buttons)
// Track if a button is just pressed, just released, or 'currently pressed'
volatile byte pressed[NUMBUTTONS], justpressed[NUMBUTTONS], justreleased[NUMBUTTONS];

//States for state machine
enum operatingState { OFF = 0, STANDBY, POWERUP, HUM, SAFETYOFF, FIRE, POWERDOWN, MUSIC };
operatingState opState = OFF;

/*
 Setup MAX7219 control
 pin 12 is connected to the DataIn
 pin 11 is connected to the CLK
 pin 10 is connected to LOAD
 There is only 1 MAX7219
 */
LedControl lc=LedControl(12,11,10,1);
wavTrigger wTrig;             //WAV Trigger object

int interval1 = 20;     //Timing for the bar graph
int updown = 1;         //Bar graph direction in poweron mode
int updown2 = 1;        //Bar graph direction in fire mode
int firepos = 0;        //Initial bargraph fire animation position
int songnum = 101;      //Initial song number (101 is the first song)
int songplaying = 1;    //Song number that is playing (will be 101 to 120 when started), used for serial print
int songcount = 1;      //Determinrs if song increases or decreases with barrel button press
int fade = 0;           //Used in hum mode to indicate whether the hum sound should be playing 0=yes, 1=no
int soundtrack = 0;     //Switch bit to put into soundtrack mode

unsigned long previousMillisbar = 0;    //used for bar graph animation timing
unsigned long previousMillisbar2 = 0;    //used for bar graph animation timing

/*
 * bytes below used for animating bar graph by "writing" them to different rows
 */
byte a[5]={B00000000,B00000001,B00000010,B00000100,B00001000};
byte b[5]={B00010000,B00100000,B01000000,B10000000,B00000000};

void setup()
{
  byte i;   //used to initialize the switches

   //Set up serial port for debugging
   //Print what the program is and how many buttons
   //were found in the size of button array above.
  Serial.begin(9600);
  Serial.print("GB Control with ");
  Serial.print(NUMBUTTONS, DEC);
  Serial.println(" buttons, bar graph and sound.");
  Serial.println("Wait");   //Indicate that setup has begun, wait for it to finish

   //Make input & enable pull-up resistors on switch pins
  for (i=0; i < NUMBUTTONS; i++)
  {
    pinMode(buttons[i], INPUT);     //Buttons are inputs
    digitalWrite(buttons[i], HIGH); //Enable pull up resistors
  }

  /*
  The MAX72XX is in power-saving mode on startup,
  we have to do a wakeup call
  */
  lc.shutdown(0,false);
  /* Set the brightness to a medium values */
  lc.setIntensity(0,8);
  /* and clear the display */
  lc.clearDisplay(0);

  // WAV Trigger startup at 57600
  wTrig.start();

  // Wait for the WAV Trigger to finish reset before trying to send commands.
  delay(1000);

  wTrig.stopAllTracks();  //Stop anything the WAV Trigger might be playing
  wTrig.masterGain(0);    //Set master gain.  Both these commands "reset" the wav trigger in case it was doing something strange

  Serial.println("Ready");  //Indicate that the setup is done
}

/*
 * Track any changes in the switch states.  This function was taken from an online example.
 * I would like to try and get it to work on an interrupt timer again (used it before in the
 * example that I found), but until I have all the other functions running I won't and interrupt
 * timers can mess up PWMs on pins.
 */
void check_switches()
{
  static byte previousstate[NUMBUTTONS];
  static byte currentstate[NUMBUTTONS];
  static long lasttime;
  byte index;

  if (millis() < lasttime)  // we wrapped around, lets just try again
  {
     lasttime = millis();
  }

  if ((lasttime + DEBOUNCE) > millis())
  {
    // not enough time has passed to debounce
    return;
  }
  // ok we have waited DEBOUNCE milliseconds, lets reset the timer
  lasttime = millis();

  for (index = 0; index < NUMBUTTONS; index++)
  {
    currentstate[index] = digitalRead(buttons[index]);   // read the button

    if (currentstate[index] == previousstate[index])
    {
      if ((pressed[index] == LOW) && (currentstate[index] == LOW))
      {
          // just pressed
          justpressed[index] = 1;
      }
      else if ((pressed[index] == HIGH) && (currentstate[index] == HIGH))
      {
          // just released
          justreleased[index] = 1;
      }
      pressed[index] = !currentstate[index];  // remember, digital HIGH means NOT pressed
    }
    //Serial.println(pressed[index], DEC);
    previousstate[index] = currentstate[index];   // keep a running tally of the buttons
  }
}

void loop()
{
  check_switches();   //Call the check switches every time through the loop

  switch (opState)    //Switch part of the switch/case state machine
  {
    case OFF:         //Off.  The initial state
      off();
      break;
    case STANDBY:     //Standby.  Like off but the barrel button is pressed
      standby();
      break;
    case POWERUP:     //State between off and hum (Power switch flipped on)
      wTrig.trackPlayPoly(1);   //Play powerup sound
      powerup();
      break;
    case HUM:         //Hum, power switch is on, pack is "idle"
      wTrig.trackLoop(2, 1);    //If hum sound is playing, put it on a loop
      hum();
      break;
    case SAFETYOFF:   //Like hum, but now ready to fire (Activate switch flipped on)
      safetyoff();
      break;
    case FIRE:        //Fire animations and sounds (Intensify button pressed)
      fire();
      break;
    case POWERDOWN:     //Powerdown animation and sound (Power switch flipped off)
      powerdown();
      break;
    case MUSIC:         //Power switch flipped on while in standby
      music();
      break;
  }
}

void off()
{
  lc.clearDisplay(0);   //Turn off bar graph

  if (justpressed[2])  //The "power" switch on
  {
    justpressed[2] = 0; //reset justpressed 2
    Serial.println("Power On");
    opState = POWERUP;    //Go to powerup mode
    return;
  }

  if ((justpressed[4]) || (pressed[4])) //Barrel button is pressed or held
  {
    justpressed[4] = 0; //reset justpressed 2
    Serial.println("Button Pressed");
    opState = STANDBY;    //Go to standby mode
    return;
  }
}

void standby()
{
  if (justpressed[2])  //the "power" switch on
  {
    justpressed[2] = 0; //reset justpressed 2
    Serial.println("Music");
    opState = MUSIC;    //Go to music mode
    return;
  }

  if (justreleased[4])  //the "barrel" button off
  {
    justreleased[4] = 0; //reset justpressed 4
    Serial.println("Off");
    opState = OFF;    //Go to off mode
    return;
  }
}

void powerup()     //Start bar graph at empty and fill it.
{
  int col = 0;    //Start at the first LED
  int row = 0;    //Start at the first LED
  while(col<7)    //There are only seven columns, 0 - 6
  {
    while(row<4)  //There are only four rows, 0 - 3
    {
      unsigned long currentMillisbar = millis();      //Get current program time
      lc.setLed(0,row,col,true);                      //Set the LED at row and col to on
      if(currentMillisbar - previousMillisbar > 50)   //Check to see if the interval time has passed
      {                                               //50 is used as it causes the bar graph to fill in abot the time it takes to play the startup sound
      previousMillisbar = currentMillisbar;           //If enough time has passed: store current program time
      row++;                                          //Increase row number by one
      }
    }           //row has passed 3, exit while loop
    row = 0;    //Reset row to zero
    col++;      //Increase column number by one
  }             //col value has passed 6, bargraph is full

  Serial.println("Hum");    //Print next state
  wTrig.trackPlayPoly(2);   //Start the hum sound
  opState = HUM;            //Go to hum mode
  return;
}

void hum()
{
  if (updown = 1)   //Positive value of "updown" means filling the bar graph
  {
    int col = 0;          //Start at the first LED
    int row = 0;          //Start at the first LED
    while(col<7)          //There are only seven columns, 0 - 6
    {
      while(row<4)          //There are only four rows, 0 - 3
      {

        check_switches();  //In the while loop the program wont run the check switches function
                           //so I'm calling it here.  This way I don't have to wait until the
                           //bargraph is eighther completely full or empty to respond to button presses
                           //This can hopefully be removed when I have the switches called by a
                           //timer interrupt

        if (pressed[3])   //If the extra switch it flipped on
        {
          fade = 1;       //Set fade to 1
        }
        else              //Otherwise...
        {
          fade = 0;       //Leave it at zero.
        }

         if (fade == 1)          //If the extra switch is flipped on
        {
          wTrig.trackStop(2);   //stop playing the hum sounc
                                //I wanted this to fade out, but it wouldn't work.
                                //I suspect I can fix it by playing with justpressed instead of pressed
        }

        /*
         * I discovered that if I pressed the Intesify button while in hum
         * that the justpressed bit was held and when the activate switch
         * was flipped the system started the fire and then immediately
         * played the wind down sound.  This is here just to prevent that
         */

        if (justpressed[0])
        {
          justpressed[0] = 0; //reset justpressed
        }

        if (justreleased[2])  //the "power" switch off
        {
          justreleased[2] = 0;  //reset justreleased 2
          Serial.println("Shutting Down");  //Print next state
          opState = POWERDOWN;  //Go to shutdown mode
          return;
        }

        if ((justpressed[1]) || (pressed[1])) //if the "activate" switch is switched on, in this case I'm using it as a safety
        {
          justpressed[1] = 0;   //reset justpressed[1]
          Serial.println("Safety Off!");  //Print next state
          opState = SAFETYOFF;  //Go to safety off
          return;
        }

        /*
        * Now that the buttons have been checked and any button state changes handled
        * update the bar graph
        * NOTE:  at the moment the barrel and intensify buttons don't do anything in this state
        */
        unsigned long currentMillisbar = millis();    //Get current program time
        lc.setLed(0,row,col,true);                    //Set the LED at row and col to on
        if(currentMillisbar - previousMillisbar > interval1)  //Check to see if the interval time has passed
        {                                               //If enough time has passed:
          previousMillisbar = currentMillisbar;           //Store current program time
          row++;        //Increase row number by one
        }
      }     //row has passed 3, exit while loop
      row = 0;    //Reset row to zero
      col++;   //Increase column number by one
    }       //col value has passed 6, bargraph is full
    updown -= updown; //updown changes from positive to negative value
  }

  if (updown = -1)    //Negative value of "updown" means emptying the bar graph
  {
    int col = 7;      //Start at last LED
    int row = 4;      //Start at last LED
    while(col>0)      //This prevents this loop from doing anything with the first column
    {                 //The first four LEDs will always be lit.  Change this to -1 to empty completely
      while(row>-1)   //Count the rows down to zero
      {

        check_switches();  //In the while loop the program wont run the check switches function
                           //so I'm calling it here.  This way I don't have to wait until the
                           //bargraph is eighther completely full or empty to respond to button presses
                           //This can hopefully be removed when I have the switches called by a
                           //timer interrupt

        if (pressed[3])   //If the extra switch it flipped on
        {
          fade = 1;       //Set fade to 1
        }
        else              //Otherwise...
        {
          fade = 0;       //Leave it at zero.
        }

         if (fade == 1)          //If the extra switch is flipped on
        {
          wTrig.trackStop(2);   //stop playing the hum sounc
                                //I wanted this to fade out, but it wouldn't work.
                                //I suspect I can fix it by playing with justpressed instead of pressed
        }

        if (justreleased[2])  //the "power" switch off
        {
          justreleased[2] = 0;  //reset justreleased 2
          Serial.println("Shutting Down");  //Print next state
          opState = POWERDOWN;  //Go to shutdown mode
          return;
        }

        if ((justpressed[1]) || (pressed[1])) //if the "activate" switch is switched on, in this case I'm using it as a safety
        {
          justpressed[1] = 0;   //reset justpressed[1]
          Serial.println("Safety Off!");  //Print next state
          opState = SAFETYOFF;  //Go to safety off
          return;
        }

        /*
        * Now that the buttons have been checked and any button state changes handled
        * update the bar graph
        * NOTE:  at the moment the barrel and intensify buttons don't do anything
        */
        unsigned long currentMillisbar = millis();      //Get current program time
        lc.setLed(0,row,col,false);                     //Set the LED at row and col to off
        if(currentMillisbar - previousMillisbar > interval1) //Check to see if the interval time has passed
        {                                       //If enough time has passed:
          previousMillisbar = currentMillisbar;  //Store current program time
          row--;                              //Decrease row number by one
        }                                       //Decrease row number by one
      }
      row = 4;              //Reset row to 4
      col--;                //Decrease column number by one
  }
  updown -= updown;     //updown changes from negative to positive value
  }                   //updown no longer negative, exit if loop
}

void safetyoff()    //System is ready to fire
{
  justreleased[0] = 0;  //sometimes the wind down sound plays first when the intensify button is pressed
                        //this seems to prevent that.
  /*
   * The below code is very similar to the hum code.  Please see hum section for
   * comments.  I will note differences here
   */
  if (updown = 1)
  {
    int col = 0;
    int row = 0;
    while(col<7)
    {
      while(row<4)
      {
        check_switches();

        if (pressed[0])  //the "intensify" switch on
        {

          Serial.println("Fire");  //Print next state
          wTrig.trackPlayPoly(3);  //Start to play firing sound
          opState = FIRE;      //Go to fire
          return;
        }

        if (justreleased[1])  //the "activate" switch off
        {
          justreleased[1] = 0;  //reset justreleased 1
          Serial.println("Safety On"); //Print next state
          opState = HUM;     //Go to hum
          return;
        }

        if (justreleased[2])  //the "power" switch off
        {
          justreleased[2] = 0;  //reset justreleased 2
          Serial.println("Shutting Down");  //Print next state
          opState = POWERDOWN;    //Go to powerdown
          return;
        }
        lc.setLed(0,row,col,true);
        row++;
      }
      row = 0;
      col++;
      /*
       * NOTE THAT TEHRE IS NO TIMING HERE, THIS WILL GIVE THE APPEARANCE
       * OF THE BAR GRAPH FILLING UP INSTANTANEOUSLY
       */
    }
  updown -= updown;
  }

  long barstop = random(1, 4);  //This is a random number between one and three that will be used
                                //to keep the bar graph mostly lit but animated
  if (updown = -1)
  {
    int col = 7;
    int row = 4;
    while(col>barstop)
    {
      while(row>-1)
      {
        check_switches();
        if ((justpressed[0]) || (pressed[0]))  //the "intensify" switch off
        {
          justpressed[0] = 0;  //reset justreleased 0
          Serial.println("Fire"); //Print next state
          wTrig.trackPlayPoly(3); //Play the firing sound
          wTrig.trackLoop(3, 1);  //Put firing sound on a loop
          opState = FIRE; //Go to fire
          return;
        }

        if (justreleased[1])  //the "activate" switch off
        {
          justreleased[1] = 0;  //reset justreleased 1
          Serial.println("Safety On");
          opState = HUM;
          return;
        }

        if (justreleased[2])  //the "power" switch off
        {
          justreleased[2] = 0;  //reset justreleased 2
          Serial.println("Shutting Down");
          opState = POWERDOWN;
          return;
        }

        unsigned long currentMillisbar = millis();
        lc.setLed(0,row,col,false);
        if(currentMillisbar - previousMillisbar > 10)
        {
          previousMillisbar = currentMillisbar;
          row--;
        }
      }
      row = 4;
      col--;
    }
    updown -= updown;
  }
}

void fire()
{
  unsigned long currentMillisbar2 = millis();           //Get program time
  if(currentMillisbar2 - previousMillisbar2 > interval1)  //If enough time has passed
  {
    check_switches();

    if (justreleased[0])  //the "intensify" switch off
    {
      justreleased[0] = 0;  //reset justreleased 0
      Serial.println("Cease Fire - Still armed");
      wTrig.trackStop(3); //stop firing sound
      wTrig.trackPlayPoly(4); //play wind down sound
      opState = SAFETYOFF;    //Go to safety off
      return;
    }

    if (justreleased[1])  //the "activate" switch off
    {
      justreleased[1] = 0;  //reset justreleased 1
      Serial.println("Cease Fire - Unarmed");
      wTrig.trackStop(3);  //stop firing sound
      wTrig.trackPlayPoly(4); //play wind down sound
      opState = HUM;    //Go to hum
      return;
    }

    if (justreleased[2])  //the "power" switch off
    {
      justreleased[2] = 0;  //reset justreleased 2
      Serial.println("Shutting Down");  //Pring next state
      opState = POWERDOWN;  //Go to powerdown (don't worry about stopping the sounds, powerdown takes care of that
      return;
    }

    previousMillisbar2 = currentMillisbar2; //Record current time
    firepos = firepos + updown2;    //Increment firepos by updown2 (+/-1)
  }

  if(firepos == 0)        //All the following ifs set the rows of the matrix bar graph
  {                       //using values from the bytes defined near the beginning of
  lc.setRow(0,0,a[0]);    //the program
  lc.setRow(0,1,b[0]);
  lc.setRow(0,2,b[0]);
  lc.setRow(0,3,a[0]);
  }
  else if(firepos == 1)
  {
  lc.setRow(0,0,b[0]);
  lc.setRow(0,1,a[0]);
  lc.setRow(0,2,a[0]);
  lc.setRow(0,3,b[0]);
  }
  else if(firepos == 2)
  {
  lc.setRow(0,0,a[4]);
  lc.setRow(0,1,a[0]);
  lc.setRow(0,2,a[0]);
  lc.setRow(0,3,b[1]);
  }
  else if(firepos == 3)
  {
  lc.setRow(0,0,a[0]);
  lc.setRow(0,1,a[4]);
  lc.setRow(0,2,b[1]);
  lc.setRow(0,3,a[0]);
  }
  else if(firepos == 4)
  {
  lc.setRow(0,0,a[0]);
  lc.setRow(0,1,b[1]);
  lc.setRow(0,2,a[4]);
  lc.setRow(0,3,a[0]);
  }
  else if(firepos == 5)
  {
  lc.setRow(0,0,b[1]);
  lc.setRow(0,1,a[0]);
  lc.setRow(0,2,a[0]);
  lc.setRow(0,3,a[4]);
  }
  else if(firepos == 6)
  {
  lc.setRow(0,0,a[3]);
  lc.setRow(0,1,a[0]);
  lc.setRow(0,2,a[0]);
  lc.setRow(0,3,b[2]);
  }
  else if(firepos == 7)
  {
  lc.setRow(0,0,a[0]);
  lc.setRow(0,1,a[3]);
  lc.setRow(0,2,b[2]);
  lc.setRow(0,3,a[0]);
  }
  else if(firepos == 8)
  {
  lc.setRow(0,0,a[0]);
  lc.setRow(0,1,b[2]);
  lc.setRow(0,2,a[3]);
  lc.setRow(0,3,a[0]);
  }
  else if(firepos == 9)
  {
  lc.setRow(0,0,b[2]);
  lc.setRow(0,1,a[0]);
  lc.setRow(0,2,a[0]);
  lc.setRow(0,3,a[3]);
  }
  else if(firepos == 10)
  {
  lc.setRow(0,0,a[2]);
  lc.setRow(0,1,a[0]);
  lc.setRow(0,2,a[0]);
  lc.setRow(0,3,b[3]);
  }
  else if(firepos == 11)
  {
  lc.setRow(0,0,a[0]);
  lc.setRow(0,1,a[2]);
  lc.setRow(0,2,b[3]);
  lc.setRow(0,3,a[0]);
  }
  else if(firepos == 12)
  {
  lc.setRow(0,0,a[0]);
  lc.setRow(0,1,b[3]);
  lc.setRow(0,2,a[2]);
  lc.setRow(0,3,a[0]);
  }
  else if(firepos == 13)
  {
  lc.setRow(0,0,b[3]);
  lc.setRow(0,1,a[0]);
  lc.setRow(0,2,a[0]);
  lc.setRow(0,3,a[2]);
  }

  if (firepos > 13) //There are thirteen steps through this animation, if firepos passes 13
  {
    updown2 = -1;   //Set updown2 to -1 to which causes animation to run backwards
  }

  if (firepos < 0)  //Animation has run all the way backwards to the start
  {
    updown2 = 1;    //Set updown2 to +1 to start again
  }
}

void powerdown()
{
  wTrig.stopAllTracks();    //Stop all sounds/music
  wTrig.trackPlayPoly(5);   //Play power off sound
  /*
   * The below code should be familiar now.  This time it just empties the
   * bar graph at a rate such taht the end of the animation roughly lines up
   * with the end of the power off sound.
   */
  int col = 7;
  int row = 4;
  while(col>-1)
  {
    while(row>-1)
    {
      unsigned long currentMillisbar = millis();
      lc.setLed(0,row,col,false);
      if(currentMillisbar - previousMillisbar > 50)
      {
        previousMillisbar = currentMillisbar;
        row--;
      }
    }
    row = 4;
    col--;
  }

  Serial.println("Off");    //print the next state
  opState = OFF;    //Go to off
  return;
}

void music()    //Music mode
{
  /*
   *   Since there ins't any timing to worry about here the check switches
   *   function call in the main loop is good enough for button/switch tracking
   *
   *   So far I am only using the soundtracks for the first and second movies
   *   Each on has ten songs.
   */
  if (pressed[1]) //Activate switch is flipped on
  {
    songcount = -1; //count down through the songs
  }
  else
  {
    songcount = 1;  //count up through the songs
  }

  if (pressed[3])   //if the extra switch if flipped up
  {
    soundtrack = 1; //Indicate soundtrack mode desired
  }
  else
  {
    soundtrack = 0; //No soundtrack mode
  }

  if (justpressed[4]) //barrel button pressed
  {
    justpressed[4] = 0; //reset justpressed[4]
    songnum = songnum + songcount;  //increment the song number by 1 if activate is off and -1 if activate is on
      if(songnum < 101) //Lower than the firest song
      {
        songnum = 120;  //Set to highest song
      }
      if(songnum > 120) //Higher than last song
      {
        songnum = 101;  //Set to lowest song
      }
      Serial.print("Next song cued ");  //Print the selected song number
      Serial.print(songnum);
      Serial.println();
  }

  /*
   * The below bar graph code lights up one LED for the corresponding song
   */
  if (songnum == 101)
  {
      lc.setRow(0,0,b[3]);
      lc.setRow(0,1,a[0]);
      lc.setRow(0,2,a[0]);
      lc.setRow(0,3,a[0]);
    }
    if (songnum == 102)
    {
      lc.setRow(0,0,a[0]);
      lc.setRow(0,1,b[3]);
      lc.setRow(0,2,a[0]);
      lc.setRow(0,3,a[0]);
    }
    if (songnum == 103)
    {
      lc.setRow(0,0,a[0]);
      lc.setRow(0,1,a[0]);
      lc.setRow(0,2,b[3]);
      lc.setRow(0,3,a[0]);
    }
    if (songnum == 104)
    {
      lc.setRow(0,0,a[0]);
      lc.setRow(0,1,a[0]);
      lc.setRow(0,2,a[0]);
      lc.setRow(0,3,b[3]);
    }
    if (songnum == 105)
    {
      lc.setRow(0,0,b[2]);
      lc.setRow(0,1,a[0]);
      lc.setRow(0,2,a[0]);
      lc.setRow(0,3,a[0]);
    }
    if (songnum == 106)
    {
      lc.setRow(0,0,a[0]);
      lc.setRow(0,1,b[2]);
      lc.setRow(0,2,a[0]);
      lc.setRow(0,3,a[0]);
    }
    if (songnum == 107)
    {
      lc.setRow(0,0,a[0]);
      lc.setRow(0,1,a[0]);
      lc.setRow(0,2,b[2]);
      lc.setRow(0,3,a[0]);
    }
    if (songnum == 108)
    {
      lc.setRow(0,0,a[0]);
      lc.setRow(0,1,a[0]);
      lc.setRow(0,2,a[0]);
      lc.setRow(0,3,b[2]);
    }
    if (songnum == 109)
    {
      lc.setRow(0,0,b[1]);
      lc.setRow(0,1,a[0]);
      lc.setRow(0,2,a[0]);
      lc.setRow(0,3,a[0]);
    }
    if (songnum == 110)
    {
      lc.setRow(0,0,a[0]);
      lc.setRow(0,1,b[1]);
      lc.setRow(0,2,a[0]);
      lc.setRow(0,3,a[0]);
    }
    if (songnum == 111)
    {
      lc.setRow(0,0,a[0]);
      lc.setRow(0,1,a[0]);
      lc.setRow(0,2,b[1]);
      lc.setRow(0,3,a[0]);
    }
    if (songnum == 112)
    {
      lc.setRow(0,0,a[0]);
      lc.setRow(0,1,a[0]);
      lc.setRow(0,2,a[0]);
      lc.setRow(0,3,b[1]);
    }
    if (songnum == 113)
    {
      lc.setRow(0,0,b[0]);
      lc.setRow(0,1,a[0]);
      lc.setRow(0,2,a[0]);
      lc.setRow(0,3,a[0]);
    }
    if (songnum == 114)
    {
      lc.setRow(0,0,a[0]);
      lc.setRow(0,1,b[0]);
      lc.setRow(0,2,a[0]);
      lc.setRow(0,3,a[0]);
    }
    if (songnum == 115)
    {
      lc.setRow(0,0,a[0]);
      lc.setRow(0,1,a[0]);
      lc.setRow(0,2,b[0]);
      lc.setRow(0,3,a[0]);
    }
    if (songnum == 116)
    {
      lc.setRow(0,0,a[0]);
      lc.setRow(0,1,a[0]);
      lc.setRow(0,2,a[0]);
      lc.setRow(0,3,b[0]);
    }
    if (songnum == 117)
    {
      lc.setRow(0,0,a[4]);
      lc.setRow(0,1,a[0]);
      lc.setRow(0,2,a[0]);
      lc.setRow(0,3,a[0]);
    }
    if (songnum == 118)
    {
      lc.setRow(0,0,a[0]);
      lc.setRow(0,1,a[4]);
      lc.setRow(0,2,a[0]);
      lc.setRow(0,3,a[0]);
    }
    if (songnum == 119)
    {
      lc.setRow(0,0,a[0]);
      lc.setRow(0,1,a[0]);
      lc.setRow(0,2,a[4]);
      lc.setRow(0,3,a[0]);
    }
    if (songnum == 120)
    {
      lc.setRow(0,0,a[0]);
      lc.setRow(0,1,a[0]);
      lc.setRow(0,2,a[0]);
      lc.setRow(0,3,a[4]);
    }

  if (justpressed[0]) //Intensify is pressed
  {
    justpressed[0] = 0; //reset justpressed[0]
    songplaying = songnum;  //selected song now equals playing song
    wTrig.stopAllTracks();  //stop all sounds/songs
    wTrig.trackPlayPoly(songnum); //start playing selected song
    Serial.print("Now Playing: ");  //Print the playing song
    Serial.print(songplaying);
    Serial.println();
  }
  if (justreleased[2])  //the "power" switch off
  {
    justreleased[2] = 0;  //reset justreleased 2
    if (soundtrack == 0)  //Extra switch is flipped off
    {
      wTrig.stopAllTracks();  //stop all sounds/music
    }
    else if (soundtrack == 1) //Soundtrack mode called for
    {
      wTrig.trackLoop(songplaying, 1);  //Loop the song that is playing
    }
    songnum = 101;  //Reset the song select counter for next time entering music mode
    Serial.println("Off");  //Print next state
    opState = OFF;  //Go to off
    return;
  }
}
Please forgive any spelling mistakes in my comments.
Cheers,
Berg