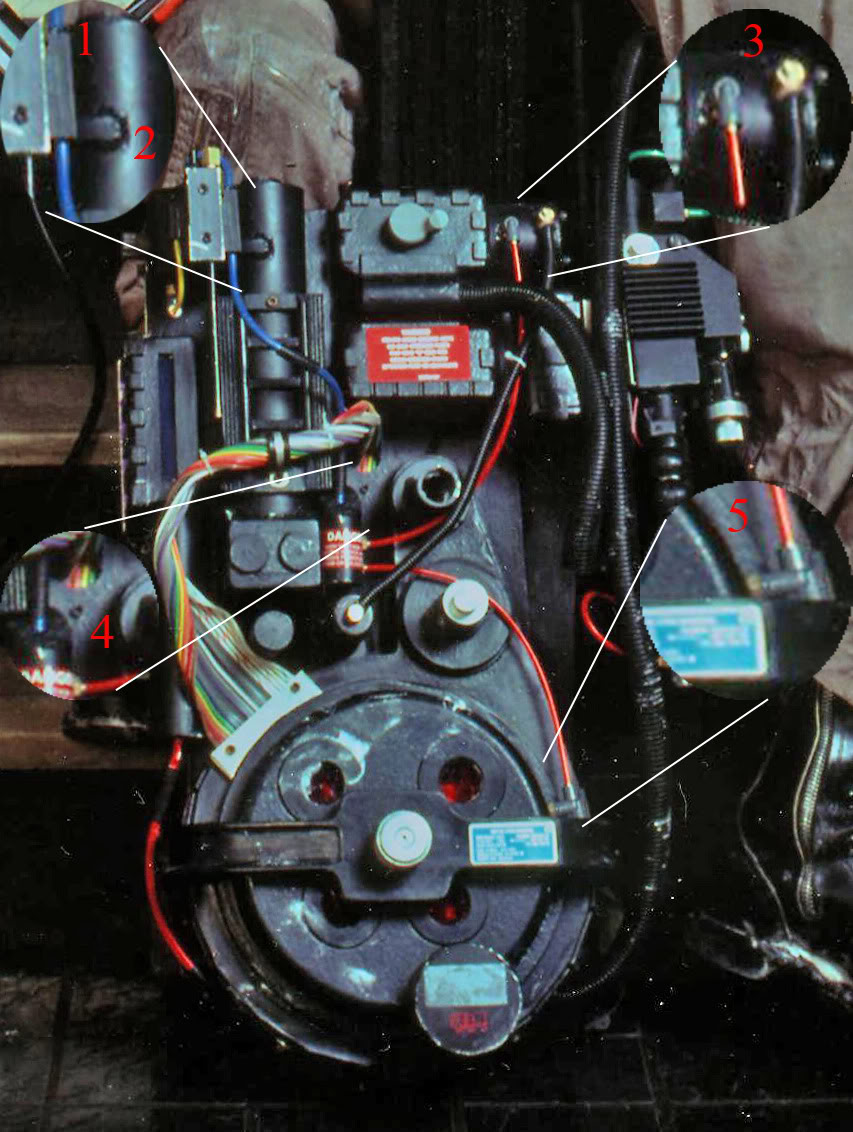
It’s possible it could have been used on the roof top scene. There are things on that pack that you do not see on other packs that makes that particular pack stand out to me.
Sage M50W Resistor - the only other time this is seen clearly is on the OMNI Magazine Cover pack.
Horizontal Weld - All the packs had a weld between the ion arm and the booster tube BUT this pack seems to have a cross arm of sorts welded on there and this is the only pack I’ve seen this on.
HGA Elbows - This is the only pack that I could notice that didn’t have the Legris Elbow and Clippard L-Fitting lined up flush on the HGA. The L-Fitting seems to be sitting slightly higher up on the HGA.
Socket Head bolt - This is the only pack I’ve seen a socket head under the Ribbon cable like that
Cyclotron Legris Elbow - The Legris Elbow on this pack’s cyclotron seems to be mounted lower then other hero packs seen in the first film.
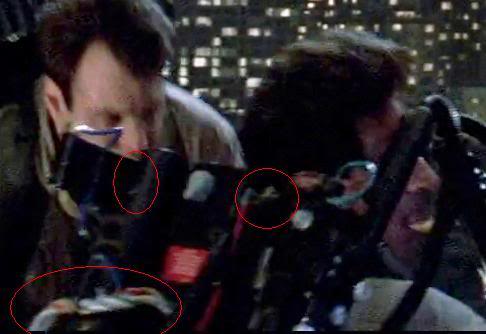
Now saying that, I think, THINK, this is the pack that Harold Ramis wears for parts of the roof top scene.
In these 2 screen shots, the HGA Elbows and the ribbon cable look the same. I also think I can kind of see the goofy weld on the booster tube. So I think you are replicating Spengler’s pack from GB1, my good sir.
Great info Matt. This will help me out a lot. I was planning on doing that horizontal weld. Wasn’t going to say anything, but might as well now.
There are a couple of other things though that are different, IMO. The filler tube and beam line tubes are moved further to the left and if you notice, I have drilled my holes for placement further away. This way my ribbon cable will bump into the filler tube and fold over slightly.
I’ve also got the hole drilled under the ribbon cable entry point for an 8-32 cap head screw. I’m going to use it and some large washers to secure the ribbon cable.
I’ll definitely look into making adjustments for the other things you pointed out.
What’s the general consensus about Reflectors behind your cyclotron lights? I have 4 maglight reflectors I was going to use, but they really stand out a little too much. I’m thinking about just spraying them black on the inside and using them to hold the incandescent lights.
Nice job so far Brian. Reflectors are ideal for the cyclotron lights but not accurate. In GB1 and GB2 the lights were mounted to a circuit board on the mobo you could check my current thread of my pack and see what I did for the lights when I was doing the Bigi shell early on which is what they did in GB2 for the semi-hero packs.
If you don’t really care to much about going that route spray painting the reflectors black will definitely help and make them not stand out, and you still get a nice light up.
That would be fun for a pic or 2. Then I’d wipe it off though lol.
Anywho, I took a short break from work this morning to abuse my ion rod. Boy does that sound wrong.
I already had a few scratches on it but I tried to replicate the one on the pack. I added the big gash under one of the screw holes. I think it looks fairly close. Might need to scrape a little off the very bottom of the rod.
your going in to some really neat details and you are putting me feel bad about slacking on my build.
It’s really neat to find out that that pack belonged spengler. Some times I wonder just how much spare time Matt has on his hands to find all these nuggets of info.
Did you apply your fake weld between the ion arm and booster tube after you painted it or before. I’m about to tackle that myself…
I’m sure you’re not slacking…you’re just busy with the coolest damn job in the world.
It’s still just speculation that it’s Spengler’s pack but what the hell? I’ll run with it.
Actually, I put the welds on after. I didn’t realize it even had welds until checking out some reference photos. Plus, I already had the parts painted ahead of time.
I’m working on finishing the welds and putting that goofy weld on the booster tube as we speak. Got to redrill the hole in the cyclotron too. Then I’ll hit it with another coat of bbq black. That paint seems to recoat easy.
Attached a few things to see how they look. Some of them are just sitting on top…so don’t worry, I haven’t positioned them wrong.
Also, I shot the photo this way because I’m not ready to reveal the work I did on the booster tube just yet.
I’ve run into a problem though…my filler and beam line tubes are too big. I’m not going to be able to achieve the look I’m after without the tubes with the correct diameter. If anyone has a spare set of the proper aluminum filler and beam line tubes/rods they want to sell, let me know. Shipping is a bitch on those things when you have to buy online. I tried a local distributor, but they have to special order it too.
Otherwise, that’s what I’m really waiting for… that and another light coat of paint. Plus, I need to reinforce the madeinsocal ribbon cable that I bought. I’m going for the same twist as my reference photo. It’s that way or bust.
So getting close to being done with this bad boy…on the outside anyway. I was tempted to finish it this morning but my kids will be up in a few hours. I’ll get the ppd on tomorrow. Just need to print a new label at the shop. I think it’s coming along well though.
I changed the angle of the elbow on the cyclotron and added the goofy weld to the booster tube. Ordered the correct sized filler tube and beam line tube from speedy metals, so I’ll have to wait on that.
I need to know the correct position for the injector tube bracket. Anyone have insight into this?
Also, things look slightly off in the photo because of the ■■■■■■ angle I took it at. Hey…it’s 4:43 am here though. Sue me.