Proton Pack Building Parts List

I get asked frequently for a list of parts necessary to build a replica Proton Pack.

Here are some links to items that are needed for the build:

Main Parts

-Fiberglass Shell

-Motherboard

-ALICE Frame

-Mounting Brackets

-Mounting Hardware (Bolts, Nuts, Standoff / Spacers).

Attachment Parts

-Booster Tube (Aluminum or ABS)

-Booster Frame (Resin)

-Booster Plug (Resin or built into Aluminum tube)

-HGA (Aluminum or Resin)

-Filler Tube (Aluminum or Resin)

-Beamline Tube (Aluminum or Resin)

-Vacuum Tube (Aluminum or Resin)

-N-Filter (Aluminum or one built into shell)

-Injector Tubes (Aluminum or Resin)

-Ion Arm (Aluminum or Resin)

-Bumper (Resin)

-Various Mounting Hardware (Bolts & Epoxy)

Accessory Parts

-Clippard Elbow Fittings (2 for GB1, 3 for GB2)

-Legris Elbows or SMC Elbow Fitting (3 required)

-Ion Arm End Cap (GB1 or GB2)

-Crank Knob (Resin or Replica)

-Legris Straight Fittings

-Dale PH-25 Resistor

-Dale RH-25 or Sage M25W or Pacific Resistor

-Dale RH-50 Resistor

-Clippard R-331 Valve (or R-701 if you prefer)

-Bellows

-Ribbon Cable (GB1 or GB2)

-Ribbon Cable Aluminum Hold Down Clamp

-Ribbon Cable Clamp (GB1: 1-1/4" or GB2: 7/8")

-Stickers (Standard & Metallic)

-Dry Rub Transfers

-ALICE Frame Padding

Tubing

-4mm OD Yellow Tubing (1 foot)

-1/4" OD Red Tubing (2-3 feet)

-1/4" OD Blue Tubing (2-3 feet)

-1/4" Split Loom (1-2 feet)

-3/4" Split Loom (4-5 feet)

Electronic Parts

-Amplified Sound Board

-Power Cell & Cyclotron Light Kit

-Power Cell Connection Ribbon Cable

-Speaker

-Battery

-Wire (for speaker and battery connection)

See also wand parts for more.

Proton Wand Building List

Main Parts

-Proton Wand Body

-Handles (PVC or Aluminum)

-Wand Grips

-Rear Instrument Box

-Side Switch Box

-Front Handle “Ears”

-Front Cylinder

-Rear Cylinder

Accessory Parts

-Front Knob

-Side Knob

-Top Knob

-Side Discs (GB1: Smooth or GB2: Knurled)

-Heatsink

-White Hat Light (1 or 2 depending preferred style)

-Orange Hat Light (1 or 2 depending preferred style)

-Hat Light Socket (3 recommended)

-Red Arcolectric or Cliplites

-White Arcolectric or Cliplites

-Clippard R-701 Valve (or R-331 if you prefer)

-Acrylic Tube

-Trigger Tip (Welded or Machined)

-Legris Banjo Fittings (2 required)

-Clippard Hose Barb Fittings (2 required)

-Dry Rub Transfers

Tubing

-1/4" OD Green Tubing (1 foot)

-4mm OD Red Tubing (1 foot)

Electronic Parts

-Wand Electronic Light Kit

-Wand Electronic Ribbon Cable Connection

-Vibration Rumble Motor (optional)

Thank you so much for this! Just in time for my first build too! Just bought the shell and motherboard from the GBfans shop.

I have some questions though:

  • The Beamline Tube and the Filler Tube go to the same beam line shop page - what are the differences between the two?

  • The bellows is the same as the shock mount, correct?

  • What are the dry rub transfers? Just another option rather than stickers?

And can someone point me to the right direction to a thread or video of something attaching the shell or pack to the motherboard? Can’t seem to find anything on that - or how to attach the electronics to the motherboard or how to position it inside of the pack? Any tips would help!

Thanks to everyone on the best board there is! :cool:

Edit: also a little clueless on how to attach the Aluminum Welded Booster Tube / Plug to the shell? Tried watching some videos but none of that has been included so far

[quote=Corey91 post_id=4931534 time=1582566444 user_id=52002]The Beamline Tube and the Filler Tube go to the same beam line shop page - what are the differences between the two?
[/quote]

That was a typo in the link that has been corrected. The beam line tube has a tapped NPT 1/8-27 hole for a Clippard fitting, the filler tube is smooth with no hole.

[quote=Corey91 post_id=4931534 time=1582566444 user_id=52002]The bellows is the same as the shock mount, correct?
[/quote]

The bellows is commonly referred to as a shock mount or ion knob.

[quote=Corey91 post_id=4931534 time=1582566444 user_id=52002]What are the dry rub transfers? Just another option rather than stickers?
[/quote]

They are a type of sticker that are basically a wax ink on a plastic sheet. You use a dull edge (like a finger nail) to actually rub or transfer the waxy colors on to another surface. They are more accurate than stickers and are mainly used on the wand and Ghost Trap pedal.

For the other things, I’d recommend checking out various people’s build threads here on the forum: Proton Packs - GBFans.com

Is there a list of what screws, nuts, fasteners etc are needed? Thanks!

I may be having a brain-■■■■, but I think the proton pack list is missing the three Dale resistors on the Ion arm.

That was a big oversight! Added.

Let me know if anyone else finds something missing.

I have also added ALICE Frame padding.

Thanks!

Does anyone know what size screw goes in the Legris Banjo Fittings on the wand?

I believe it’s an 8/32 Festo bolt.

image

Wish I saw this a year ago. But treasure hunt was fun

Think pack is missing 4mm red tubing.

I think they might be 10-32 on the GBFans banjos? I’ll check tomorrow if I remember! :slight_smile:

Thanks! Id appreciate it!

We use a #10-32 banjo bolt supplied by Clippard.

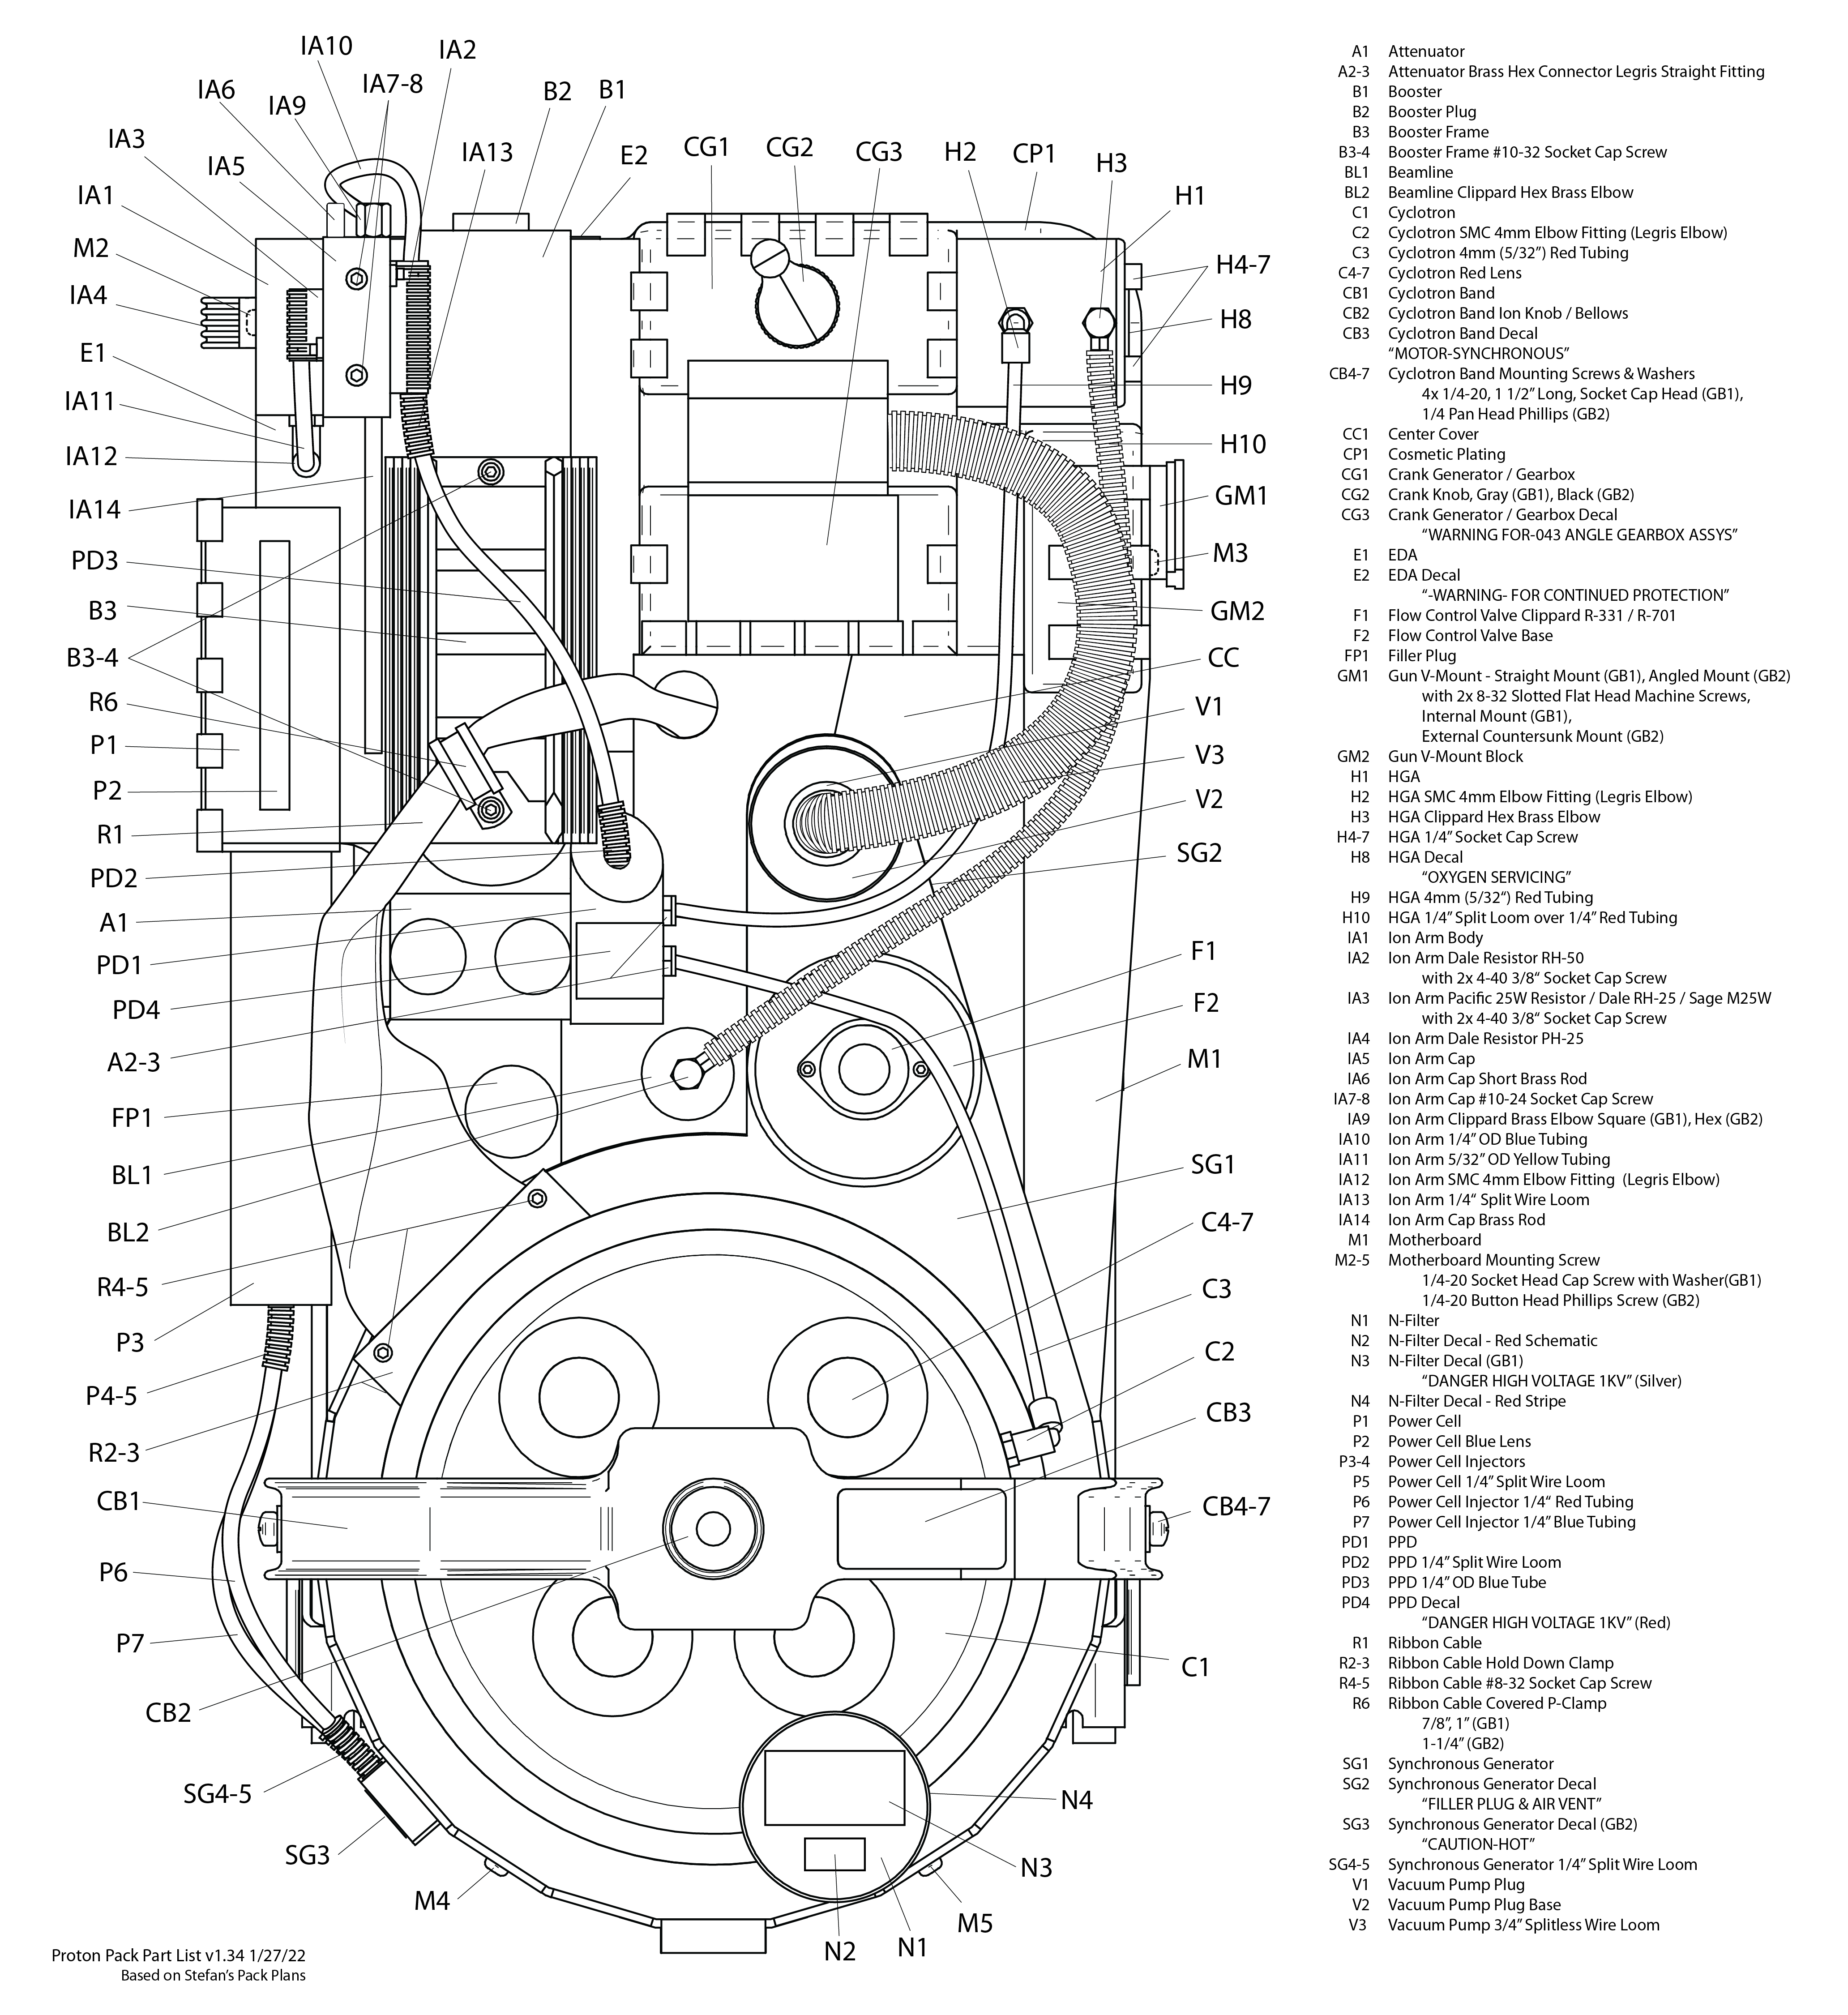
Howdy, thank you for the list! I’ve been telling myself that I’m going to start a pack build soon and in preparation I’ve been working on as comprehensive of a part list as I can muster. I’ve been making the list as a callout out poster in Illustrator, have based it off of Stefan Ottos’s plans, and have done a fair amount of research hunting down all the info. Right now it is only the pack but I’m starting on the wand next.

Here is a link to the updated poster. (To see at a higher resolution open image in new tab or download.)

Pack

Imgur

https://github.com/Tomdf/Ghostbusters/blob/main/Proton%20Pack/Proton%20Pack%20Part%20Callout-01.png

Wand

Imgur: The magic of the Internet (Open image in new tab to zoom in)

https://github.com/Tomdf/Ghostbusters/blob/main/Wand/Proton_Gun%20Callout-01.png

I’ve double checked it a few times but was hoping to get a few more eyes on it to check for errors. On top of needing the list for myself I’m kinda hoping that the community can get some use out of it as well, if so I can provide higher resolution images, pdf, and the original files.

PS: I believe the original pack part list here may be missing the Wand V-Mount, Cyclotron Lenses, and the Power Cell Lens, all sold on the GBfans site.

Nice bit of work. Couple of bits I noticed:

The Clippard valve wasn’t an R331 on all packs, some had an R701.

The elbows you’ve listed as SMC elbows were all legris brand, and SMC is a similar modern equivalent. I mention this as you’ve used the correct part number for the legris straights, even though they’re also hard to find as vintage.

You might want to label the plug in the booster tube, as unless it’s a metal welded booster tube this is a separate part in most kits.

You might want to differentiate between the clippard elbow on top of the ion arm for GB1/2. Ditto the screws on the bumper.

Hello,

With the comments of additions or changes is the lost the most up to date? Starting a build soon and I going to start going though this as a checklist for my pack?

Thank you

Ty! This is exactly the kind of help I need and it is appreciated. Making this list is basically my learning process and I was straight up unaware of most of the things you mentioned. I’ve gone through and added all of your edits and updated the link in my first post.

I’ve updated the list with the edits suggested. I’ll be keeping the links updated with the most recent version. I am still learning about the pack and can’t say with certainty that this is 100% accurate at this point. It is possible there will be future changes.

For part GM1 the screws (and possibly the whole male section as the angle changed significantly) were changed between films. GB1 had screws from inside the pack so you only saw the bottom of the screw, whereas GB2 was countersunk screws from the outside.