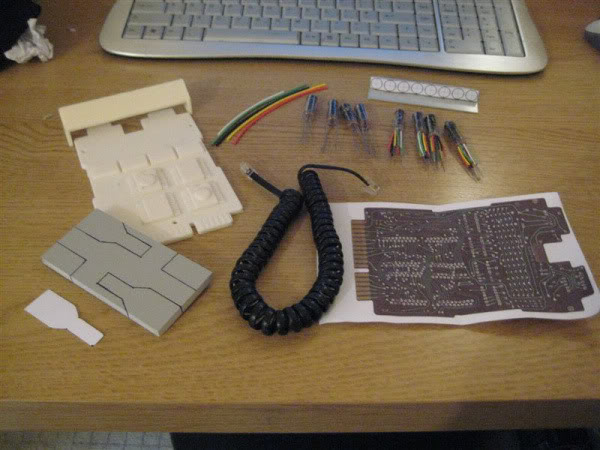
Hey Guys, I’ve finally started putting together all the bits and bobs for my belt gizmo. I’m ultimately going to build two of them so I’ve been getting double the quantity of stuff where I can. The 2nd one is going to be for a friend who’s also planning on joining the ranks.
I’ve got a few more pieces to get but I have the majority of it. I’ll post prices of all the bits I have so far (if anyone is interested?)
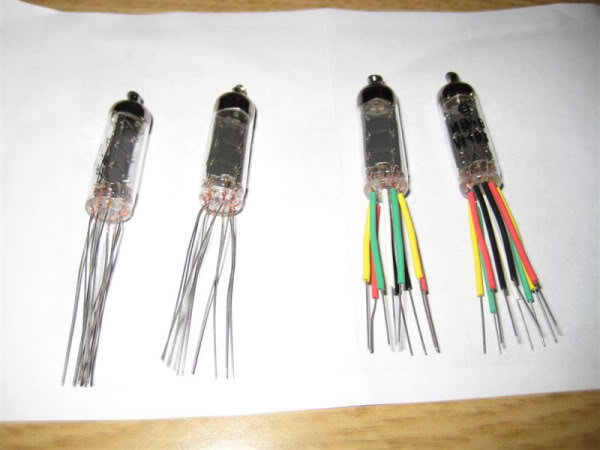
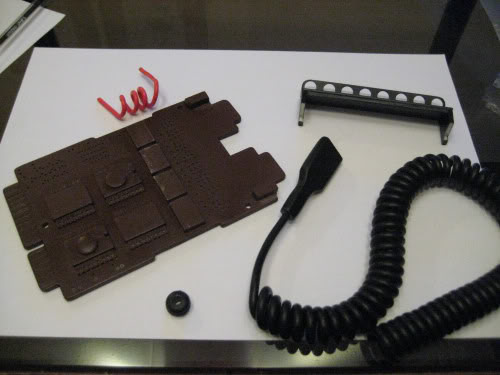
I was able to get a set of 16 Nixie Tubes (IV-9 Numitron Tubes From Russia) and started to fit all the shrink sleeving to some based on this photo of the original circuit I found on the boards! (LINK)
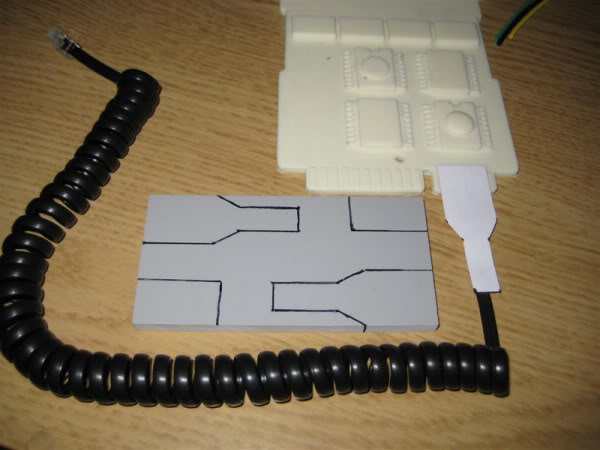
Got myself a Nick-a-tron Belt Gizmo Resin Kit (awesome) and I’m going to make myself the plug end for the cable out of some 7mm thick epoxy resin sheet I had in the office. Also I’m going to make that long flap/chip (that covers the bottom right white microchip) out of the same material. I was going to use the black phone cable (in the picture) but I just ordered a black coiled guitar-amp cable that looks WAY better. This is the better cable (LINK). I’ll just snip the ends off, chop it in half (which will leave me enough spare for the 2nd gizmo.)
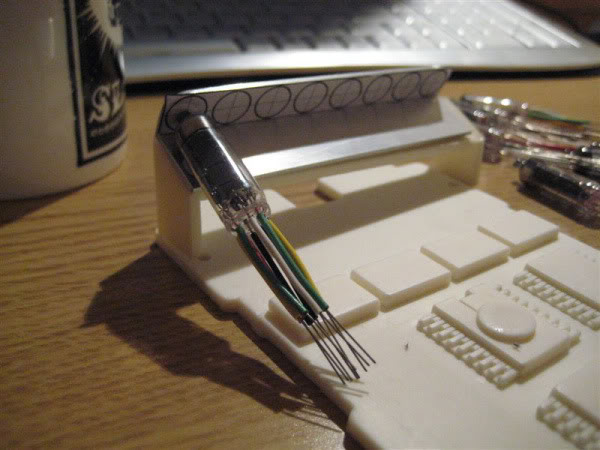
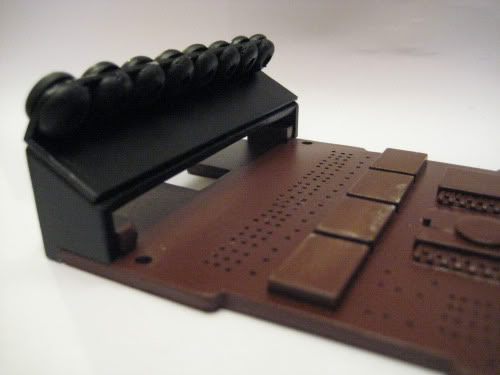
I also plan on modifying the nixie-holder that comes with Nick’s kit, I’m not QUITE sure how I’m supposed to mount it but I like the idea of having the bracket on the top made from aluminium. I got myself a piece of 3/4" x 1/2" x 1/16" Angle that is perfect for the job. I’m going to drill it out and slot in some 7mm black rubber grommets (which have a 4mm hole through them) to hold the glass “■■■■■■” on top of the nixie. (LINK) and I think that will give a great look to the gizmo and keep everything in place. I’ll also need to shorten the resin bracket that came with nick’s kit to accommodate all this.
(Held together with a little blu-tac for the photo)
I’m going to drill the bracket out once the gommets arrive, check they fit, spray it black then mount it on the board (which I will spray dark brown after I have drilled all the required holes then paint all the necessecary bits the colours they need to be.
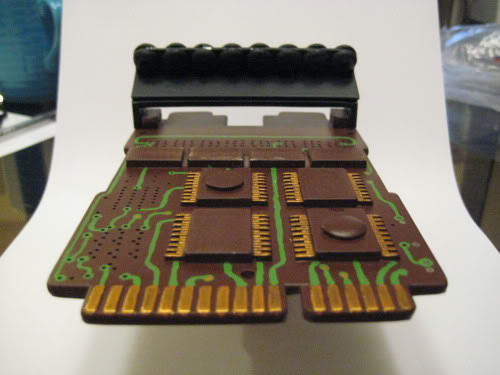
An update, So I painted up all the bits that needed painting and made the “plug” to connect the motherboard to the daughter-board and attached it to my new coiled cable (whihc is WAY better than the telephone cable i was thinking of using)
Then I dropped the rubber grommets in to boiling water to soften them up and eased them in to the holes I drilled in my aluminium. This was not easy but I think it gives a fairly authentic look to the build so worth the effort. I had added a couple of epoxy blocks to the inside of the nixie holder to create a better surface for glueing it to the motherboard.
Then I painted the circuits, pick-up points and chip pins. I dont have any black or white paint so this is all the painting i can do at the moment. Looks kinda rubbish with brown microchips. I’m hoping that the chips and electrical components will transform it!
I’ll nip in to town tomorrow lunch and grab some white, black and yellow acrylic psint so i can finish the chips off then I’ll start glueing the real electrical components in place which I imagine is going to be tricky and will probably need to be done in several stages. (I’ll cover as much of the back in epoxy glue as possible to fix the wires in place then once dry, give the back a spray over of the brown to cover it up!
I’m pleased with it so far but I wish my hand was a little steadier for the circuit painting!
Almost done now… just a little detailing, another coat of paint on the white chips, add a bit of yellow to the round bits, stick the SANYO labels on the black chips, add some other little bits and bobs and then I need to get myself a holster and knock up a daughterboard (already made a start, no pics yet as it’s just a board sprayed with primer!
This is my first attempt at a prop-build and I’m quite pleased with it!
I think your hand is quite steady, the painting looks great! You wouldn’t even be able to tell it was hand-painted unless you had your nose right up to it.
I started work on the daughter-board now, all drilled and painted.
I’m thinking of how to fix the plug to the bottom of the motherboard. I was just going to glue it but since the wire will be permanently fixed to the daughter board but I’m now thinking I might use a magnet so I can remove it if I want and if (when) I catch the wire it on something it’s not going to snap anything when it springs off.
I made the cardinal sin of sticking the lables on the black SANYO chips upside down! D’oh! Luckily I haven’t photographed it again so I’ll take them off and stick some more the* correct *way up and post photos of the finished article later this week
Worst part of costuming: Waiting for the paint to dry!
Oh man, thanks for the compliment, but really… for me to make them it would just be too expensive… it took me hours and hours to do (time is money n’all that!) and the bits alone cost me around £80! (about $135)
(I kinda wish I hadn’t added it all up now… this is an expensive hobby!)
Sweet! Nice job, Cheex! Are you going to make the holster too? I made a crapy one out an old Colecovision controller board that was brown, but it came out ok and the price was right. : )
Cheex, very nice prop you’ve made there! The resin circuit board is a time-saver, I bet. But then you’d need a steady hand to paint on all those printed circuits. Again, very nice.
You can make your own leather holder. You need a piece of leather, a leather hole punch, a utility knife, a rivet set, and some black dye. You should be able to find all that at any craft store. Mine was handmade and I could’t believe how easy it was. A prop that nice deserves a nice handmade leather holder!