I’m looking to turn my crank knob into my volume control. I’ve read the GBFans documentation for the soundboard which states I need a 10k linear potentiometer. I am correct in thinking the item below is what I need?
Also what type of wire would I need to solder this to? 3 amp?
I used the one u show. The stem on it is to short and with the split in it, it made it hard to tighten down the set screws in the crank knob and have it sit and spin correctly. Best bet is to use the one from radioshack with the super long stem. Its solid and you can cut it down to the correct length. Worked a lot better.
Unfortunately I’m in the UK so we don’t have RadioShack over here, I’ll look for a long stemmed potentiometer though thanks. Any idea on the type of wire I need? Cheers for the reply
While it seems neat to have the volume control on the crank knob on the pack, it’s not the easiest thing for the pack wearer to access, and is more likely to be messed with by any prankster who runs up behind you. Why not put the volume control potentiometer on the thrower? (that’s what I do with every pack I build). Just curious.
This! Unless there is a specific reason to do this with the Crank Knob, a control on the thrower or motherboard would be preferable purely from a usability standpoint. Having said that, you might still mount the knob on a potentiometer so that it turns nicely even if not connected to a circuit. If you want it to spin around unhindered, remove the potentiometer stop.
Great idea FA and thanks Bishop for your input too. I think you guys might be right about the accessibility of the crank knob. Hmmmm the top knob on the thrower would be good to use
I used 4K7 ohm potentiometer in our packs, and the GBFans soundboard without worries. Our newest rookie’s pack has the same potentiometer under the Crank Knob for volume control, and works nicely.
Might change that to the Clippard on the gun though, when the thrower is done, like in my tutorial here;
Hey Venkman - I just finished mine after doing some research. I used a 10K potentiometer (it was what was recommended on here somewheres for the GBFans board).
I bought a 10K Linear Potentiometer with a longer shaft from Radio Shack. I then used a wiring diagram from the internet.
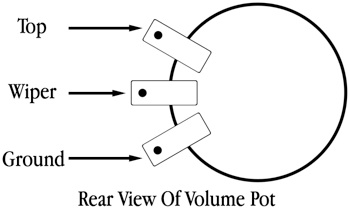
I used this image (as if you are looking at the rear of the potentiometer, shaft facing away from you)
Thanks for that diagram Hoot. I literally just mounted my volume pot on my motherboard and was about to go scouring the net to figure out which terminal went where. You’re timing couldn’t be better.
No, the “wiper” is the negative connection for the sound board. So if we went with normal wire color it’d be Red on top (positive) black in the middle (negative) and green on the bottom (ground). Check out my electronic setup: Proton Pack Build part Deux -- My GB1 Super Hero - #31 by thebigone2087 - Proton Packs - GBFans.com scroll down until you see the layout and the pot orientation. Keep in mind my pot is backward.
Awesome thanks mate. I’ve never worked with electronics apart from the GBFans lights and sound kits so the earth/ground/green wire is something I’ve never used. Its always been just Red+ and black- so thanks for your help