Hey guys, I’ve been doing some searches but having a hard time turning up anything really substantial. Does anybody have any good advice on how to make the lever for the gun, and the green handle on it? I know norm’s plans suggest an alternate, but I’d like to go more accurate.
Well, I bought a resin part which can with one, but it was too short, so I had to quickly come up with a solution and I realised a bent wire coathanger would be just fine. As for the green bit, all that is is some of the same tubing used on the other side of the gun. The wire threaded through it keeps it straight.
I used a 1/8” (.125) brass rod from a hobby store. When you bend it, you kind of got to flatten out the sides of the bend with a hammer on an anvil so you get a good 90-degree bend. This is so it fits well in that little gap between the gun body and the trigger box.
Of course you could always take 2 pieces and braze them together to get your bend.
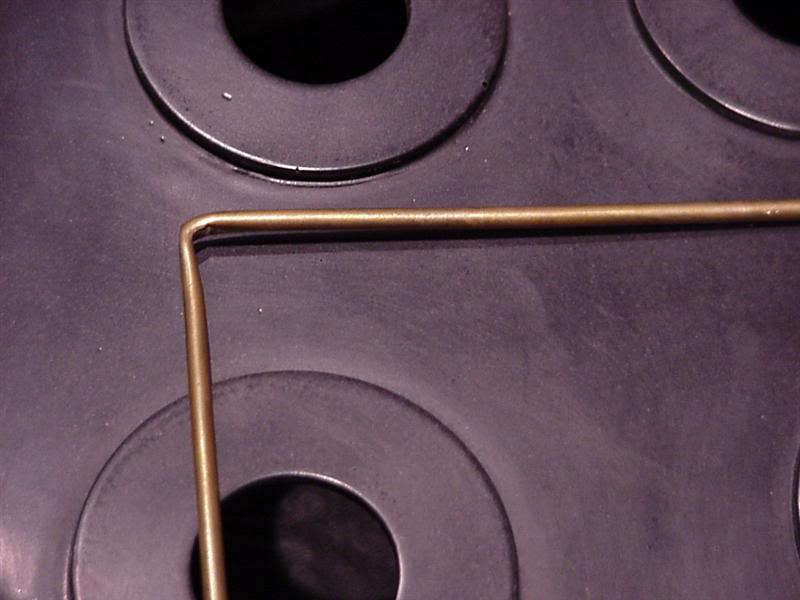
Brass rod, bent in L shape, green hose put over it. Pretty simple.
Hey thanks fellas!
I gotta run by the hobby store this week anyway, so that’ll just be something to add to the list!
If you can’t find a straight rod by itself look for a metal clothes hanger. Can butcher one of those up, they’re readily available and cheap.
another thing that you can do after you get the rod bent is (if you have a tap and die set) thread the brass rod and thread the small upper knob on the outside of the gun box. That way you can screw the knob onto the other end of the rod and it will steady the brass rod inside the gun box so it wont be “floating” around in there.
wire coat hanger is not the right size and the standard hose doesnt fit snugly on it.
like logan cade and TC said, brass rods from the hobby store are the way to go.
I used an allen wrench cause I was too lazy to run out and buy a rod. Works in a pinch.
i did the same
MultimediaMayhem sent me a lever and rod with their trigger box, but I’m not too impressed by the stuff. It’s great that they include it with the box, but it’s about 3 times too long. I wound up snipping it to look more like the levers on the Planet Hollywood packs.
The trigger box is bein a pain. MMM sends little metal rods with rubber insulation to use as dowels to insert it. The inside of the box itself (resin) is way too small to use bolts and nuts like many plans call for, so you’re left trying to make the insulated metal dowels work and still have room for the lever. What I’m winding up with so far is the rubber insulation on the dowels is moving up the rod when I shove the box in like a sleeve of “annoying.” The gun box isn’t sitting flush and the rubber pushes it out away from the gun about 1/8". I can’t use a bolt to hold it tight because there’s no room inside the gunbox after my switches and wiring went it, so about all I can do now to get the trigger box flush and still have a lever is remove everything and hollow out the box to the point that I CAN use bolts, or I can get a small metal 90 degree bracket and screw the thing into place under the triggerbox where it won’t be too obvious.
I take it having a huge abundance of wires is the major downside to adding lights and sounds that respond to your gun switches, because it looks like hell underneath my triggerbox and there’s nowhere to put the wires.
Oh well…it still makes me smile when I fire the gun and hear that garbling sound of a thrower while it flashes convulsively!
G
Gaval- from what I understand, the trigger box should be attached to the rear instrument bar, not the gun body. Even if you do put an attachment pin in the upper part of the trigger box as well, if you’re trying to include the green lever in your buildup, there’s no way that the trigger box should be flush with the gun body-- the green lever is located in the gap between the trigger box and the gun body.
Example: http://www.gbfans.com/images/equipment/reference/1/2.jpg

Perhaps I am misreading your post. If so, please post a picture.
I have the MMM gun kit and I know exactly what you’re talking about. I was able to use the metal pins by drilling 2 small holes in the gun body and in the trigger box along the opening seam. That way I could put the pins in the gun body, then clamp the trigger box over the pins. I had planned to glue the pins into the body allowing me to remove the trigger box if I needed to in the future. This worked great before I got my DPDT momentary push button switch so my sound kit would work with the proptronix lights.
Due to the mechanical nature of the push button switch, it requires alot more pressure to engage than the standard momentary switch. Therefore the metal pins simply wouldn’t hold under the pressure required to push the button. After much deliberation, I decided to do away with the thumb lever all together and epoxy the top portion of the trigger box directly to the gun body. This provided an extremely stable base that can withstand the pressure of pushing the new switch.
I’m sad that the lever isn’t going to be apart of the gun, but I would rather my trigger box not flop around when I use the fire button. Also, since it won’t serve a purpose on my gun aside from aesthetics, it’s not a great loss in my opinion.
As the other fellow said, the trigger box is supposed to sit 1/8" away from the gun body:


And it is mounted to the rear instrument bar which also extends out 1/8" from the body.
I have the MMM trigger box too, and the only problem I had with it was the little rod is way too short because it seems he intended the trigger to go into the side of the gun, in a location which is incorrect and ends up being covered up by the rear instrument bar. At least, that’s where he drilled a hole for it. This is in addition to the hole for the wires.
I however have last year’s model, so maybe the wire provided is longer now. I see he’s changed the design to use a single bolt in the middle to hold the back plate on. (I prefer the two bolts myself, but I think there’s no bolts at all there on a real gun so you’d want to fill those anyway for accuracy.)
And the wire needs to be longer, because the trigger doesn’t go into the side of the trigger box, it goes into the side of the gun. And if you glue the trigger box in place before you paint, there’s no way to then get the trigger in between the box and the gun body into the hole. And there’s no way to get a bolt in that resin trigger box. I guess you could drill a hole put a threaded rod in there, and then glue that threaded rod into the side of the rear instrument box after painting, but I prefer to be able to dissasemble my gun so I can improve it.
Luckilly, it seems the neccessary hole is actually just at the back and top of the trigger box, so it is possible to drill it and get the pin in after gluing the trigger box in place. At least that’s what I’ll be doing. If it’s wrong, it’s close enough, since I can’t tell by looking at the reference photos any better exactly where it’s supposed to go, and stephan’s plans don’t provide a see-thru view so you can see where it goes behind the trigger box.
GAVAL, can you post photos of your problem? Lots of people here have used MMM and I am sure they could easily help you out. With my kit, I simply secure the trigger box with a couple of screws and some epoxy. Surely it is the same principle with the MMM kit, and I’ve never had a problem with the trigger box staying put. No bolts required.
HAH! Wish I had seen this before I started drilling my trigger box. I’ll remember this for my next gun. 
Could the trigger box and the light bar be cast together as one piece separate from the gun box? That would make things easier..
Throwing:
The MMM trigger box is filled with resin. There’s only a couple holes inside to slip the switches into. At least, that’s the way the the version I got last year was made.
I suppose one could try to drill their own holes in the side of it to do that, but it might be problematic.
Ya, see, my trigger box looks NOTHING like yours. I’d kill for all that space in there. If I had it I could fit my wires in it and would have plenty room to screw the booger in like you did.
There’s only a small oval opening in the trigger box I got that isn’t even big enough for two switches, much less big enough for putting them in teh right place. The holes that came for them look way too close together, and when I put my DTPT momentary switch in, I couldn’t even get it deep enough to thread the nut on the top near the button without taking a Dremel bit to the small oval hold from the back and augering out corners for the DTPT so it could go deep enough to thread. If there’s not enough room for the switches there’s no way there’s gonna be room for threaded bolts, so I have to make the rubber coated steel pins fit.
It helps that you guys pointed out there’s a 1/8" gap between the gun and the gun body, and that it’s supposed to be mounted to the rear instrument panel, but that creates two problems:
-
The space creates instability. As Rockman mentioned, the DTPT momentary requires a lot of pressure to activate, and that box just can’t be allowed to give at all if you want something solid. What kind of Epoxy did you use, Rock? My gun is made of plywood so I’d be attempting to epoxy wood to resin…on top of the 2 pins that came with the gun.
-
When you say “instrument panel” for mounting, do you mean the one the rear lever goes into, or the one down below with the green wire and “SLO-BLO” decal for mounting the Trigger box and Lever? If it’s supposed to go into the Slo Blo instrument panel, that’s not an option for me because the one I have is a simple strip of plywood, not a box, per say. I have a battery for gun lights hiding under there.
3(ish), I already cut the lever down to a size so it would mount into my trigger box or gunbox, so it’s no longer long enough to mount in the right place. I’m afraid it’s gonna have to stay in the trigger box into which I’ve already drilled about 5 holes. I think I put about 4 holes into the left side of my gunbox trying to get the trigger box mounted right, and now that it’s sort of rightish, it’s not very stable.
I’m thinking of inserting a few wood strips (shunts? Is that the right term?) between the trigger box and gunbox with some hot glue or epoxy to give it more stability, yet allow the 1/8" gap.
My pack and gun aren’t screen accurate, they’re scratch, so I’m flexible.
One more thing Rock, I know you gave up on the lever, but it’s really a nice touch. Have you considered just putting an insulated ring tongue terminal with blue insulation into the gap to make your lever? That’s what I started with and I was quite fond of it. Norm’s plans call it an “Acceptible alternative” but I know many of the guys going for 100% accuracy would consider it blasphemy and would rather leave it out. Just a thought…
I’ll see if I can post pics for you guys once I get home, but for now my plans are to shunt the top of the trigger box with a 1/8" wood strip. I just need suggestions for a good epoxy that’ll give it the support a stubborn DTPT switch that I will probably use a LOT needs.
RIght now the trigger box is held in place by 2 of MMM’s insulated pins, but they’re both rather low on the Trig box. They had to be there because they go through the box and between the switches, so there were limited options on where to put them without interfering with the switches. The end result is the box is uneven on the gun, it’s unstable, it’s has play on the gun, the lever looks like it’s in the wrong place, and underneat the trigger box is a nightmare of necessary wires that I just can’t hide because the trigger box isnt’ hollow. It just had minimum room for two switches…barely.
G
Amen. When you see how hideously riddled with hot glue my instrument panel and light bar are, you’ll likely call the Ghostbusters to bust me!
Next year I think I"m gonna redo the entire instrument panel, just not enough time to make it pretty this year. It works for now…
Gotta get that Trigger box stable and that lever a home I can live with.
G