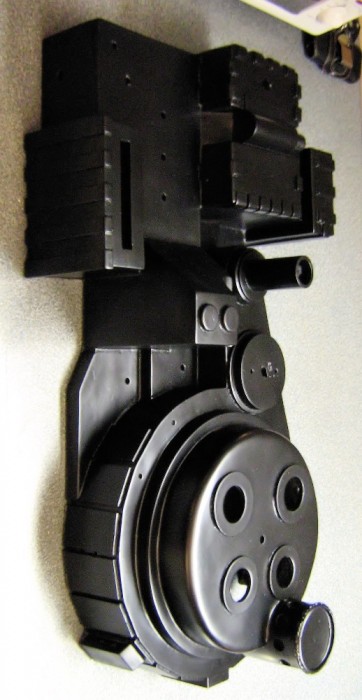
Hey guys, I received a Bigi71 shell from Vincenzo and the So-Cal Ghostbusters (best shell ever!) and although it is going to be a long build due to lack of time and money, I’ve already started looking for the most accurate paint job out there. I’ve looked at Filandrius’ thread and he painted it using Krylon BBQ black which gave it a nice, new look:
When viewing “The Best Reference Photos Ever Available!!” thread, I noticed in a few photos that it seems that a lot of the shell looks 'hammered" such as the:
Has there ever been a consensus on the most accurate paint job or type of paint to use? I’m a big fan of Mburkit’s “hammered” cyclotron and am considering doing it to the whole pack, but want some opinions.
I personally LOVE the hammered finish, and just might do it to my pack… especially since it will cover up any imperfections of my “reject” shell I bought from Vincenzo. But at the same time… the purists may yell at me… so I’m not sure which way to go yet.
Most semi glosses will do the job in terms of the finish it’s more on how you weather it which is the true technique to a accurate finish. I like Krylon but with my experience using pretty much every type of spray paint, Rustoleum professional paint and primer seems to be the most heavy duty, but Krylon does do the job as well. Start with Rustoleum hammered paint for your first coat or until you get the desired hammered effect, then hit it with Rustoleum professional gray primer (even though hammered is a primer in itself I still prefer hitting it with a coat of gray primer just because the screen packs had a underlying grey primer coat and it also tones down the gloss finish with hammered paint so your semi gloss will actually look semi gloss) Then hit it with a Rustoleum professional semi-gloss coat and weather with Fullers Earth, should do you good.
My recommendation is to get some painters tape and cover the cyclotron holes and “ribs” that run around the crank gen/power cell areas. Then carefully with an X-acto blade cut the tape neatly so that it only covers the face of those parts.
From there I’d use either hammered paint or some spray-on wall texture (on the finest nozzle setting) to get the look of the screen-used packs. That’s what I’ll be eventually doing when I get to that stage of my build thread. From up close the packs look like cast-iron frying pans.
I’ll also be using Rustoleum satin black for my final coat as I feel it best matches the finish of the Hero packs.
Agreed with the cast iron frying pan analogy. Looks very similar to that material. And I was actually thinking exactly the same thing, as far as masking off the “ribs” and painting with hammered paint.
If memory serves me correct I think the main foundation of the hero shell was carved from some kind of foam which gave it that hammered look in those particular areas. Hammered paint seems to be the best option in replicating that effect.
I’m really digging Filandrius’s paint job. Now could you use the rustoleum hammered finish as the primer and then put Filandrius’s BBQ black on top of that?
You would definitely want to use some kind of grey primer as a medium between the two for accuracy and for helping your initial finish. Hammered paint tends to give a gloss finish therefore putting a Krylon BBQ paint over a smooth glossy finish tends to make the final coat more glossy. The grey primer will tone down the gloss on the hammered paint and make your semi gloss actually look semi gloss instead of a straight gloss look which putting a coat of semi gloss paint over the hammered paint with no medium would give you. Hope that makes sense
As I heard it, the packs themselves were cut from pink construction foam and then molded. Then the ribs & cyclotron rings were made of wood and nailed onto the prototype shell. It looks like the EDA discs were then riveted on and a second mold was made which gave us the final product. That’s where the contrast in textures comes from and in some small places you can make out where the brad nails were used to attach the ribs & rings. Basically all of the other parts were made of aluminum.
I don’t know if your wanting to idealize your pack with the illusion that it’s metal underneath or actually trying to be accurate to the screen packs. Putting nickel shimmer over hammered paint would make for a shiny/glossy coat and make your finish more then likely gloss. I’m recommending the primer over that hammered because it’s flat and will make your final coat less shiny and give you a more accurate finish.
I would recommend doing a coat of primer, then a coat of the hammered textured paint, sand down the ribs, cyclotron rings, and ppd discs to make them smooth again; primer again then use satin black. That will give you the closest finish to the packs.
This might be the stupidest question ever, but would I do this for all parts (including aluminum parts) or would the metal parts require a different method? Also, what about the gun, assuming it is metal?
The metal parts would not get the hammered finish. It’s up to you if you want to primer them or not, I prefer not to since when they get scratched they’ll show the metal underneath.