Beginner modding advice needed!

Hi,

First-time modder from the UK here :waving_hand:

I’m planning to begin work on customising the Hasbro 84 pack and Spengler wand, but hoping to get some tips and advice before I start. I want to upgrade many of the parts, and I have purchased quite a lot of items (hoses, cables, lens diffusers, stickers, v-hook mount, etc.) I think I can manage the installation of these but would welcome any advice from experienced members. I haven’t bought any original/replica legris elbows yet, and am wondering if the stock ones can be painted convincingly rather than needing to be replaced?

My main concern is with the weathering of the pack. I want it to look battered and worn, so although it will be hard to “ruin” the work, I want to be sure I am getting the best results.

I have bought brass/copper, silver and pewter Rub n Buff, and a clear matt spray to seal at the end, but is there a good way to make the black plastic look better before I add damage and weathering? Or will a black/dark brown wash be enough to add realism and reduce the plastic appearance? Would I need to use primer anywhere, or will paints and Rub n Buff stick to the plastic okay?

I also have the black/ebony Rub n Buff, and am wondering if I can apply this to the body of the pack to improve the realism, or if this will ruin it. It’s hard to tell using a small test area.

Any help or advice the members could provide would be really appreciated, thank you all if you are willing to share some tips with me.

Bust Wishes,

Monkeyboy :monkey::folded_hands:

Practice on something other than your pack and figure out what works for you. Work on individual areas but try to make the entire thing blend together. Adam Savage has some great videos on weathering his packs that I used as a starting point and made it my own. And if you’re going for a real worn look, try to get the spots that would be hit most, ion arm, n filter etc. Take your time and let things dry, and remember, more doesn’t always mean better.

2 Likes

Hello @monkeyboys-toys I’m also from the UK so good to see you here!

I did a pretty hefty Spirit 1:1 customisation a couple of years ago which you can see here, and I’m now doing quite a deep Hasbro 84’ project now too, which you can also see here.

In terms of advice, that’s pretty subjective and it really depends on what you personally want to achieve. From currently doing my second full pack, I’d say it’s also worth thinking about the following:

  1. What kind of look you want - you’ve already mentioned you want it to look beat up, which is kind of what I did with my Spirit pack. Rub n’ Buff is okay, lots of people use it and I did on the Spirit, it’s fun to use, but if you want to go a bit more Afterlife, then you might also want to think about washes/other tones like greys/blacks/browns etc to give it more depth.
  2. How much do you want to spend - the pack itself may be ‘cheap’ at £320, but the cost of these projects overall can soon balloon. Depending on how screen accurate you want it, how much quality matters, and how far you want to go, you could easily spend five or six times more that the original cost.
  3. How hands on you want to be - do you just want to go superficial, or are you happy to start cutting the pack to bits, spray painting, or getting involved in things like electronics or 3D printing.
  4. How you’ll use the pack - will it be a display piece that will just sit in a man cave, or will you wear to fancy dress parties or even comic cons? The latter a really fun and I’m aiming to go to a couple myself in October, but then you’ll need to make sure the pack is robust and can be worn for several hours, as well as staying powered.

But Hasbro have given us a good base with this and the good news is that you can go as light or as deep as you want to. With my Spirit pack, I did loads of work butchering the pack and replacing large sections with 3D printed parts, but this time I’m happy with the 84’ pack body so I’m focusing more on the details, using quality hardware, upgrading the electronics and making it more of a movie prop replica display piece that I’ll also wear to cons.

Just have fun with it though, there’s a great community of like-minded people to support you, and if you ever need help, just reach out!

1 Like

Oh, and this website is amazing for reference photos:

2 Likes

So is this site: https://www.gbfans.com/gallery/reference-photos

2 Likes

Sorry @aj-quick didn’t mean to take the OP away from here. I didn’t actually realise how many photos you have on here, I think you actually have a lot more than that other website!

1 Like

@gbrich is pretty spot on. in short, don’t be like venkman, who never studied. do your homework. pre-plan. don’t just "get her.

Prioritize. But understand why some mods will affect others. Not everything has to be done together.

Also, though there are many great sellers out there, including this site, prices for replica parts are going up.

Another thing…are you a prop-master making a prop or egon making a proton pack? There are details that would not make sense “in-universe.” Are you making a specific pack or something of your own design?

This forum, and the ability to google search it, is invaluable.

1 Like

@beric has made some really good points here. It’s worth really thinking up front about what kind of pack you want to make. Do you want it to be authentic and “in universe”, like it’s from one of the films, or do you want to take in a different direction and do something more custom and unique to you? Plenty of people do the latter, but if you want to go the authentic route, then it’s really worth thinking about how a "real’ proton pack would have been made originally and then how it would have aged and accumulated wear over time, something I’ll come back to.

But to loop back and try and answer some of your original questions:

Should you prime/paint the body? I would say no. You’re not the first person who said the 84’ pack looks “plasticky”, but I think if you repainted it, you’d probably still end up back where you started. When I did my Spirit pack, I had to respray the whole body because I’d replaced much of the body shell with 3D printed parts, but it was a load of work, not easy to get right, but even when the full respray was done and the pack was completely matte/satin black (before I weathered it) it basically looked exactly the same as the new 84’ pack does now. It’s the weathering that can make the difference.

Should you upgrade to original brass elbows etc? I would say yes. It’s a small detail that actually makes a huge difference. Hasbro needed to keep the costs down somehow, but the hardware on the pack is probably it’s weakest point. It just looks cheap and rubbery. I have seen people try to paint them with bronze/copper paint or Rub n’ Buff, but I personally think that nothing looks as good as real metal.

In fact, in terms of a checklist of weak parts/areas to replace, it sounds like you’ve already got most of it, but here’s what I focused on:

  • Brass elbows/legris
  • Hoses
  • Stickers
  • Clippard valves
  • Dale resistors
  • Shock mount
  • Ribbon cable (hard to find 84’ replacements though)
  • Aluminium ribbon cable connector
  • Lenses
  • Strain reliefs
  • Screws/bolts/washers (I chose black with copper washers, screws or M-type bolts)

Then it comes back to weathering and using stuff like Rub n’ Buff etc. This is a really important point, and something I’ve given a lot of thought to. Rub ’ Buff is great as it’s fun to use, easy to apply, and gives good results quickly. But I also think it’s easy to fall into the trap of ‘over weathering’ and just smothering the pack with it, to the point that it can end up looking more like it’s just been heavily dry brushed with paint (which it basically has) than actually worn and weathered.

That’s why I’ve started to think more about weathering in terms of how a ‘real’ pack would age, and I like to think about this like a spectrum.

One one end of the spectrum, you have GB1/1984 when the packs would have been fresh built by Egon/Ray etc. They were probably meant to be ‘made’ out of some kind of silver metal (aluminium or steel, I’m not sure) but painted satin black, with perhaps some very minor ‘workshop’ wear like minor scuffs/scratches.

Then on the complete opposite end of this spectrum, you have Afterlife, where the packs are nearly 40 years old, have suffered lots of wear and abuse, but have also been kept in an old barn and accumulated lots of dirt/grime/dust etc.

It then depends where on this spectrum you want your pack to sit. Do you want it be closer to the fresher/cleaner GB1/GB2 end, or more towards the heavy-weathered Afterlife end?

Even then, with the weathering, I personally think it needs to be considered, layered, i.e., use washes of greys/blacks/browns etc, but also use it sparingly, build it up gradually, and really think about how paint that’s been applied to metal would actually wear off?

Also, think about how you’d remove it if you end up with results that you don’t like, i.e., make sure you have some rubbing/isopropyl alcohol and magic erasers to hand. If you had painted the body, then applied Rub n’ Buff, then tried to remove it using IPA, you’d probably end up with an awful mess, but if you just apply the weathering to the black plastic shell, it should be easier to bring it back if you do mess up.

Love this reply :smiling_face::folded_hands:

Great advice here, thank you :blush: :folded_hands:

For me, every bit of damage or weathering needs to have a reason or a backstory, so nothing will be done just for the sake of it.

I won’t be painting scratches and dents on the surface, I will be adding the scratches and dings to the pack and then painting them.

I’m going for a mix of details from all the packs and all the movies, taking elements I like from all the different packs, using the reference photos from this site. I’m not going for a single screen-accurate replica, I’m going for a hybrid of all of them. I’m also going to add a couple of greeblys and cables to make it more unique to myself, again with some “logic” and backstory to justify the additions.

It will still (hopefully) look immediately recognisable as a classic proton pack, and only fans with a good knowledge will be able to spot the minor additions.

Thanks also for the list of upgrades I should consider. There are a few I hadn’t considered or become aware of, so I will factor these into my project. I am learning a lot here, and it’s very interesting :+1::+1:

(post deleted by author)

Awesome advice, thank you! :ok_hand::+1::+1:

Great advice and tips on how to approach this! Many thanks for your support! :sign_of_the_horns:

No worries at all! Sounds like a great plan and I can’t wait to see your progress, so please share photos as you go :smiley:

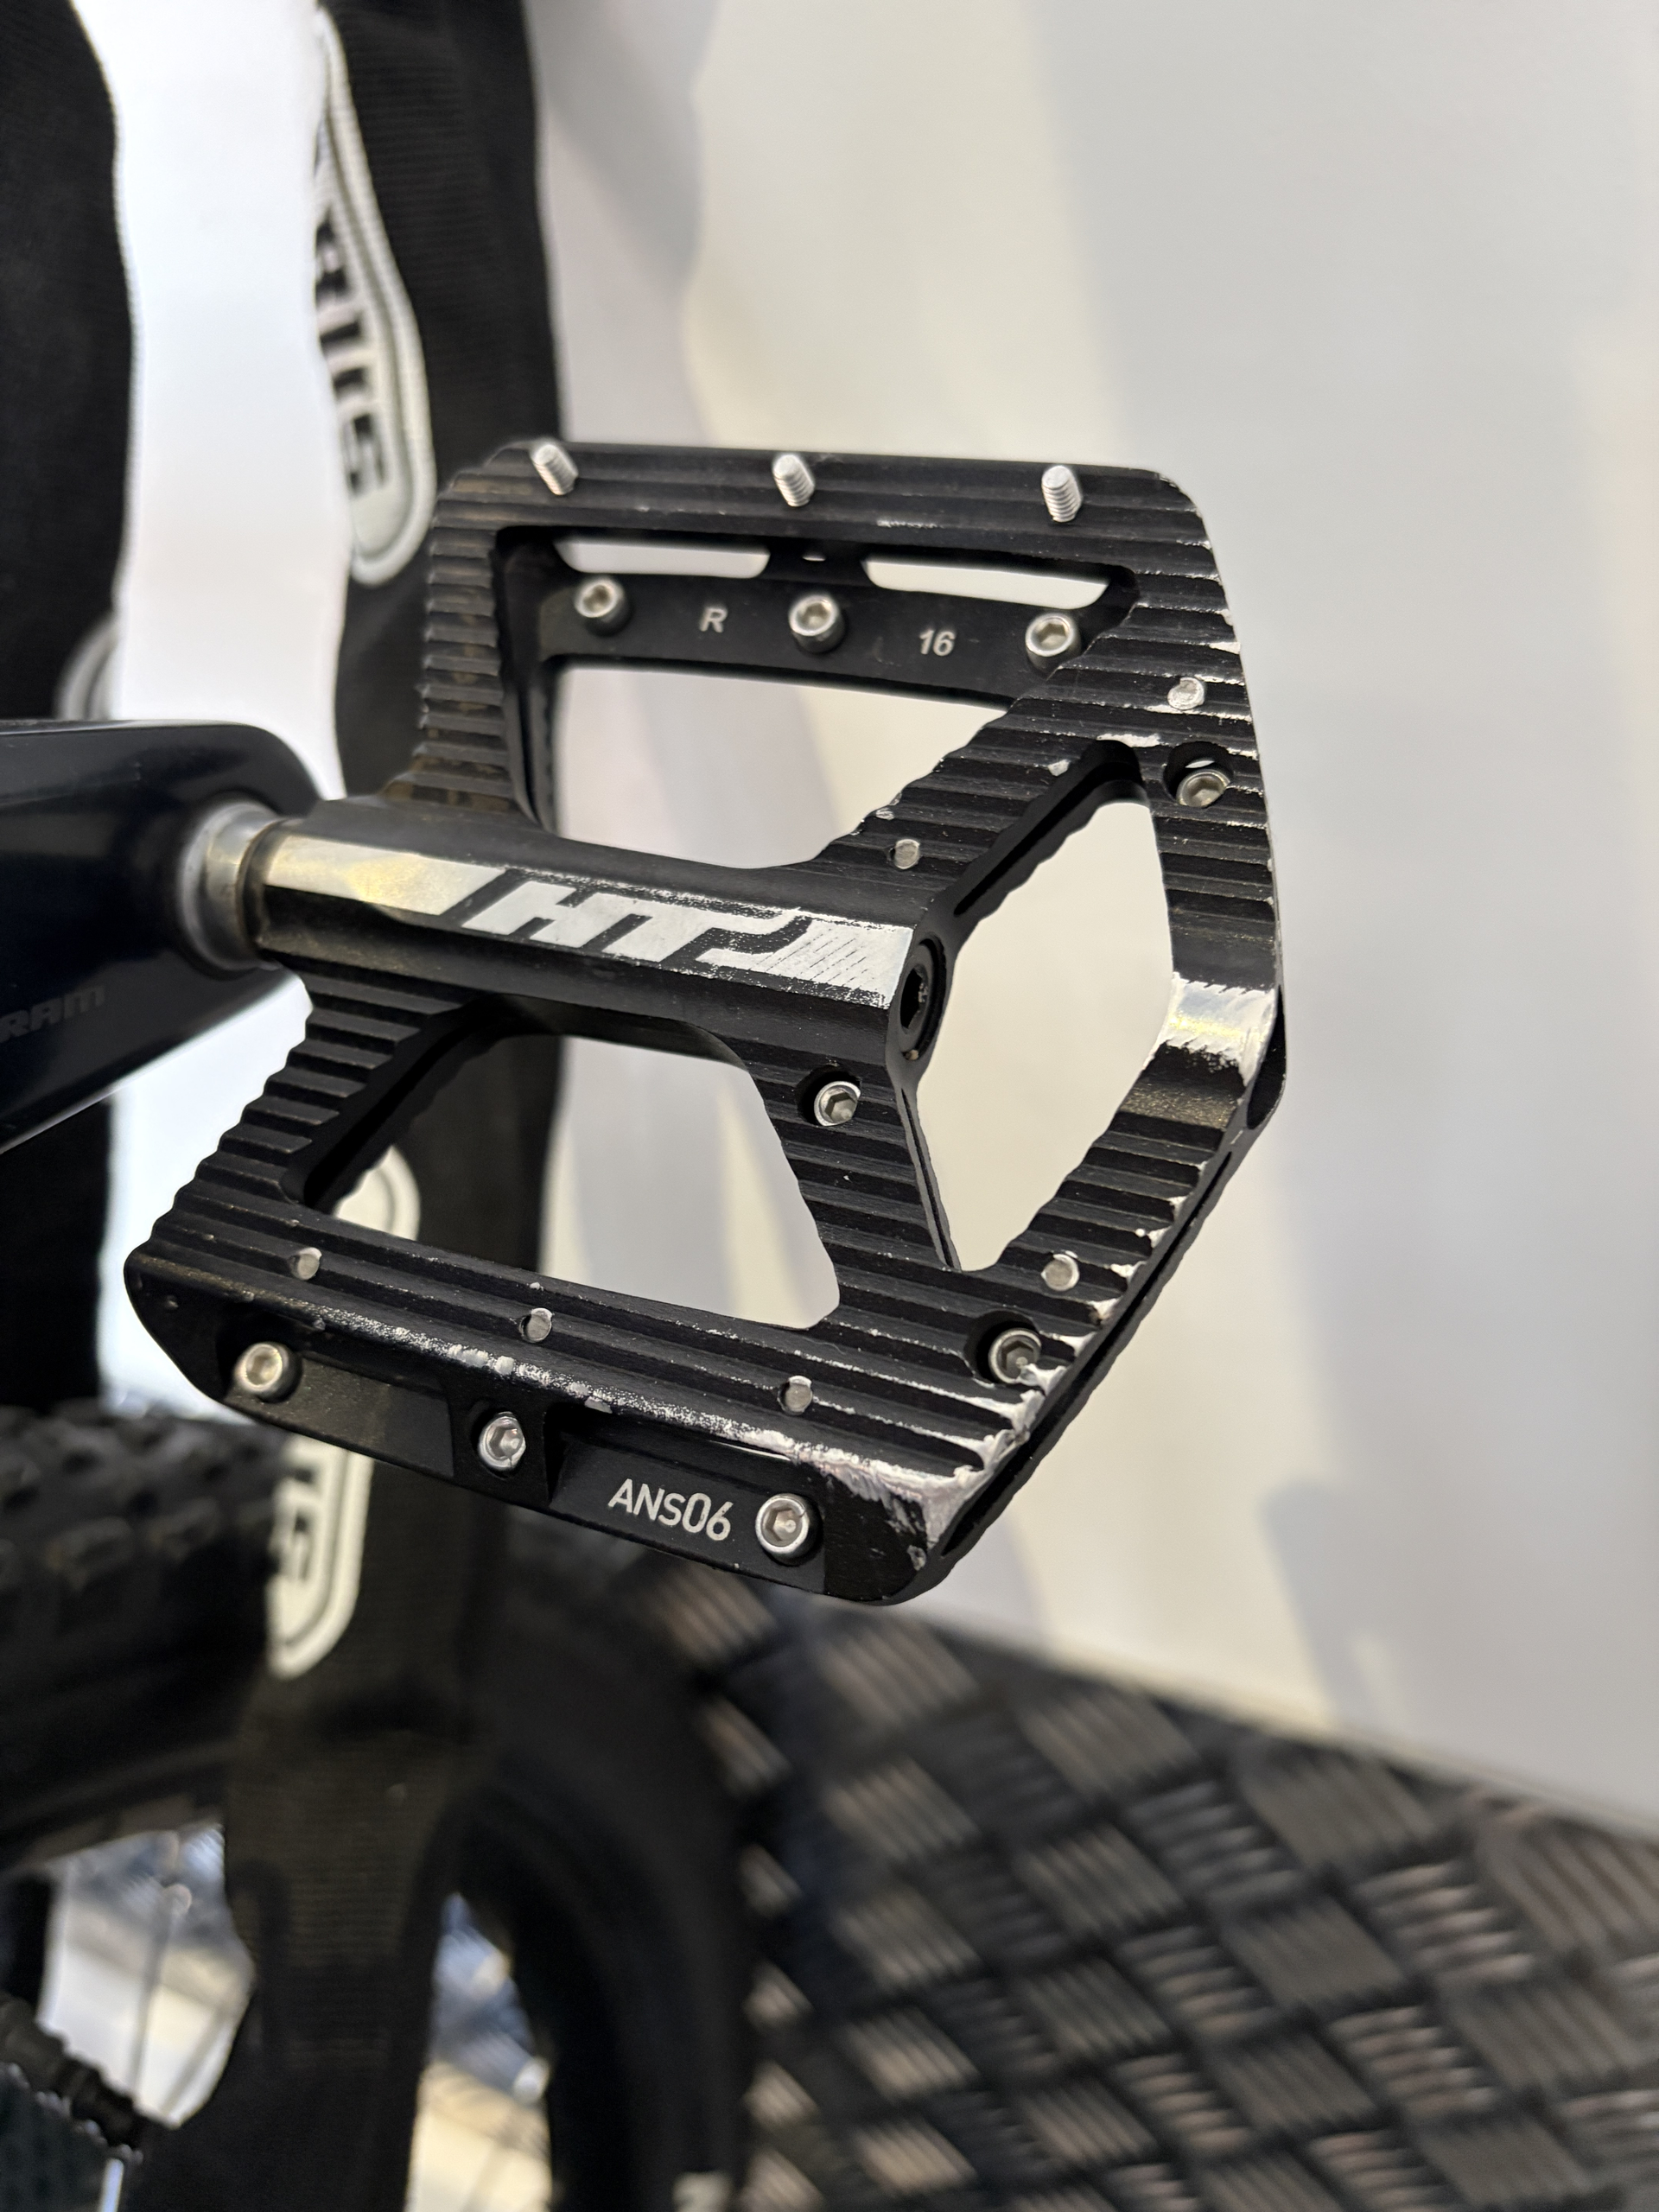
Incidentally, I stumbled across this in my garage. It’s a pedal on my mountain bike, so may seem like a weird reference, but it’s actually a really good example of something that’s made of metal, painted black, and then the paint has been scuffed around the edges:

The revealed metal is more reflective and the edges between the black paint and the metal more defined that dry brushing with Rub n’ Buff usually achieves. I’m going to try something similar with my pack using a Molotow Liquid Chrome pen instead of Rub n’ Buff. Not quite as much weathering as this, just some subtle scuff marks along the edges and corners.

yeah man! discourse! personally, gate-keeping and key-mastering is so boring. No one is better than anyone else due to the details they replicated, details they missed, craftsmanship, etc.

We’re all here to help and inspire each other, not be snippy, rude, or ignore people. Anyway, enough griping.

Short of it, i’m almost done with modding my spirit pack and resto-modding a 20yr old pack. I went thru the rabbit hole and mine are intended to be pack specific. So, I got to thinking… I tried to find a way to explain the presentation of the packs in the real world as if they were in-universe. Which, to Rich’s point, how would you maintain your pack?

Winston is ex-military. He would clean and maintain and repair his pack practically every day. Though it may be banged up, he’d repaint and clean and such. Maybe you’d see where new paint was applied, but he’d be really caring for this equipment.

Ray is a boy with a toy. He’s excited. He doesn’t do much to care for it. He’s having too much fun.

Pete is lazy. He’s not going to do a damned thing. But because he’s lazy, he’s going to be more careful so he doesn’t have to do anything.

Egon is diligent, and these are his, but he has other equipment to maintain. He’d probably has a set schedule. But, also, since these are his, he might try different things on his pack, so the paint might not match, or welds may be sanded.

So, i figured that is a fun exercise to play to think of how you would maintain your pack.

And amen to you, brother, for making your own pack. I won’t speak for any of us who have tried for replicas, but you’re free! you’ve seen the light!