So this thread is going to be for me to ask questions I have and get help about building a proton pack. Instead of starting a new thread for every question, they’ll all be compiled here. This may also be used by others seeking the same answers somewhere down the road. The search engine is fun and all…but there are a lot of build threads out there that don’t go too far in depth and some that have a couple years since the last post. So here it goes.
First question: what is the best spray paint to use on an aluminum thrower?
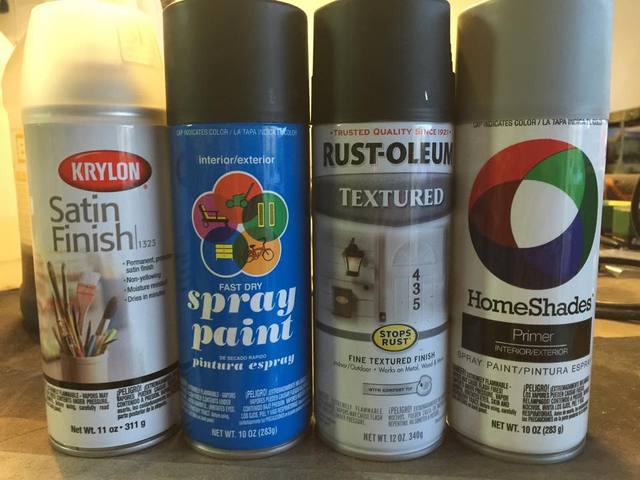
I’m looking for the dull worn look. I’ve read a lot of people use the Rustoleum Ultra satin paint and primer. I picked up a can of this stuff (with the newer nozzle) and within 10 seconds of spraying, the paint was coming out like a running faucet. Took it back and got another can, but the end result wasn’t quite satin. More like a semi gloss.
Second question: what is the best way to weather the paint?
I don’t want to use anything too abrasive because of scratch marks. I’d like to have an all-natural worn look. I’ve seen a lot great paint jobs and weathering on here but no real tutorials.
Any and all help in this thread is greatly appreciated. I really love these forums and the people in it because it almost feels like one big dysfunctional distant family. Thanks all!
For aluminum, start with a “self etching” primer, preferably black. Before the first application, give the metal a quick sanding followed by a wipe down with acetone to help with adhesion. Apply a THIN COAT.
As for the paint, I have had good luck with Rustoleum High Performance Enamel, flat black…
Apply 2-3 THIN COATS, following the instructions on the can (within 4 hours or after 7 days I think). Let dry for a week. The finish will be beautifully flat but you don’t want that because it will immediately start to scuff and look weird. Use very find steel wool (000 or 0000) and lightly buff the finish in a circular pattern. Done properly, this is what will make the finish resilient and aged. If you don’t like the dry flat look this stage leaves, you can polish it lightly to give it a satin appearance.
Weather the thrower using layers of fuller’s earth.
I used Rustoleum’s Universal Satin Black. This might be what you’re talking about. Every can that I’ve used I’ve had to use upside down to get a good, even coat. I did not use any kind of primer, rather just gave the parts a good warm soapy bath, followed by a denatured alcohol rub-down (wearing nitrile gloves throughout this process as to not transfer oils to the parts; causes orange peel and fish eye!). Anyway, 6 thin coats of paint.
After a 48 hour cure, I buffed the paint to knock down the sheen (as Bishop is describing) with 0000 steel wool. Give a warm soapy bath once again and allow to sit for another 48 hours. It turns out perfect, and the steel wool also gives the parts a weathered look in the process.
This is what the paint looked like “off the press”. Look familiar? Awfully glossy?
After the buffing, and in love with after full assembly…
You can even use a light amount of polish (as Bishop describes in his pack build) if you over buff or if you would like a little bit of a slight gloss in the paint.
Grimmy, first off I love Billy and Mandy. Second, that pack looks awesome.
After I painted my thrower I used some 0000 steel wool to try and dull it down. The problem was it took the paint off the edges of the whole gun to where it looked like it had a silver trim. I know what I did wrong and that’s the nice thing about working with aluminum. I can strip it down and not worry about ruining the gun. One of the reasons I’m trying to get things down before I get the shell.
I actually looked at that paint that you suggested Bishop, but I wasn’t too sure how it’d look. When using the steel wool, you work it lightly so as not to majorly scuff or scratch the paint right?
I’ve considered trying the Rustoleum BBQ paint. I know I’ve seen a few people on here use it here and there.
I was told that this setup works well and is very cheap as well:
I’ll be using this, and once I get to finally painting my pack, it is the method I will be using, and I will document how it turns out…
But, just like Grimmy mentioned above, I wouldn’t use primer on aluminum, especially if you’re planning to get the weathered look…
Basically, the blue “Flat Black” bottle will be used for the aluminum parts…
For the shell, a coat of the Primer, the hammered black paint (if preferred on the parts that have it) over that, and then a layer of the Flat Black paint to cover it all up…
And then, coat all the parts (shell and aluminum) with the Clear Satin…
Again, I haven’t tested it myself, so I can’t vouch for it yet, but it gives you an idea of how many different setups there can be…
Best paint I have ever used. Period. Of course, as you can see, everyone has a technique that works for them. Depends on what you are trying to accomplish.
For the steel wool, a very light circular motion. You want to create swirls of micro scratches to keep the reflection low but remain resilient. Flat black doesn’t hold up well on its own… in my opinion.
I’m really thinking of going with the BBQ paint. I’ve seen CPU’s painted thrower and really like the look of it. As a matter of fact, he’s who provided me with mine. I still can’t thank you enough for it.
For some natural weathering and scuffing…I’ve read somewhere on here before about somebody putting a bunch of gravel in a bucket and shaking their painted parts around in side…like a tumbler. Gives it a nice uneven look. Then definately picking up some Fullers Earth to finish it off.
Now after I get it looking nice and worn, would a satin clear coat be ideal for sealing the paint from getting more worn, the Fullers earth from rubbing off, and help keep the dry rub stickers from coming off over time? I use Testors Dullcoat when painting miniatures (warhammer, zombicide, etc) and it never leaves a gloss finish. Almost can’t tell it’s been sealed.
I didn’t put any weathering on my thrower, and also used self etching primer before the satin paint, and it’s acquired a nice natural weathered look over the past 3 years from bumping into things here and there. The primer doesn’t show when scratches are made, when it gets bumped, both layers come off.
I always use they gray stuff, never had a problem with it affecting the color. You just have to make sure to let it cure a day or 2 before you apply the black, to ensure proper adhesion. I know the can says 1 hour, but I prefer to wait a day or two to ensure a full cure.
So in the end I decided to go with CPU64’s suggestion using the Rustoleum high heat BBQ spray. After spraying the first few coats and seeing the dull grayness of the paint, I thought to myself “oh dear god…what the hell did Chris talk me into?!?” But after following his instructions to use a soft cloth (my work shirt…yea it’s soft. That’s how I roll) to rub off the gray, I started to see how miraculous this paint really was. I can honestly say I’m extremely happy with this. Thank you everyone for the suggestions. I might try Bishops method on the next pack I do…but that’ll be down the road a ways. After I pay off the 3 mortgages on my house for the first one.
Here’s some comparison pictures of how the paint looked before and after a good rubbing. (Insert dirty joke here)
Now my next question: how is the PH25 resistor mounted into the ion arm? Is the hole drilled and tapped to screw it in? I know some people epoxy theirs on. Is that how they originally did it?
Honestly, I’d like to drill and tap the hole. I feel it’d be easier to remove and replace if I need to and feel like it was more secure. Does anyone know what size tap I’ll need? We have HUGE ones at my work. I’m talking couple inches in diameter. (That’s what she said)
That paint looks fantastic. Good illustration of the before & after using the flat finish. On its own, flat is not a good choice (IMO) but once you buff it out, it is much nicer than using a satin paint. It takes an extra step but it’s worth it.
Grimmy- I see, I think I may have needle nose long enough to get inside the arm to hold the nut in place. The resistor is pretty much dead center on the side of the arm right? Judging from some of the reference pics I seen and other peoples pre drilled parts.
 Thanks all!