OMNI Pack HMS Shell Build

Hi everyone! within the last month, one of the shells from the line of HMS shells that have been floating around the community for the past year came into my hands. Originally I was building up a heavily modified Bigi330 shell to have as my “cherry” pack for display at home; it was going to be the proton pack on the cover of the OMNI Magazine during the montage of Ghost Busters. With acquiring this new shell that has supposed lineage to the GB1 production, I decided that this new shell would become my display pack at home. And so begun my usual dive into insanity with modifying something to be how I want it to be. . .

The shell came to me looking like this:
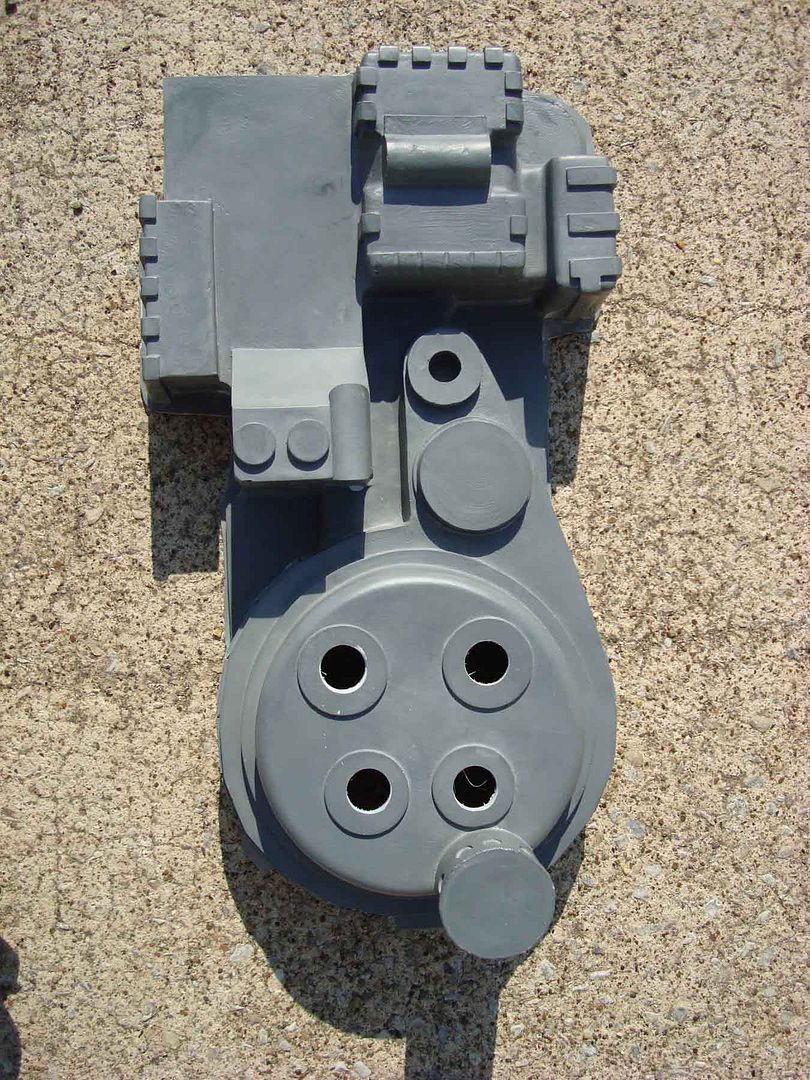
This shell boggles my mind when I stare at it. On one hand, it has certain things that look like they got right with this mold, but then other things that are either missing or completely wrong along with all the deformities.

![image](http://www.gbfans.com/images/pb/mburkit/HMS GB1 OMNI Pack Build_RossShellchanges_zps69121b1c.jpg)

I wanted this pack to look like a Hero fiberglass shell from the production of GB1. To do so, I had to remove, change and/or add to the shell. The above photo has the things I wanted to change circled. Once the shell was in hand, I began to modify! First came filling in the 2 holes that are on the pack for the vacuum hose on the crank knob and the top of the sync generator. Next came the “■■■■■■■” on the EDA Discs, as well as sanding down the spot for the PPD, which was shaped wrong. After those things came some bigger stuff, such as removing the deformed Clippard Valve disc and the cast in N-Filter. Lastly, I tried my best to get rid of the “bulge” that’s on the side of the sync gen, near the clippard valve. The real packs didn’t have this and it always bugged me every time I saw a pack built from this shell.

![image](http://www.gbfans.com/images/pb/mburkit/HMS GB1 OMNI Pack Build_IMAG1305.jpg)

I clayed in the hallow N-Filter and fiberglassed over it. Once that was all set up, I flipped it over and cut the N-Filter. The result of that process is in the above photo.

Another thing that I noticed yesterday was the top rib of the PowerCell was missing the connecting material between the rib and the EDA.

![image](http://www.gbfans.com/images/pb/mburkit/HMS GB1 OMNI Pack Build_IMAG1313.jpg)

So I filled that in too!

![image](http://www.gbfans.com/images/pb/mburkit/HMS GB1 OMNI Pack Build_IMAG1314.jpg)

And with that, I felt confident enough to texture the ■■■■■■.

![image](http://www.gbfans.com/images/pb/mburkit/HMS GB1 OMNI Pack Build_IMAG1328.jpg)

After texturing, I added a few of the “tells” seen on the heros. These consisted mostly of sanding marks on the ribs, some cuts on the bottom of the crank gen, and visible nails on some of the ribs of the crank gen and powercell.

![image](http://www.gbfans.com/images/pb/mburkit/HMS GB1 OMNI Pack Build_IMAG1323.jpg)

![image](http://www.gbfans.com/images/pb/mburkit/HMS GB1 OMNI Pack Build_IMAG1324.jpg)

![image](http://www.gbfans.com/images/pb/mburkit/HMS GB1 OMNI Pack Build_IMAG1325.jpg)

After a coat of Lacquer and then a coat of primer, I am brought to this lovely point in the build:

![image](http://www.gbfans.com/images/pb/mburkit/HMS GB1 OMNI Pack Build_IMAG1331.jpg)

The shell is now much closer to what I feel was what the production shells for the hero packs in GB1 were. Now I can start building it all up! Some of the next few things I will be doing is cutting out a motherboard for the shell and mounting it on there with aluminum L-Brackets. Stay tuned for more hijinks!

Looking good Matt!

Are you a wizard?

Good thing someone has eagle eyes and noticed the top of the powercell! :cool: :stuck_out_tongue:

I saw the pre-texture changes Matt did, and it’s pretty neat, though it opened some other questions that made us want to throw Jack out the window.

Not my fault the lineage of that shell is crookeder than a $3 coin. That’s what happens when you make something from destroyed stunt molds and measurements. Figuring out what’s original and what’s been made up is an excercise in frustration.

Looking good Matt, she’s going to be a beauty.

Heck yeah, Matt! That’s going to be a fine build.

![image](http://www.gbfans.com/images/pb/mburkit/HMS GB1 OMNI Pack Build_IMAG1337.jpg)

Bumpers on, as well as the powercell window has been cut. Hopefully I can cut a motherboard for it today too then I’m kinda out of things to do unit I get my order from mcmaster-carr.

Last update for a little while… hand cut motherboard!

![image](http://www.gbfans.com/images/pb/mburkit/HMS GB1 OMNI Pack Build_IMAG1341.jpg)

Small update. I have the shell mounted on the hand-cut motherboard and all that mounted on a LC-1 ALICE frame.

![image](http://www.gbfans.com/images/pb/mburkit/HMS GB1 OMNI Pack Build_IMAG1366.jpg)

![image](http://www.gbfans.com/images/pb/mburkit/HMS GB1 OMNI Pack Build_IMAG1367.jpg)

I also got the Clippard Valve on there with the male v-hook and crank knob, but I’m quickly running out of things to do on this pack until I get the rest of the metal parts for her. But I am liking how its coming along so far.

Very clean. I’m liking this so far! I can’t wait to see more on this one.

So I did some work on this pack today! I basically got all the metal parts I have attached to the shell at this point.

![image](http://www.gbfans.com/images/pb/mburkit/HMS GB1 OMNI Pack Build__DSC0295_zpse67b841b.jpg)

Here’s the N-Filter:

![image](http://www.gbfans.com/images/pb/mburkit/HMS GB1 OMNI Pack Build__DSC0298_zps1a396ca1.jpg)

And the plate that it slides over, like the hero packs:

![image](http://www.gbfans.com/images/pb/mburkit/HMS GB1 OMNI Pack Build__DSC0297_zps90d4ab57.jpg)

A little from the left:

![image](http://www.gbfans.com/images/pb/mburkit/HMS GB1 OMNI Pack Build__DSC0300_zps7faa1b71.jpg)

And a little from the right!

![image](http://www.gbfans.com/images/pb/mburkit/HMS GB1 OMNI Pack Build__DSC0299_zps020a45fd.jpg)

And now, just for fun, some side by sides against my Ray Stantz Pack.

![image](http://www.gbfans.com/images/pb/mburkit/HMS GB1 OMNI Pack Build__DSC0301_zps8f67ae81.jpg)

![image](http://www.gbfans.com/images/pb/mburkit/HMS GB1 OMNI Pack Build__DSC0303_zpsdc6074a7.jpg)

![image](http://www.gbfans.com/images/pb/mburkit/HMS GB1 OMNI Pack Build__DSC0302_zpsa7b30522.jpg)

That’s for a little while with this pack, until I get more parts to slap on it! Thanks for looking.

Great job!!

It’s really looking good, the OMNI has always been my fave pack and is what I’m basing my build on. Great job, can’t wait for the next installment!

This appears to be the start to a tremendous build!

One question though. Does the plate riveted to the shell, within the n-filter function as a mount somehow? If so how and is it a part of any gb1 hero pack? After all my research, I can’t say I’ve ever seen it.

I answered my own question.

Yeah, sorry. I was on vacation (and maybe doing a little bit of research) in Los Angeles, CA and only really had my phone, so I was unable to really respond the way I wanted to when I saw you post this. But for other’s that may have that same question, you can see in this photo of the Spengler pack, that they pop riveted a plate onto the bottom of the cyclotron and glued the N-Filter onto it.

Now that I’m back, I’m going to start working on this build a little more; most likely on the electronics until I get the last of my metal parts I’m waiting for.

Soooooo I’ve been gone for a while, but I figured I’d return with a small update on this pack that is still being worked on.

Once I finally got everything dry-fitted onto the shell, I took it over to my uncle’s shop to get the ion arm and booster tube welded together.

![image](http://www.gbfans.com/images/pb/mburkit/HMS GB1 OMNI Pack Build_IMAG2026_zpsf7e9765e.jpg)

Then she came home and on the last day of October that we had 60 degree weather in the North East United States, I got everything painted and re-assembled.

![image](http://www.gbfans.com/images/pb/mburkit/HMS GB1 OMNI Pack Build__DSC1945_zps483d56a7.jpg)

![image](http://www.gbfans.com/images/pb/mburkit/HMS GB1 OMNI Pack Build__DSC1944_zps4009da35.jpg)

![image](http://www.gbfans.com/images/pb/mburkit/HMS GB1 OMNI Pack Build__DSC1943_zpsb621e889.jpg)

(Since these photos have been taken, I have installed the lenses in the pack as well)

Next thing to do for me is finish designing the electronics and start dry-fitting the wand for this sucker.

Very nice looking pack!

Very nice! Well done!