Real Ghostbusters Pack Build - Dimensions will be shared

Well this has been a busy year, between getting my GB 1 pack parts organized and building the Ecto 1ATV, we haven’t had much time to do anything. The Ecto is currently waiting for the new sound chip so we have some down time. We are planning on attending Packs in the Parks this year and naturally the wife will need a pack. She decided on a RGB pack so we got to looking around for plans. Well there aren’t really any out there and the closest we could come was the DIC prints in the RGB box set which are available here: Spook Central - Real Ghostbusters Production Artwork - theraffon

We decided to base our dimensions on fitting a Alice Pack frame but we may go the way of a internal strap rig like the actual RGB packs. So far this has been a collaboration of myself, USFMichele and Silverstreak. We plan on sharing any and all dimensions for this build to make it easier for anyone in the community to build one. We will be posting dimensions and plans once the build is complete.

Here is where we are at now:

The concept sketch from the DIC box set

![image](http://www.gbfans.com/images/pb/nstevic01/Proton Pack Build_IMG_4369.jpg)

The additional sketches

![image](http://www.gbfans.com/images/pb/nstevic01/Proton Pack Build_IMG_4377.jpg)

Got to work on the main pack body

![image](http://www.gbfans.com/images/pb/nstevic01/Proton Pack Build_IMG_4361.jpg)

![image](http://www.gbfans.com/images/pb/nstevic01/Proton Pack Build_IMG_4366.jpg)

![image](http://www.gbfans.com/images/pb/nstevic01/Proton Pack Build_IMG_4362.jpg)

The back layer is 1/4" MDF with a 3/4" MDF body ring and the top layer is 1/2" MDF

![image](http://www.gbfans.com/images/pb/nstevic01/Proton Pack Build_IMG_4367.jpg)

We used dowel sections for alignment and will be making the pack body to split open for maintenance

![image](http://www.gbfans.com/images/pb/nstevic01/Proton Pack Build_IMG_4375.jpg)

Started in on some of the detail work and figuring out proportions

![image](http://www.gbfans.com/images/pb/nstevic01/Proton Pack Build_IMG_4376.jpg)

![image](http://www.gbfans.com/images/pb/nstevic01/Proton Pack Build_IMG_4378.jpg)

And there we are for now. Any suggestions or measurements would be appreciated. We want to keep this as open source as possible.
Nate ,the only thing I can say is if Michele plans on wearing it for long I would go with the alice frame, the other way is like straping an ironing board to your back ,or like a car with no shocks. . rough ride .If you set your straps and kidney belt right ,your pack disapears after about ten mins. after putting it on. . Just my 2 cents . .

We had also considered “sinking” the Alice frame into the pack body, after your input we may want to revisit those plans.

Got some more work done tonight:

Glued two 3/4" pieces of MDF together for this, used dowels for alignment

![image](http://www.gbfans.com/images/pb/nstevic01/Proton Pack Build_IMG_4392.jpg)

Ovaled it out and sanded a 15 degree angle on it

![image](http://www.gbfans.com/images/pb/nstevic01/Proton Pack Build_IMG_4393.jpg)

Placement

![image](http://www.gbfans.com/images/pb/nstevic01/Proton Pack Build_IMG_4395.jpg)

Finished the top pieces on the booster tube box

![image](http://www.gbfans.com/images/pb/nstevic01/Proton Pack Build_IMG_4397.jpg)

Started gluing the booster tube plug together, tomorrow it will be coned out

![image](http://www.gbfans.com/images/pb/nstevic01/Proton Pack Build_IMG_4394.jpg)

Worked out some dimensions for the Ion Arm

![image](http://www.gbfans.com/images/pb/nstevic01/Proton Pack Build_IMG_4399.jpg)

![image](http://www.gbfans.com/images/pb/nstevic01/Proton Pack Build_IMG_4400.jpg)

Whipped up a prototype

![image](http://www.gbfans.com/images/pb/nstevic01/Proton Pack Build_IMG_4401.jpg)

![image](http://www.gbfans.com/images/pb/nstevic01/Proton Pack Build_IMG_4402.jpg)

The Ion Arm will extend past the top of the pack body and I will work on the various angle and notched areas when it is assembled.

I am working on the pack dimensions and crossections while building so more to come!

i think if you made the hollow rings separate from routing out the mdf it would appear alot cleaner and may even be a little more stronger with less clean up work needing to be done from the holes on the bottom sheet.

it may take up more material, but in the long run it would have been much less work for you.

Are you talking about the Ion Arm layers or the Cyclotron? Most everything will be hollowed out in layers then placed together and sanded down. The weight savings is incredible when we started hollowing out parts.

I hope to be able to work on my own pack soon. Nathan LOVES using all his new toys in the garage I normally end up sitting on the computer playing Sims on facebook. NATHAN LET ME HELP DAMNIT!!

this

![image](http://www.gbfans.com/images/pb/nstevic01/Proton Pack Build_IMG_4375.jpg)

it could have been done in hollow ring layers instead of stacked and routed out.

Thats the inside and you won’t be able to see any of that mess…

The back section is in layers, it is a 1/4" flat back with a 3/4" “ring”. For the top section, we needed another 1/2" so I just used that and routed out about a 1/4". In hindsight, I prob should have sandwiched two 1/2" rings between 2 1/4" flats.

That’s what I was getting at.

Got some more work done today, it actually looks like a pack now

Tried some new dimensions on the Ion Arm, it seems to sit better now

![image](http://www.gbfans.com/images/pb/nstevic01/Proton Pack Build_IMG_4446.jpg)

The mad scientist helping out

![image](http://www.gbfans.com/images/pb/nstevic01/Proton Pack Build_IMG_4447.jpg)

![image](http://www.gbfans.com/images/pb/nstevic01/Proton Pack Build_IMG_4448.jpg)

New Ion Arm

![image](http://www.gbfans.com/images/pb/nstevic01/Proton Pack Build_IMG_4449.jpg)

![image](http://www.gbfans.com/images/pb/nstevic01/Proton Pack Build_IMG_4450.jpg)

![image](http://www.gbfans.com/images/pb/nstevic01/Proton Pack Build_IMG_4451.jpg)

![image](http://www.gbfans.com/images/pb/nstevic01/Proton Pack Build_IMG_4452.jpg)

Seeing how it all goes together

![image](http://www.gbfans.com/images/pb/nstevic01/Proton Pack Build_IMG_4453.jpg)

![image](http://www.gbfans.com/images/pb/nstevic01/Proton Pack Build_IMG_4454.jpg)

![image](http://www.gbfans.com/images/pb/nstevic01/Proton Pack Build_IMG_4455.jpg)

Should be able to get a little more done tomorrow

Wow, you’re moving right along, great stuff so far!

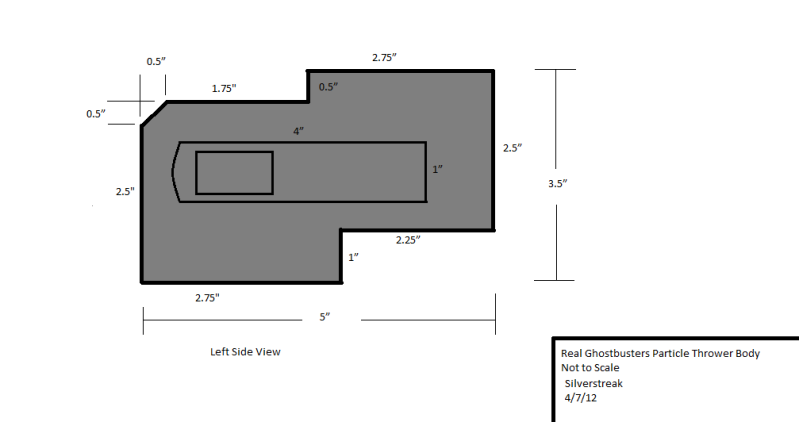
I’ve been working on my own RGB thrower, and while its not finished and thus not ready to be shared with the community, I whipped up a quick sketch showing the dimensions I used for the side panels. My main gun body is 2.5" wide and I am using 1.25" handles like the movie throwers. I hope someone can get some good use out of this drawing. I will post more plans as I create them.

My plans are not as nice or as professional in appearance as say, Stefan’s, as I am working in MS Paint. They get the point across though.

This is exactly what I was looking for. It will give us a good starting point for the thrower, and hopefully with the help of the community we can get some actually plans that the community can use and improve upon.

Thanks!

Tad more progress on the pack tonight:

Milled out the cone for the booster and used a dowel and glue to secure it. I will be leaving a small part of the dowel for a place to mount the hose to

![image](http://www.gbfans.com/images/pb/nstevic01/Proton Pack Build_IMG_4456.jpg)

![image](http://www.gbfans.com/images/pb/nstevic01/Proton Pack Build_IMG_4458.jpg)

Sanded everything down

![image](http://www.gbfans.com/images/pb/nstevic01/Proton Pack Build_IMG_4459.jpg)

Working on placement

![image](http://www.gbfans.com/images/pb/nstevic01/Proton Pack Build_IMG_4462.jpg)

Ion Arm doweled and glued

![image](http://www.gbfans.com/images/pb/nstevic01/Proton Pack Build_IMG_4460.jpg)

![image](http://www.gbfans.com/images/pb/nstevic01/Proton Pack Build_IMG_4461.jpg)

More to come!

Some really good stuff here. I love watching these builds and can’t wait to see whats to come. Good job.

Looking great so far!

Amazing!!! Can’t wait to see this finished!!! Quick…quick!! :slight_smile:

looks like this is gonna be a great one!