Bru's pack build...

Well I’ve bit the bullet so to speak and made a start on the pack/gun build.

I’ve gotten a running start with the pack as I bought Quag’s missus’ part built shell, that has quite a bit done on it already, haven’t taken any pics yet as I’ve done hardly anything to it and I’m waiting on parts to finish it off, so I thought I’d take a stab at the gun.

Bit more work than I orginally thought but it’s good to have something to get your teeth into.

No lights or sounds for either yet, am working on getting those as a birthday pressie :smiley:

So anyways heres my progress pics of the gun from dremelling the thing to disassembly ready for sanding, filling, gluing and priming.

(yep some of the bolts aren’t the exact proper ones, I know, and hope to replace them at a later date)

![image](http://www.gbfans.com/images/pb/bruenorodinson/My Personal Minis_Oddities_Ghostbusters stuff_IMG_1931-1.jpg)

![image](http://www.gbfans.com/images/pb/bruenorodinson/My Personal Minis_Oddities_Ghostbusters stuff_IMG_1930-1.jpg)

![image](http://www.gbfans.com/images/pb/bruenorodinson/My Personal Minis_Oddities_Ghostbusters stuff_IMG_1933-1.jpg)

![image](http://www.gbfans.com/images/pb/bruenorodinson/My Personal Minis_Oddities_Ghostbusters stuff_IMG_1972-1.jpg)

![image](http://www.gbfans.com/images/pb/bruenorodinson/My Personal Minis_Oddities_Ghostbusters stuff_IMG_1973-1.jpg)

![image](http://www.gbfans.com/images/pb/bruenorodinson/My Personal Minis_Oddities_Ghostbusters stuff_IMG_1975-1.jpg)

![image](http://www.gbfans.com/images/pb/bruenorodinson/My Personal Minis_Oddities_Ghostbusters stuff_IMG_1976-1.jpg)

![image](http://www.gbfans.com/images/pb/bruenorodinson/My Personal Minis_Oddities_Ghostbusters stuff_IMG_1979-1.jpg)

Will cut the lights and switches holes as I add them prior to the main paint job.

Now like the pack I’m waiting on parts to finish the gun off too, but soon they will be in my grubby mitts.

Apologies in advance for how this thread will run, very dis-jointedly, as I’m a total idiot with wip threads, I get too carried away with the project and forget to take pics. :oops:

Been getting busy with the paint.

(told ya I’d get carried away and not update :roll: )

![image](http://www.gbfans.com/images/pb/bruenorodinson/My Personal Minis_Oddities_Ghostbusters stuff_IMG_1981.jpg)

![image](http://www.gbfans.com/images/pb/bruenorodinson/My Personal Minis_Oddities_Ghostbusters stuff_IMG_1982.jpg)

Shading the metal stage, used some washes to ‘dirty’ it up a bit before the silver highlight.

![image](http://www.gbfans.com/images/pb/bruenorodinson/My Personal Minis_Oddities_Ghostbusters stuff_IMG_1984.jpg)

![image](http://www.gbfans.com/images/pb/bruenorodinson/My Personal Minis_Oddities_Ghostbusters stuff_IMG_1985.jpg)

Going to gloss over the clippard label to darken it down, as the flash has shown it too light.

Now it’s just a case of waiting on a parcel that the wifey kindly ordered for me, and a trip to Maplins for some switches to dummy until I can get a light kit in it.

Had a busy day today, most productive if I say so myself, and I even remembered to snap some pics :smiley: :wink:

Now I’m not gonna rabbit on too much, more let the pics do the talking.

![image](http://www.gbfans.com/images/pb/bruenorodinson/My Personal Minis_Oddities_Ghostbusters stuff_IMG_1997.jpg)

This is my shell, there are many like it but this one is mine… :smiley:

Can’t take credit for how far the shell has progressed as I bought it from Quag and his missus, and you can see what incredible work she’d done on it already here;

http://www.theukghostbusters.co.uk/forum/viewtopic.php?f=4&t=645

I’m very very very grateful to the pair for kindly selling me the shell, it’s saved me alot of work. :slight_smile: :sunglasses:

![image](http://www.gbfans.com/images/pb/bruenorodinson/My Personal Minis_Oddities_Ghostbusters stuff_IMG_1992.jpg)

![image](http://www.gbfans.com/images/pb/bruenorodinson/My Personal Minis_Oddities_Ghostbusters stuff_IMG_1993.jpg)

Motherboard fixings to the frame, and spacers all set.

![image](http://www.gbfans.com/images/pb/bruenorodinson/My Personal Minis_Oddities_Ghostbusters stuff_IMG_1995.jpg)

Brackets drilled and ready

![image](http://www.gbfans.com/images/pb/bruenorodinson/My Personal Minis_Oddities_Ghostbusters stuff_IMG_1996.jpg)

Placed and marked up

![image](http://www.gbfans.com/images/pb/bruenorodinson/My Personal Minis_Oddities_Ghostbusters stuff_IMG_1999.jpg)

I also marked the outside of the shell before the mother board so everything lined up just sweet.

![image](http://www.gbfans.com/images/pb/bruenorodinson/My Personal Minis_Oddities_Ghostbusters stuff_IMG_2000.jpg)

![image](http://www.gbfans.com/images/pb/bruenorodinson/My Personal Minis_Oddities_Ghostbusters stuff_IMG_2001.jpg)

Believe it or not it’s a piece of a roller blind kit, used the pole for the thrower, and had a bit left for this pipe, and decided the endcap was the best way to secure it.

![image](http://www.gbfans.com/images/pb/bruenorodinson/My Personal Minis_Oddities_Ghostbusters stuff_IMG_2002.jpg)

![image](http://www.gbfans.com/images/pb/bruenorodinson/My Personal Minis_Oddities_Ghostbusters stuff_IMG_2003.jpg)

![image](http://www.gbfans.com/images/pb/bruenorodinson/My Personal Minis_Oddities_Ghostbusters stuff_IMG_2004.jpg)

An old beaker helped out here, cut down and sanded and screws added. needs a little covering and fake weld yet, but it’s doing the job.

![image](http://www.gbfans.com/images/pb/bruenorodinson/My Personal Minis_Oddities_Ghostbusters stuff_IMG_20051.jpg)

Messy hole drilled and pipe fitted, not permanent yet, but test fitted.

![image](http://www.gbfans.com/images/pb/bruenorodinson/My Personal Minis_Oddities_Ghostbusters stuff_IMG_2006.jpg)

Then back inside to fit some ‘dummy’ switches that the thrower will keep until I can afford the proper light kit for it.

Yep need to paint the end switch red as well. :smiley:

Sorted the brass parts and light clips added and pipes and painted banjos, and tube.

Plus have painted in where to power level gauge thingy goes, as for the time being I have no light kits whatsoever, so all the light hats and clips are dummied on as are the switches.

![image](http://www.gbfans.com/images/pb/bruenorodinson/My Personal Minis_Oddities_Ghostbusters stuff_IMG_2011.jpg)

![image](http://www.gbfans.com/images/pb/bruenorodinson/My Personal Minis_Oddities_Ghostbusters stuff_IMG_2012.jpg)

![image](http://www.gbfans.com/images/pb/bruenorodinson/My Personal Minis_Oddities_Ghostbusters stuff_IMG_2013.jpg)

![image](http://www.gbfans.com/images/pb/bruenorodinson/My Personal Minis_Oddities_Ghostbusters stuff_IMG_2019.jpg)

Wiring first fix, managed to bust the fixings on the dale resistor as well, but have salvaged it with some epoxy glue, hence the blu tack holding it in place while it set.

![image](http://www.gbfans.com/images/pb/bruenorodinson/My Personal Minis_Oddities_Ghostbusters stuff_IMG_2020.jpg)

![image](http://www.gbfans.com/images/pb/bruenorodinson/My Personal Minis_Oddities_Ghostbusters stuff_IMG_2021.jpg)

Finally got round to a re-undercoat, as I wasn’t sure what paint Quag (UKGB Forums) had used and wanted to keep it the same as my thrower, so re-undercoat ready for some Halfords Satin Black.

Also took a little artistic licence and added the piece over the hole the tubing comes out and to the thrower, just looks neater.

Please don’t hang me. :frowning:

![image](http://www.gbfans.com/images/pb/bruenorodinson/My Personal Minis_Oddities_Ghostbusters stuff_IMG_2023.jpg)

All drilled and painted, hard to beleive it was an old beaker now.

![image](http://www.gbfans.com/images/pb/bruenorodinson/My Personal Minis_Oddities_Ghostbusters stuff_IMG_2025.jpg)

Frame and mobo sanded and primed.

![image](http://www.gbfans.com/images/pb/bruenorodinson/My Personal Minis_Oddities_Ghostbusters stuff_IMG_2029.jpg)

Black on both…still wet here had to bring it in as it was getting dark and slightly chilly.

![image](http://www.gbfans.com/images/pb/bruenorodinson/My Personal Minis_Oddities_Ghostbusters stuff_IMG_2031.jpg)

Final coat on the shell, and v-hook cleaned up, and daftly not masking it off. :oops:

![image](http://www.gbfans.com/images/pb/bruenorodinson/My Personal Minis_Oddities_Ghostbusters stuff_IMG_2033.jpg)

Tonight’s stuff now…added the straps back on and the neck padding, all taped up as well. ( I know the straps aren’t GB1, but this is a kind of hybrid pack until I can source and replace stuff for movie quality)

![image](http://www.gbfans.com/images/pb/bruenorodinson/My Personal Minis_Oddities_Ghostbusters stuff_IMG_2034.jpg)

Pack re-assembled and wired up, was mainly waiting on bits again now, strip, lenses, and bumper.

![image](http://www.gbfans.com/images/pb/bruenorodinson/My Personal Minis_Oddities_Ghostbusters stuff_IMG_2043.jpg)

Ion arm cut from mdf, and holes measured and drilled, and metal pieces glued into place.

![image](http://www.gbfans.com/images/pb/bruenorodinson/My Personal Minis_Oddities_Ghostbusters stuff_IMG_2045.jpg)

Painted and weathered.

![image](http://www.gbfans.com/images/pb/bruenorodinson/My Personal Minis_Oddities_Ghostbusters stuff_IMG_2047.jpg)

Attached. :slight_smile:

Nice!

Thanks!!!

End of the road in sight with this update.

![image](http://www.gbfans.com/images/pb/bruenorodinson/My Personal Minis_Oddities_Ghostbusters stuff_IMG_2051.jpg)

After fitting the lights into the pack I went on to add the switch and wires to the trigger box, a task I was ill prepared for I must admit, and I’ll tell you why.

The Crix light kit is now pre-wired for sound, with the extra wire running from the switch all ready to plug into his sound kit, now while this is ace, it also poses a problem, as he heatshrinks the two together at the base of the switch.

Why is this a problem?

It is too big for the trigger box, thats why. So I carefully removed all of the heatshrink, only to find that the hole I had drilled pre assembly was not only too small for both wire but the switch got in the way. Total ■■■■■ up on my part that, :oops: so I had to carefully drill another hole and feed the wiring through and fill said hole again.

Good thing is tho, that small amount of work doesn’t take away from what an awesome kit it really is.

![image](http://www.gbfans.com/images/pb/bruenorodinson/My Personal Minis_Oddities_Ghostbusters stuff_IMG_2052.jpg)

Had to take this pic because I was sad to see the thing in pieces again, don’t worry honey we can rebuild you.

![image](http://www.gbfans.com/images/pb/bruenorodinson/My Personal Minis_Oddities_Ghostbusters stuff_IMG_2053.jpg)

LED light fixings…thank you poundland.

(Pulled the LEDs slightly forward, bent them 90 degrees and then slotted them in the cutout part of the reflector piece, and the screw cap hold them in place real tight.

Easy to get at if I need to replace any of them.

![image](http://www.gbfans.com/images/pb/bruenorodinson/My Personal Minis_Oddities_Ghostbusters stuff_IMG_2054.jpg)

Wiring and power gauge/board fixed in place.

![image](http://www.gbfans.com/images/pb/bruenorodinson/My Personal Minis_Oddities_Ghostbusters stuff_IMG_2055.jpg)

Bumper ready to go, made a few little gouges with the dremel by accident, but have left them, along with some tiny airbubbles, as I have weathered the whole thing quite heavily and it makes the bumper look aged and slightly pitted in places. (thats my story and I’m sticking to it. :roll: )

![image](http://www.gbfans.com/images/pb/bruenorodinson/My Personal Minis_Oddities_Ghostbusters stuff_IMG_2067.jpg)

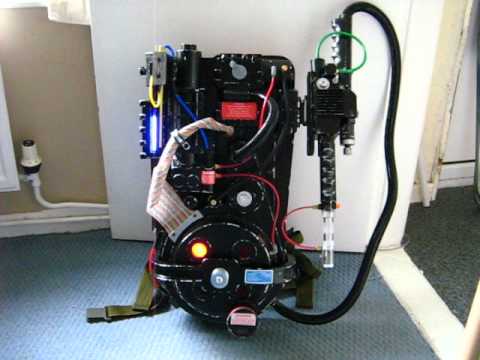
The final piece.

I know it’s not totally movie accurate, and has some custom (i.e. bodged by me, like the washers shock mount, mdf Ion arm, and so on..) parts, but what I was aiming for was a wearable pack that I can and will go back and replace with more accurate parts as and when I can afford/find them.

I will add a sound kit and lights kit for the gun, again as funds are available, so this thread isn’t totally done with yet.

That said this has been my first major prop build and has been a total rollercoaster ride of success and failures, and I have learned a few priceless lessons on the way, but it’s been a load of fun too, and great to have all the superb pack builds and folks here to help along the way too.

Thanks guys!!!

(Yes I will be picking minds again once I go all sound kit crazy… :lol: )

Poor quality video of it running, I guess the couple of glitches in the video are the ghosts crapping their ethereal pants. :lol: