Dirty Rob's Scratchbuilt Trap w/ Homebrew Electroincs

Hey guys,

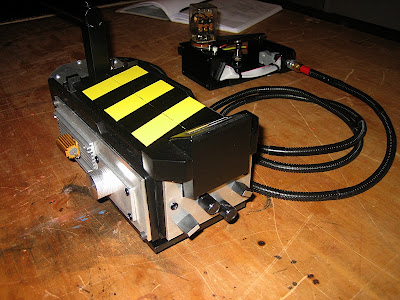
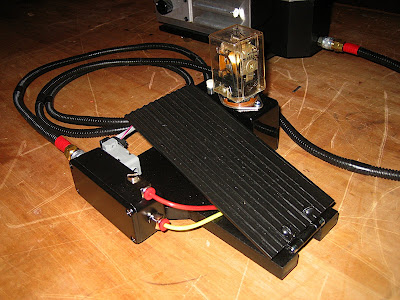
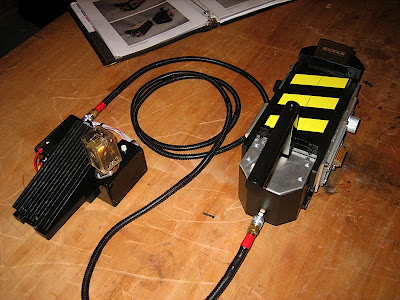
Here are some pictures of my first trap. It is made of Bondo coated MDF, hand cut aluminum, and the electronics are of my own design. I have taken some artistic license with a few of the details, sorry to disappoint the purists out there!
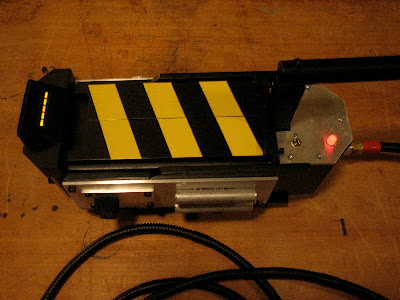
The electronic sequence is as follows:

Initialization:

  • Turns the rear light red, closes the doors (if open), and cycles the bargraph.
  • Once the trap is initialized, the rear (and pedal) light turns green to show the trap is ready. The bar graph on the forward indicator begins the chase sequence to show it’s awaiting input.

Open Trap:

  • When the pedal is pressed, the rear light turns solid red and the bar graph drops to the off state.
  • The doors open as the interior lights (LEDs) light up.
  • The bargraph fills 5 bars and begins the countdown sequence.

Countdown:

Once the trap is open, the operator has one minute to manually close it. This sequence displays the countdown.

  • Five bars are lit up (from previous sequence).
  • After 10 seconds, the buzzer beeps then 4 bars are illuminated, and so on…
  • Once the 5th bar graph segment has been turned off, the final 10 seconds are counted down by blinking one segment and beeping.

Close Trap:

  • When the pedal is pushed, the rear light turns solid red.
  • The interior lights dim as the trap door closes. You may notice that one door closes a moment before the first. This is the ensure the lip that sticks out on the bottom of the door doesn’t get hung up on the other door.
  • When the trap is closed, the bargraph lights up completely and the rear light blinks.

Reset Trap:

  • To reset the trap, the pedal is pushed one more time to run the Initialization sequence.

Here’s a quick video. Sorry about the shakey footage, I shot it with my camera:

[flash=425,344]http://www.youtube.com/v/N7N17GiIhlM&hl=en&fs=1[/flash]

I’ll post one with more detail when I have some time to edit it.

Right now I believe the only things missing from the trap are the decals and the rubber boot for the pedal. Hopefully I will be able to find something that works well at the auto store.

Thanks to the community for the information you guys have posted on the forums and reference pages; I couldn’t have made it this far without your contributions!

-Robby

Beautiful. Really nice work.

Can you discuss the mechanism(s) you used to make these doors work?

Very nice work! I think it looks great and a working trap and pedal that actually look good is hard to find.

:crunch:

Amazing work. Not only does the trap look beautiful, but the electronics work seamlessly. Hopefully you can go into detail about the inner-workings as I plan to make my trap functional when the day comes to build. What type of servos are you using (if any) and is the whole thing controlled via IC’s or any sort of micro-controller?

Hi guys,

Thanks for the compliments, I really appreciate the feedback! The trap is controlled primarily by a BS2 microprocessor. In retrospect, it may be a bit of overkill, but it was really fun to work with.

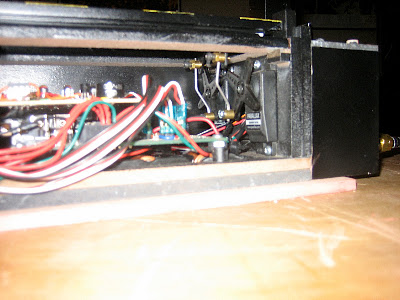
The door is opened with two standard Futaba S3003 servos. Calibrating them to match the swing of the door took a little while, but the extra time was well worth it. One challenge I had in particular was making sure the cosmetic plating lip on the inside of the right door didn’t hang up on the left door (they overlap). If you notice, at the last second the right door speeds up to close first.

Futaba S3003 Standard Servo

This is a pretty standard servo and is only about $10. You can’t beat it.

image

To attach the servos to the doors, I used piano wire and regular aircraft linkages that I was able to dig up at my local hobby shop. These are not the parts I used, but they are similar:

Control Horn

The control horns go on each of the doors. The size of the horns linked above may not be correct; it’s just to give you an idea of what it looks like.

image

Connectors

The piano wire goes through the hole on this tiny piece and a screw goes into the top to hold it in place. There is one on both the servo and horn.

image

Here’s a picture of the inside of the trap. You can see the servos/linkages all the way at the end. You may also notice all the junk inside the trap. I wanted it to look really busy and complex inside, so there is a ton of extra wires.

image

Here’s a progress video I shot for my friends earlier. At this point I hadn’t cut the doors, but you can see the servos/linkages in action if you look close. The timer sequence also runs for a bit on this particular video.

[flash=425,344]http://www.youtube.com/v/79-sjZIJWh8&hl=en&fs=1[/flash]

Making the servos work with the BS2 was easy, but information on how to put together the linkage was really hard to find. In the end, I ended up spending a few hours at Hobbytown buggging the RC guys about it until I found something that I liked. I hope this helps you guys out a bit.

Oh, and irricanian, I have one of your trap holsters and am looking forward to putting on. Unfortunately the wheels on the bottom of my trap come out a bit to far for the Dixies to line up, so I’m placing a 1/4" spacer on both the trap and holster to allow them to meet. I’m confident this’ll work out nicely.

For anyone out there who hasn’t seen these trap holsters, they are absolutely beautiful. Here are some pictures on the website (http://www.multimediamayhem.net).

-Robby

That looks awesome ! ! The electronics work beautifully ! ! !

it looks ok I suppose

Yes, it appears my post was done hastily. My apologies.

I think your facetious detector is broken there Milkman. :slight_smile:

Hey did you ever finish your trap? I’d like to see some more pics of the finished product.

Great job, we may have to build one of those now. Thanks for the parts info

That is fantastic Rob! Not only a great looking trap but the electronics are very smooth. Very impressed. Nice work.

P.S.- I am thinking you should consider putting together a trap electronics kit for those of us that are going bald from scratching our heads. :slight_smile:

This has to be the best trap that ive seen… homemade that is

I could only dream of owning a trap with those type of eletronics and lighting… just beatutiful

that is an awsome trap! well done!

rob this is one hell of a trap great work man really really nice.

I can’t believe I’ve just now seen this. This trap is a thing of beauty.

My hat’s off to you!!! Beautiful trap!!!

Awesome work!!..perfect working trap, congrats on a super build.

Keith

Wow man!!

I keep coming back to this an ogling it. Wow.