Yes, the accident prone St. Paul, MN crew is coming back! More episodes of GHOSTBUSTIN’ 911 are on the way. Principal photography is getting ready to pick up for episodes 7 and 8, and we’d like to give the fans of our show a little treat and give you a glimpse of what’s in store. I’d say “Spoiler alert”, but the title of this post already gave it away…
The ECTO-1C will meet an unfortunate demise and leave the crew in desperate need of a replacement. The new ECTO will make it’s debut in one of the next episodes, so we are keeping the specifics under wraps…but there are certain parts of ECTOs that *everyone *knows, so we will be posting photos from the build process as director and prop master, Jason (AKA: Vincent Gehin) completes the new Twin Cities Ghostbusters’ ECTO.
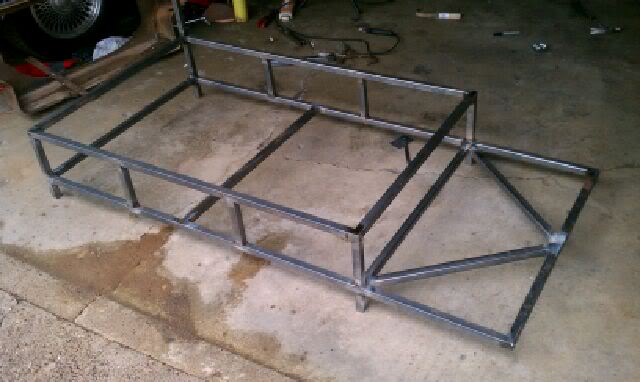
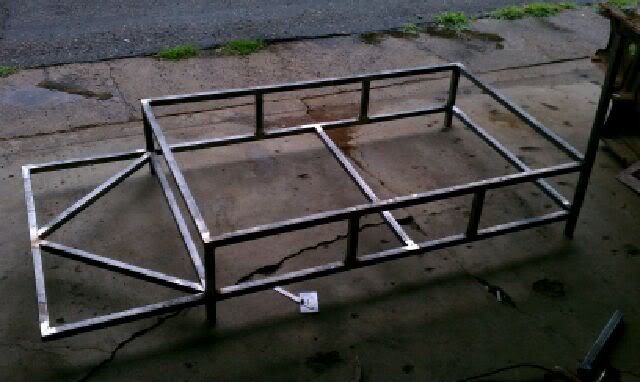
The roof rack frame…foundation of every good ECTO replica. These pics are already a bit older, and the frame is closer to being completed at this point, but you get the idea. Once Jason finishes welding everything for it, we plan to have it powder coated. Keep checking back for more pics as we get closer to revealing our new ride.
Also, if you have an ECTO and/or would like you and your crew to appear in an episode of GB911, drop us a line. We are very interested in putting more GB fan branches in GB911.
You got it. We’re all about helping out ECTO builders as much as we can. Feel free to ask us any questions you might have…and we may have some of our own for the other ECTO builders out there as we keep this project rolling along. Speaking of, here are some pics of the next piece…
In order to make the red light on the front of the roof rack (shown here)
It’s not very pretty to look at right now, I’ll admit. It’s a vintage headlight housing that came off of a rat rod (hence the beat up/rusted look) we acquired from eBay. Jason’s plan is to sandblast it and paint it silver once it’s smooth again. You may notice it’s not as extended as the original, but Jason has a rather ambitious plan to elongate it and get it to resemble the original bucket light housing. More details on that as it comes along.
He also plans to pop out the mounting bolt on the bottom (which you can see is shot) and replace it with a new one.
Here’s another part (this one’s completed and ready to go); the checkered half bubble dome and red arrow…uh…thingy. Anyone know if this thing ever been given a more official title?
Jason cut it out and cut it in half (which is nice in case it ever breaks…we’ll have a spare!). Then he cut a half circle base out of stainless steel (to prevent corrosion). He lined the bottom with the yellow and black checkered tape that everyone is familiar with at this point. The red arrow was made with 1" square steel tubing (same stuff he used to make the roof rack frame).
Gladly. In fact, I think I found an even better eBay auction than the original one we found.
It’s an auction selling ACRYLIC HEMISPHERES. They come in 4 colors, and thankfully the all important ‘clear’ is one of them. It says ‘More than 10 available’. They come in 8" 10" 12" 14" sizes, so you could find big ones for your 50’s or 60’s caddy…or lil’ ones for your VW bug or Smartcar ectos.
Any other parts on ebay that anyone would like links to? We search almost every day, and we’ve acquired quite a watch list. I’m happy to share the knowledge.
In return for your offer, are you familiar with how to obtain the A6 oxygen tanks for the side? If you’re still looking (doubtful), lemme know as there are a few sources out there.
Unfortunately, Im probably gonna be selling my ecto also. Need the money, and dont have money to fix it up. Gonna find a good home for her and redo with different car down the road. Its a hard decision cuz she’s my baby but gotta make sacrifices. Im sad 8…(
Just a heads up for anyone that goes there…their website is a little wonky and unfinished. I can put you in touch with our contact over there. He’s pretty helpful and shipped our tanks fast. He knew exactly what we needed by scoping a photo we sent him of the movie ecto.
I asked how many they have left and they said there are about 50 of the A-6 bottles available in “used cond”. They said they are mainly in need of painting.
He drilled out 2 holes on the cannon base for the barrels to be inserted, then he screwed PVC pipe caps to the back on the inside of the barrel base to hold the barrels in place. I’m told it was quite the painstaking process, but worth it.