yea im getting bumps cause the silicon had some air bubbles and are causing resin bumps. But bumps can always be sanded and are better than holes. Also how did you get so much done already haha?? You’ve been movin man !
Haha well that first day gave me a good head start on getting things done, because my friend is a carpenter and he was really quick with the mobo and was able to get on to other things. Meanwhile, Colin’s new gun kit is really easy to put together!
It’ll be a while before I can update next though. I’m not sure when that’ll be. I want to get a light kit first before I finish this kit so that I can make the ears and stuff, and I’m waiting on a few more parts for the main pack that I want to work with and some of my buddies who are also going to be putting together some packs want a chance to look at the shell before I start modifying it, and see how I do some stuff.
Shane
the light i linked you to is more accurate than the cover you got from MMM. the red cliplite covers you got from MMM are meant to be an acceptable replacement. i suggest picking the one up from radioshack and using it instead. exoray’s LED is small and will fit inside it just fine.
Does Exoray not have the correct covers for his light? I assume the cover will come off the one you linked me to?
Thanks, by the way! I’ll have to pick one of those up for sure.
Shane
none of the light kits available come with any light covers at all.
not proptronix, not exoray, not R2DEVO
the one i linked you to is one piece. you cut off half of the bottom and remove the bulb thats in there, then if you drilled the hole the right size in your gun, the light cover’s shaft will fit tightly in the hole and stay snug w/o any glue, then you just slip the LED in from underneath.
its very simple.
Excellent! Thanks again!
Shane
Man all of you stuff is shaping up nicely. I like that first pic you posted up reminds me of when I laid all my parts out. It was pretty overwhelming at that point but it looks like you have it handled nicely. One thing to point out of I may:
I’m not sure if you can change it now but your green lever looks to be a bit to long. Both the rod itself and the green tubing sheath that goes over the rod. If I remember right from when I did my builds the green tubing section that slips over the rod was just a little over an inch long.
you can kinda see what I mean here
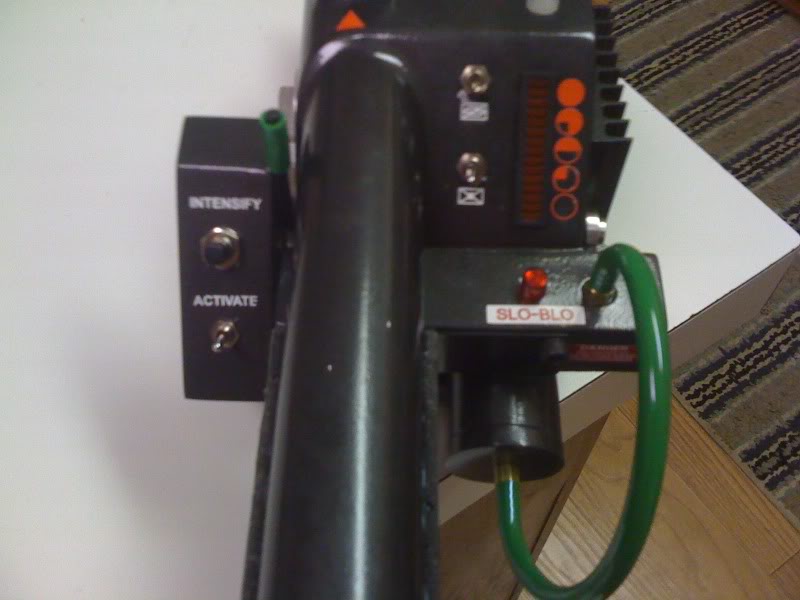
:lol: Whoops. I epoxied the sheath on already. But I can trim the height of the actual lever!
Thanks for pointing that out and for the compliments!
Shane
My Exoray lights came yesterday, and you know what that means! Waiting on some epoxy to dry right now on the gun ears, and I’ll be posting progress pictures later on.
Flynn’s kit is reeeeally great! If you’re on the fence about getting it, it’s VERY easy to put together, and looks fantastic. I can’t believe my thrower has working lights and switches in it!
Shane
I may order a second one from MMM now that the first one is a learning in process. I know what I’d do differently this time. Maybe I can give this one off to a fan or someone’s kid for a halloween costume :). I didn’t mess the pack up at all…yet :).
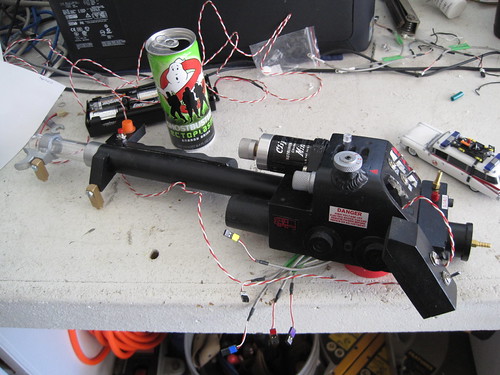
First thing I did yesterday was put in the little red clip light that Colin sent, and pull off the hose barb from that cylinder in the back. It was sitting crooked and I wanted to remount it. I also put the switches into the trigger box, which was fun. I had to dremel out a little of the inside so the switches would stick out far enough to screw the nuts back on.
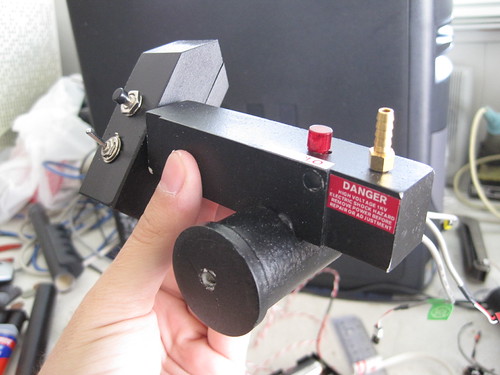
Then I ran the wires through the slow-blo box, to where the gunbox would be.
The hole on the far left and right are for bolts to hold this onto the gunbox. The big one on the left just bends straight up and narrows to that LED. The other one makes a turn towards the trigger box, and is matched with a hole the same size there. It all fits together great! I did mess up and drill an extra hole though, and so it’s hiding in this picture. I think I’ll bondo it up.
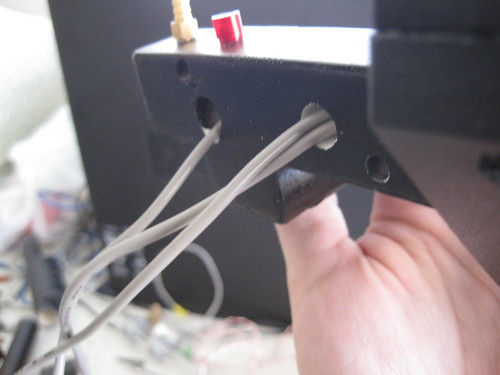
I was also asked for pictures of the holes I drilled, so I’ll repost this picture of the trigger box.
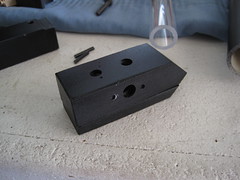
The holes on the left-most side are for the switches and stuff. The others are for mounting and running hidden wires.
Then I got to the interesting part of putting the lights on the gun ear. I drilled a hole that was wider on the back of the ear than on the front for the switch (so the threading would stick out but no more than that), and a consistent size for the LED. I epoxied the light cap on, and ran the electronics like this:
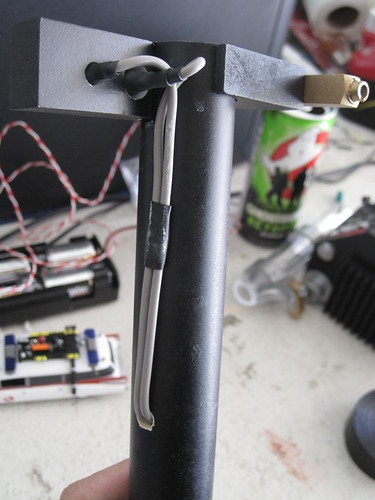
Then I dremelled out a trough in my grip, and installed it!
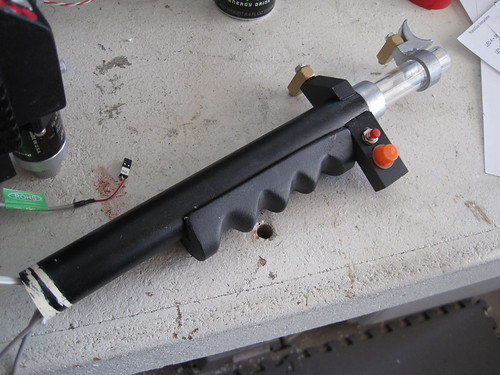
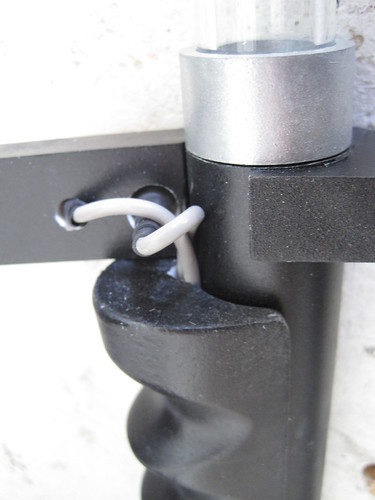
At this point I had also put the barrel light and vibration module into that front tube. I put the barrel in after the ear lights were in, but before I glued in the acrylic tube.
I also wrapped the barrel light once or twice with electrical tape, which made it fit nice and snug inside the barrel.
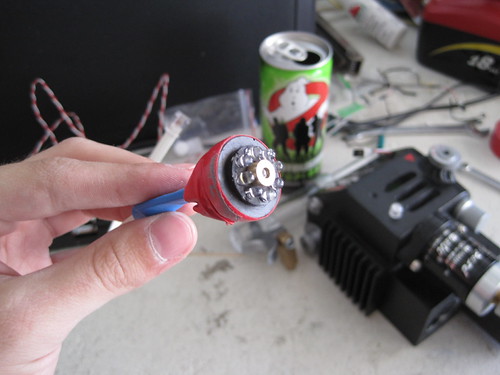
And here’s the way my gun looks now! (Except I’ve got the red and green hoses back on)
I’m going to have to get some bondo though, maybe for the extra hole I put in the slow-blo box, but definitely for the bar graph area. Turns out it was actually too short and too wide. I’ve lengthened it, but I have to narrow out the area from before that was too wide. Aw well. Guess first time pack builds never go smoothly!
Shane
I am looking for ideas on what sort of light caps to use for that other one on top of the gun, and the one in front of the Clippard. Anybody got any ideas? Or are those a couple of rare ones that people only sell once in a while?
Shane
just wondering… have you cut your gun handles?
for inside the gun box if you dont cut away the excess you may run into trouble
when fitting the light kit.. seriously you need all the room you can give yourself
this is what i did with mine and im damm lucky i did cos the light kit just wouldnt have fit

as for the led caps you mention sometimes thers a run of them on here but usually not when you need them,
ther is substitues but they can look naff.
this could be an area wher you may need to get creative and experiment
all i did was look at reference pics and then looked round my house and shed for things that could potentially be used
Yeah, I was looking at your thread and noticed you cut your handles down. I’ll probably do that too, but the front handle doesn’t go in that far anyway. The back tube I’ll definitely cut down though! What did you use to cut it?
Shane
i just marked it out put it in a vice and used a small hacksaw..
have you tried fitting the bargraph yet? trying to fit those little prong legs into the connector through the bargraph window is REALLY hard
took me forever
nice progress by the way its defo comming along nicely
Yeah the bargraph was a pain in the butt. I ended up bending a few prongs once or twice, but I put them back and tested it and it still worked fine, so I’m not worried. I found out the bargraph slot I cut was too wide and too short when I tried to fit it. I also carefully dremelled off part of the rubber/glue that’s underneath the frame on the bargraph so it would fit easier. After that it fit nice and tight, but getting the ribbon cable on was a pain in the butt.
Shane
Well, shit. that placement makes far more sense. Guess it’s some bondo for me. I can’t remember if I epoxied the slow blo on, but I’m praying I just used the screws that came with it.
Glad I could help! If you did use the epoxy, sometimes you can just snap parts off, sand them, and re-epoxy. But if you used the 'pox AND screws, it might be pretty tough.
Also - a little update! I used Colin’s other light caps and they seem to be working just great. I hollowed out the white one for by the Clippard with a drill, and epoxied the rubber one on and they both look great. I also just slapped some bondo onto the bar graph area so I can make the hole narrower.
Shane
Going back to your paint you used on the gun knobs. I believe that is Valspar spray paint. You can find it at any Lowes.
That is probably what I am going to use when my MMM gun kit comes in. Your build looks really good man. Keep up the good work.
I know I used some Valspar, but I don’t think that was the one I used for the silver. We HAD some silver Valspar, but the one I used was in a black can (which is actually in one of the pics early on page one). I’ll look into it if you’re interested!
Thanks for the compliments! I’m glad to be building it, and I actually just learned that I’m missing a few pieces (namely the locking block) that I’ll need to get asap!
Shane