No prob man. Yeah I went back and saw that black can. I just thought you used that Valspar. If you have time you can let me know about what paint you used. What part was the locking block? Was it something not in the kit? Im asking cause I had not heard of that.
Yeah, I’ll find out about the silver paint. It looked really great, but it actually kind of tarnishes. Might want to do several coats (I think I did 2) if you actually use it.
The locking block is a polygonal piece that goes on the front handle, between the gunbox and the front grip. Check out this picture:
http://www.gbfans.com/image.php?url=/images/equipment/reference/1/19.jpg
There’s a tube coming out of the gunbox, into which the front handle goes. On that tube are a couple of bolts, and just forward of that, on the front handle, is the locking block, with a bolt going through it into the grip. Nick-a-tron sells the locking blocks, so I’ll have to pick one up from him!
Shane
Cool man. Ok I never noticed that piece. Yeah I will have to pick up one of those. You’ll have to post a pic.
Here are some shots of the finished gun! I do think I’ll end up weathering it at some point, but for now it’s pretty much finished. Probably still needs an S hook on the bottom, but that’s no big deal.


Shane
Great job shane :crunch: Hope you had fun building it
Great job! Looks great!!! 
Sure did, Colin! Thanks for offering the awesome parts, stickers, and easy-to-put-togther kit! This is the first time I’ve ever built anything! So I’m damn pleased with it!
Shane
hey very nice
what did you end up using for the orange light cap?
and how did you find the installation of the light kit?
iv added more detail to mine since last time iv added the 2 screws and washers to the front gun handle (just under the clippard)
and im going to add a barrel lock when it arrives just for a bit more detail oh and metal gun knobs are on the way as we speak
again V Good job
That looks awesome man. Yeah, I have been looking at yours and slime me please as references. My only concern is when I do the trigger box. Placement is my real concern.
Nice job on the thrower !
You can tell this is gonna be a great pack once everything is put together.
the trigger box i was also dreadding doing all i can say is find the position you comfortable with then
drill the 2 holes and use the 2 prongs (if your using MMMs kit)
oh and remember to drill a slightly bigger hole to run your switch wires through
shoot me a pm if u need any help
Thanks everybody for the compliments! You all are the tough crowd, so I really appreciate your collective approval!
Nice! Those metal knobs will really make your gun look awesome, I think. I would have gone with the metal ones but I wanted to save that extra few dollars.
I just ended up using the orange cap that Colin sends with his gun kit. I think it looks pretty good, and it fits on the gun ear just fine.
I forgot to mention that Dan signed the inside of the gunbox (on the reverse side of the guntrack), but it was a pain to stuff the lighting kit in there, so I don’t want to take it out just to get a picture of it. When I get the sound kit and a flashlight cone for the interior lights I’ll snap a picture of the signature.
Speaking of stuffing the kit into the gunbox, that was probably the hardest part about wiring up the light kit. That, and getting the bargraph prongs back into the ribbon cable. That was hard! I would suggest installing the bargraph first once you have all the holes drilled. I think with less wires inside the gunbox, it might be easier to get those prongs to sit in the ribbon cable nicely. Otherwise it’s just too crowded!
Here’s a shot of the locking block and 2 bolts that I put on the front barrel. I think they may be placed wrong, but since there was some differences even between the different hero packs, I’m not too worried about it. 
Those 2 bolts are actually placed such that it keeps the vibration module from sliding back into the gunbox! Kind of a happy accident.
With the trigger box - make sure you mark all the holes with a pencil first before you drill! Then test fit it with the imaginary drawn holes first to make sure they all go where you want them too before you drill for reals, and like Slime said, be sure to do a larger hole in addition to the small one, so you can run wires through the slo-blo box into the gunbox.
Shane
hey nice pic of the 2 screws on the front handle
i did mine tonight too mine are just glued on for extra detail and im gonna add the barrel lock soon too
heres my effort i glued a few washers together painted them and glued them to the screw then just hot glued it to the gun

btw wher did you get that barrel lock? was it umoribawar?
Were the originals glued on? I just drilled in and used brass washers. Hmmm!
Regarding the barrel lock - It’s actually from Colin. He sent them out in the later gun kits. Maybe he’ll sell you one if you ask!
Shane
The real ones were set screws holding the front handle in the gun body.
Here you can see this wand, that was on display at the Minnesota PH, only had 1 still in there:
And this wand, which is currently on display at Sony, is missing the 2 screws that hold the front handle in and its falling out of the gun. The front handle of this wand is probably only being held on by the wiring for the electronics in this picture:
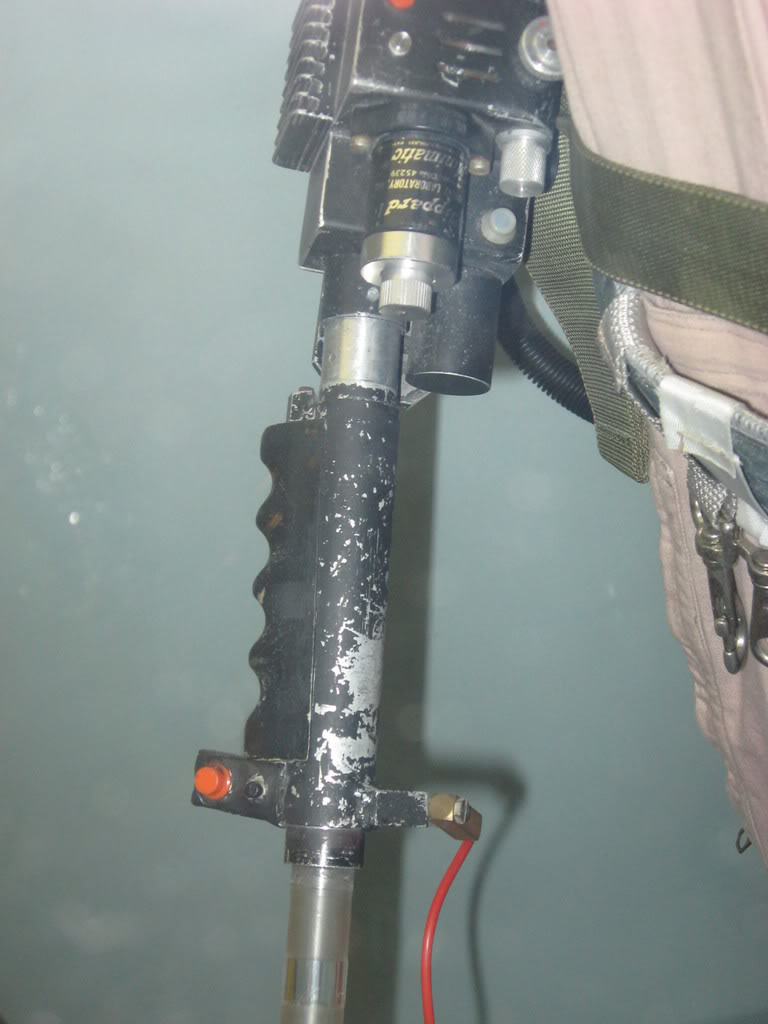
Fun little fact, the wand that’s on displayed at Sony is probably the same one used in the “heat 'em up” scene, due to the orange top hat seated in the gun body.
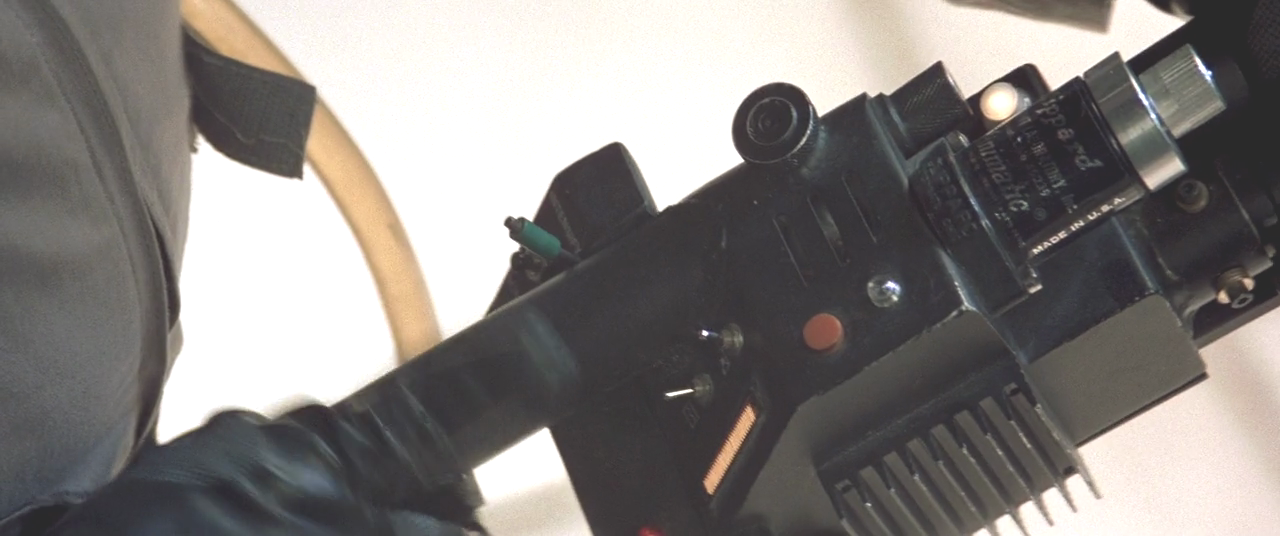
good eye Matt! That would explain the R-331 on there.
Oh good! Then mine’s not too bad. The only thing I wish I could have found was a piece of PVC large enough to fit over the front tube, but small enough on the outside that the sides of the pipe didn’t then poke out over the side of the gunbox.
Shane
Yeah Shane, it looks really thin there.
Maybe steel or copper tubing would do the job for that part.
:idea:
Great gun!
You know, it might just be the camera lens.. but the handles on the gun look warped somehow. In both pics it appears bowed a bit. Is it just the perspective or lens?
Yeah I see that too, 1.21 Gigawatts,
Almost looks like its ready to fall off the the gun box.
As if it’s about out of the metal sleeve.