MMM/ Irricanian's GB fans stunt trap tutorial

I bought one of AJ’s stunt trap kits for two reasons, 1. I was curious to see what a CNC routered trap kit would look like and how it would go together and 2. I was thinking I would build it, do a tutorial and then auction the finished trap off with the proceeds going to Gilda’s Club (our franchises GB charity)

So here goes!

Unpacked the contents of the box, here’s what all the components look like

![image](http://www.gbfans.com/images/pb/multimediamayhem/GBfans trap kit tutorial_ajkit1.jpg)

There are 20 pieces to this raw kit, if you are missing any components you will need to contact the kit supplier before you proceed. Additional parts needed to complete the base assembly are:

  1. Suitable handle material (resin cast, wood dowel or PVC pipe) the choice on what to use is up to the buyer.I used a resin piece as thats what i had on hand. Dimensions: 3/4" diameter by 5.375" long

[![image](http://www.gbfans.com/images/pb/multimediamayhem/GBfans trap kit tutorial_th_ajkit25.jpg)](http://www.gbfans.com/images/pb/multimediamayhem/GBfans trap kit tutorial_?action=view&current=ajkit25.jpg)

  1. Blocks for mounting your wheel assembly, I cut two pieces of 1/2" square poplar wood to 2.25" long

[![image](http://www.gbfans.com/images/pb/multimediamayhem/GBfans trap kit tutorial_th_ajkit32.jpg)](http://www.gbfans.com/images/pb/multimediamayhem/GBfans trap kit tutorial_?action=view&current=ajkit32.jpg)

You will want to drill and tap for the type of axles you will be using to mount your wheels

[![image](http://www.gbfans.com/images/pb/multimediamayhem/GBfans trap kit tutorial_th_ajkit33.jpg)](http://www.gbfans.com/images/pb/multimediamayhem/GBfans trap kit tutorial_?action=view&current=ajkit33.jpg)

I drilled 7/32" holes and tapped for the 1/4" bolts I used as axles, you will need to drill/ tap accordingly.

You are going to need some basic tools to assemble your trap: Sandpaper (in various grits), drill and drill bits, assorted threaded taps, wood glue , clamps, squared edge file. These are for basic assembly, we will get into finishing later on.

Step 1:

Dry fit all of the parts BEFORE doing any glueing and clamping. you will want to ensure everthing fits together properly and do any needed sanding or filing now.

![image](http://www.gbfans.com/images/pb/multimediamayhem/GBfans trap kit tutorial_ajkit3.jpg)

Step 2:

Assemble the wheel section

Once you have your two axle supports cut to 2.25" and you have drilled and tapped them accordingly you will want to test fit the wheels to ensure there is ample clearance in the slots. Once you are happy with that you can glue them in place and clamp them. You will install the wheels on final assembly.

[![image](http://www.gbfans.com/images/pb/multimediamayhem/GBfans trap kit tutorial_th_ajkit34.jpg)](http://www.gbfans.com/images/pb/multimediamayhem/GBfans trap kit tutorial_?action=view&current=ajkit34.jpg)[![image](http://www.gbfans.com/images/pb/multimediamayhem/GBfans trap kit tutorial_th_ajkit35.jpg)](http://www.gbfans.com/images/pb/multimediamayhem/GBfans trap kit tutorial_?action=view&current=ajkit35.jpg)

You can now put this aside until later in the assembly

Step 3:

**Assemble the trap body. **

The trap handles vertical post fits into the grove in the rear wall of the cartridge, glue the rear wall in place then insert the vertical post

[![image](http://www.gbfans.com/images/pb/multimediamayhem/GBfans trap kit tutorial_th_ajkit5.jpg)](http://www.gbfans.com/images/pb/multimediamayhem/GBfans trap kit tutorial_?action=view&current=ajkit5.jpg)[![image](http://www.gbfans.com/images/pb/multimediamayhem/GBfans trap kit tutorial_th_ajkit7.jpg)](http://www.gbfans.com/images/pb/multimediamayhem/GBfans trap kit tutorial_?action=view&current=ajkit7.jpg)[![image](http://www.gbfans.com/images/pb/multimediamayhem/GBfans trap kit tutorial_th_ajkit6.jpg)](http://www.gbfans.com/images/pb/multimediamayhem/GBfans trap kit tutorial_?action=view&current=ajkit6.jpg)

Once you have this in place you can then attach the side walls

[![image](http://www.gbfans.com/images/pb/multimediamayhem/GBfans trap kit tutorial_th_ajkit8.jpg)](http://www.gbfans.com/images/pb/multimediamayhem/GBfans trap kit tutorial_?action=view&current=ajkit8.jpg)

[![image](http://www.gbfans.com/images/pb/multimediamayhem/GBfans trap kit tutorial_th_ajkit9.jpg)](http://www.gbfans.com/images/pb/multimediamayhem/GBfans trap kit tutorial_?action=view&current=ajkit9.jpg)

Glue ,clamp and let dry overnight

Step 4:

Assemble the rear battery box.

Since you already test fitted your parts all you need to do is glue and stack and then clamp in place

[![image](http://www.gbfans.com/images/pb/multimediamayhem/GBfans trap kit tutorial_th_ajkit10.jpg)](http://www.gbfans.com/images/pb/multimediamayhem/GBfans trap kit tutorial_?action=view&current=ajkit10.jpg)[![image](http://www.gbfans.com/images/pb/multimediamayhem/GBfans trap kit tutorial_th_ajkit11.jpg)](http://www.gbfans.com/images/pb/multimediamayhem/GBfans trap kit tutorial_?action=view&current=ajkit11.jpg)[![image](http://www.gbfans.com/images/pb/multimediamayhem/GBfans trap kit tutorial_th_ajkit12.jpg)](http://www.gbfans.com/images/pb/multimediamayhem/GBfans trap kit tutorial_?action=view&current=ajkit12.jpg)[![image](http://www.gbfans.com/images/pb/multimediamayhem/GBfans trap kit tutorial_th_ajkit13.jpg)](http://www.gbfans.com/images/pb/multimediamayhem/GBfans trap kit tutorial_?action=view&current=ajkit13.jpg)[![image](http://www.gbfans.com/images/pb/multimediamayhem/GBfans trap kit tutorial_th_ajkit14.jpg)](http://www.gbfans.com/images/pb/multimediamayhem/GBfans trap kit tutorial_?action=view&current=ajkit14.jpg)

Let your glue dry overnite before proceeding

If you plan on putting electronics into your trap you will want to bolt the battery box lid on instead of glueing it, you can use 5 - #4 or #6 button head Allen bolts for this (your choice), you may also want to drill the holes for a switch and light in the lid.

[![image](http://www.gbfans.com/images/pb/multimediamayhem/GBfans trap kit tutorial_th_ajkit15.jpg)](http://www.gbfans.com/images/pb/multimediamayhem/GBfans trap kit tutorial_?action=view&current=ajkit15.jpg)[![image](http://www.gbfans.com/images/pb/multimediamayhem/GBfans trap kit tutorial_th_ajkit39.jpg)](http://www.gbfans.com/images/pb/multimediamayhem/GBfans trap kit tutorial_?action=view&current=ajkit39.jpg)[![image](http://www.gbfans.com/images/pb/multimediamayhem/GBfans trap kit tutorial_th_ajkit38.jpg)](http://www.gbfans.com/images/pb/multimediamayhem/GBfans trap kit tutorial_?action=view&current=ajkit38.jpg)[![image](http://www.gbfans.com/images/pb/multimediamayhem/GBfans trap kit tutorial_th_ajkit40.jpg)](http://www.gbfans.com/images/pb/multimediamayhem/GBfans trap kit tutorial_?action=view&current=ajkit40.jpg)[![image](http://www.gbfans.com/images/pb/multimediamayhem/GBfans trap kit tutorial_th_ajkit41.jpg)](http://www.gbfans.com/images/pb/multimediamayhem/GBfans trap kit tutorial_?action=view&current=ajkit41.jpg)

Builders tip:Place a scrap piece of wood behind when drilling so the MDF doesn’t splinter. You will get a much better result.

[![image](http://www.gbfans.com/images/pb/multimediamayhem/GBfans trap kit tutorial_th_ajkit43.jpg)](http://www.gbfans.com/images/pb/multimediamayhem/GBfans trap kit tutorial_?action=view&current=ajkit43.jpg)[![image](http://www.gbfans.com/images/pb/multimediamayhem/GBfans trap kit tutorial_th_ajkit44.jpg)](http://www.gbfans.com/images/pb/multimediamayhem/GBfans trap kit tutorial_?action=view&current=ajkit44.jpg)[![image](http://www.gbfans.com/images/pb/multimediamayhem/GBfans trap kit tutorial_th_ajkit45.jpg)](http://www.gbfans.com/images/pb/multimediamayhem/GBfans trap kit tutorial_?action=view&current=ajkit45.jpg)

Step 5:

Inner cartridge assembly.

Glue the two inner walls in place

[![image](http://www.gbfans.com/images/pb/multimediamayhem/GBfans trap kit tutorial_th_ajkit19.jpg)](http://www.gbfans.com/images/pb/multimediamayhem/GBfans trap kit tutorial_?action=view&current=ajkit19.jpg)

and then the 3 pieces of the front indicator, making sure the parts all sit evenly on all sides.

[![image](http://www.gbfans.com/images/pb/multimediamayhem/GBfans trap kit tutorial_th_ajkit20.jpg)](http://www.gbfans.com/images/pb/multimediamayhem/GBfans trap kit tutorial_?action=view&current=ajkit20.jpg)[![image](http://www.gbfans.com/images/pb/multimediamayhem/GBfans trap kit tutorial_th_ajkit23.jpg)](http://www.gbfans.com/images/pb/multimediamayhem/GBfans trap kit tutorial_?action=view&current=ajkit23.jpg)[![image](http://www.gbfans.com/images/pb/multimediamayhem/GBfans trap kit tutorial_th_ajkit21.jpg)](http://www.gbfans.com/images/pb/multimediamayhem/GBfans trap kit tutorial_?action=view&current=ajkit21.jpg)

You can also glue the gun ears in place ( if adding #6 or #8 bolts (your choice) to the outside of the ears you may want to drill and tap them first for installation of the bolts after painting)

[![image](http://www.gbfans.com/images/pb/multimediamayhem/GBfans trap kit tutorial_th_ajkit36.jpg)](http://www.gbfans.com/images/pb/multimediamayhem/GBfans trap kit tutorial_?action=view&current=ajkit36.jpg)[![image](http://www.gbfans.com/images/pb/multimediamayhem/GBfans trap kit tutorial_th_ajkit37.jpg)](http://www.gbfans.com/images/pb/multimediamayhem/GBfans trap kit tutorial_?action=view&current=ajkit37.jpg)

Step 6:

Mount the handle.

I recommend using a #10 x 1 1/4" long Allen bolt to mount the handle.You will want to drill a thru hole in the handle (13/64") and drill and tap for a #10 bolt in your vertical post. (5/32" drill for #10 tap) Builders Note: Since you are drilling and tapping into the end grain of the MDF be sure you pre-drill the hole to a depth slightly more than you need, MDF splits very easily so be careful when putting in the bolt.

[![image](http://www.gbfans.com/images/pb/multimediamayhem/GBfans trap kit tutorial_th_ajkit26.jpg)](http://www.gbfans.com/images/pb/multimediamayhem/GBfans trap kit tutorial_?action=view&current=ajkit26.jpg)[![image](http://www.gbfans.com/images/pb/multimediamayhem/GBfans trap kit tutorial_th_ajkit46.jpg)](http://www.gbfans.com/images/pb/multimediamayhem/GBfans trap kit tutorial_?action=view&current=ajkit46.jpg)

Step 7:

Remember safety when dealing with dust and paint fumes, wear the proper PPE
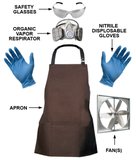
image

Prep for paint.

At this point, once all your glue is dry you will want to do your prep work for painting. Since MDF is pourous you will need to seal it, this can be done in a number of ways.

  1. Brush wood glue onto all exposed edges

  2. Use wood filler on all exposed edges

  3. Shellac or other clear sealer

Once you have sanded the wood smooth and sealed it you can go onto priming and then painting. You may need several coats to get good coverage and may also require sanding with finer sandpaper in between coats before you put your finish coat on. Plan ahead for the result you want to acheive.

Once your parts are all painted you can move onto installing your accessories, here’s what you will need:

Cosmetic plating (aluminum or painted styrene)

[![image](http://www.gbfans.com/images/pb/multimediamayhem/Metal parts_th_015.jpg)](http://www.gbfans.com/images/pb/multimediamayhem/Metal parts_?action=view&current=015.jpg)

Socket cap Allen bolts for mounting plating, resistor, vector plate

TBA

Vector plate (resin or metal)

[![image](http://www.gbfans.com/images/pb/multimediamayhem/Metal parts_th_P026.jpg)](http://www.gbfans.com/images/pb/multimediamayhem/Metal parts_?action=view&current=P026.jpg)

Cal-R resistor

[![image](http://www.gbfans.com/images/pb/multimediamayhem/Metal parts_th_P045.jpg)](http://www.gbfans.com/images/pb/multimediamayhem/Metal parts_?action=view&current=P045.jpg)

Side rods ( wood dowel or metal) 1/2" x 3" long

[![image](http://www.gbfans.com/images/pb/multimediamayhem/Metal parts_th_P102.jpg)](http://www.gbfans.com/images/pb/multimediamayhem/Metal parts_?action=view&current=P102.jpg)

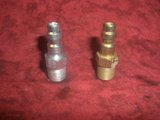
Foster 22-2 coupler

image

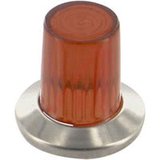
Light bezel

image

Switch

A SPST or DPDT toggle switch to control your lights

Trap knobs

[![image](http://www.gbfans.com/images/pb/multimediamayhem/Resin parts_th_002-2.jpg)](http://www.gbfans.com/images/pb/multimediamayhem/Resin parts_?action=view&current=002-2.jpg)

V-hook

[![image](http://www.gbfans.com/images/pb/multimediamayhem/Metal parts_th_P005.jpg)](http://www.gbfans.com/images/pb/multimediamayhem/Metal parts_?action=view&current=P005.jpg)

Wheels

[![image](http://www.gbfans.com/images/pb/multimediamayhem/Metal parts_th_P123.jpg)](http://www.gbfans.com/images/pb/multimediamayhem/Metal parts_?action=view&current=P123.jpg)

Decals

Finished trap, Dec. 8th

[![image](http://www.gbfans.com/images/pb/multimediamayhem/GBfans trap kit tutorial_th_014.jpg)](http://www.gbfans.com/images/pb/multimediamayhem/GBfans trap kit tutorial_?action=view&current=014.jpg)

[![image](http://www.gbfans.com/images/pb/multimediamayhem/GBfans trap kit tutorial_th_013.jpg)](http://www.gbfans.com/images/pb/multimediamayhem/GBfans trap kit tutorial_?action=view&current=013.jpg)

[![image](http://www.gbfans.com/images/pb/multimediamayhem/GBfans trap kit tutorial_th_009.jpg)](http://www.gbfans.com/images/pb/multimediamayhem/GBfans trap kit tutorial_?action=view&current=009.jpg)

[![image](http://www.gbfans.com/images/pb/multimediamayhem/GBfans trap kit tutorial_th_008.jpg)](http://www.gbfans.com/images/pb/multimediamayhem/GBfans trap kit tutorial_?action=view&current=008.jpg)

[![image](http://www.gbfans.com/images/pb/multimediamayhem/GBfans trap kit tutorial_th_007.jpg)](http://www.gbfans.com/images/pb/multimediamayhem/GBfans trap kit tutorial_?action=view&current=007.jpg)

[![image](http://www.gbfans.com/images/pb/multimediamayhem/GBfans trap kit tutorial_th_012.jpg)](http://www.gbfans.com/images/pb/multimediamayhem/GBfans trap kit tutorial_?action=view&current=012.jpg)

[![image](http://www.gbfans.com/images/pb/multimediamayhem/GBfans trap kit tutorial_th_011.jpg)](http://www.gbfans.com/images/pb/multimediamayhem/GBfans trap kit tutorial_?action=view&current=011.jpg)

[![image](http://www.gbfans.com/images/pb/multimediamayhem/GBfans trap kit tutorial_th_010.jpg)](http://www.gbfans.com/images/pb/multimediamayhem/GBfans trap kit tutorial_?action=view&current=010.jpg)

![image](http://www.gbfans.com/images/pb/multimediamayhem/GBfans trap kit tutorial_006.jpg)

Now THAT’s how you do it. :slight_smile:

Great job, man. :crunch:

Great job!

Awesome job so far! I’m gonna work on mine this weekend, I’m sure I’ll peek back at this.

Well done!

Leave it to the professional to show us how to do it right.

Got my kit yesterday and dry fitted it last night.

I will start glueing tonight.

Cheers

Sebastian

2nd post updated Dec 8th

Finished trap

Overall the kit went together quite easily, the only issues to note were the problems with drilling and tapping into the grain of the MDF where splitting can easily occur. Places to note: square post where round handle mounts, face of front indicator where cosmetic plate mounts to. Due to the nature of MDF the end grain is the weakest point and you need to take extra precautions when drilling and tapping.

For this build I used:

    • painted styrene cosmetic plating
  • real aluminum side rods and Cal-R resistor

  • resin cast vector plate and trap knobs

  • real Allen bolt hardware used throughout

  • real roller bearing wheels

  • real Foster brass 22-2 coupler

  • real flat profile toggle switch and LED bezel

I did replace the rear battery cover with a thinner styrene one, the MDF one made for difficult installation of the switch and the tolerances were a bit tight once painted. Either method can be used with good results.

![image](http://www.gbfans.com/images/pb/multimediamayhem/GBfans trap kit tutorial_006.jpg)

A few words of advice:

The rear box cover (with the switch and indicator) and small metal plates should use size #4 screws instead of the size #6 you recommend.

The ears and large metal plates should have #6 instead of #8, as well.

Aside from that minor nitpick, the kit turned out pretty

Thanks, I added that info into the tutorial.

B-E-A-U-TIFUL! Great build! Great looking trap! I’ll be referring back to this, int he future! :cool: :crunch:

Colin, you are one of the more experienced true Ghostheads around here. You’re stuff looks great and thanks for showing us how it’s done.

That’s how it’s done!

is it all one piece?

Did you not see the first post or are you asking if the trap has a removable cartridge?

Sent from my SCH-I500 using Ghostbusters Fans on Android

Im waaaay late to this. Is a kit like this still made? Where i can put it together?