My own Containment Unit (I'm inspired...)

Okay, I’ve wanted to build an ECU for a while that we can use at conventions and other events… and Hell’s Inc.'s build has finally lit the fire under my butt to get busy.

I thought I’d start a thread of my own, in case anyone’s interested in following a second ECU thread with slightly different methods.

I want to underscore the fact that I think chibigear’s build is AWESOME!

I’m just taking a different approach to my build.

To start, I looked at reference photos, same as chibigear did, and I came up with measurements that fit my needs. I drew it all out on paper, made my cut list, and headed over to Home Depot for lumber only (at this time).

I bought one sheet of .322" sanded plywood and three 1" x 6" x 8’ pine boards. I had the store cut the plywood down to the overall sizes of the “main/back plate” and the face of the “body” of the unit (that way, it would fit into our vehicle for the trip home).

First, I cut the lower part of the “main/back plate” using a jigsaw. Then, I chopped the pine boards down to make the sides and braces for the “body” part of the ECU. This far, everything is put together with only wood glue and finish nails (a pneumatic nail gun saved a lot of time).

![image](http://www.gbfans.com/images/pb/coryalex/Ecto Containment Unit_1.jpg)

Then, I chopped the pine boards down to make the sides and braces for the “body” part of the ECU. This far, everything is put together with only wood glue and finish nails (a pneumatic nail gun saved a lot of time).

![image](http://www.gbfans.com/images/pb/coryalex/Ecto Containment Unit_2.jpg)

![image](http://www.gbfans.com/images/pb/coryalex/Ecto Containment Unit_3.jpg)

Here’s a view inside the “body” of the unit… I braced it so I would have good strength for the door while trying to keep the upper chamber open for wiring the electronics.

![image](http://www.gbfans.com/images/pb/coryalex/Ecto Containment Unit_4.jpg)

Here are my pencil outlines for the door opening and door itself. I left 1" overlap for the door to cover its opening when I’m done. Yes, it’s off center, because I wanted it that way. In some of the reference photos, it looked like the side with the handle had more room, and it will work better to give myself more room to rig a mechanism to hold the handle in the up or down position.

![image](http://www.gbfans.com/images/pb/coryalex/Ecto Containment Unit_5.jpg)

I cut the door opening using a Formica Finishing tool on my router. It has a ball bearing on the end that traced right along the inner frame and cut the door opening exactly the same dimensions as the bracing for a flush fit.

![image](http://www.gbfans.com/images/pb/coryalex/Ecto Containment Unit_6.jpg)

![image](http://www.gbfans.com/images/pb/coryalex/Ecto Containment Unit_7.jpg)

![image](http://www.gbfans.com/images/pb/coryalex/Ecto Containment Unit_8.jpg)

After working on this project for one weekend (off and on for a few hours, here I am.

![image](http://www.gbfans.com/images/pb/coryalex/Ecto Containment Unit_9.jpg)

Going forward, I will finish up rough fitting all the pieces together. Once all the major components are present, I’m going to sand heavily, then I will use a large putty knife to cover all the surfaces lightly with body filler to fill in all the imperfections in the wood. That should take care of any wood grain patterns, big blemishes, or seams. Once that’s cured and sanded, I am going to brush the entire unit with fiberglass resin to provide the unit with a surface free from any organic patterns… I’m hoping this technique will yield a surface that will look like steel when it’s painted.

I’m open to suggestions, criticism, and any other help the boards might have to offer.

I will post progress photos as I go forward.

I’m most excited about the method I’ve devised to display this prop… I don’t want to say too much, but I hope I’m able to execute in reality as well as it’s come together in my mind. (that project will be part of this one… but I won’t start on it until I’m about done with the ECU itself)
I like it, great start so far

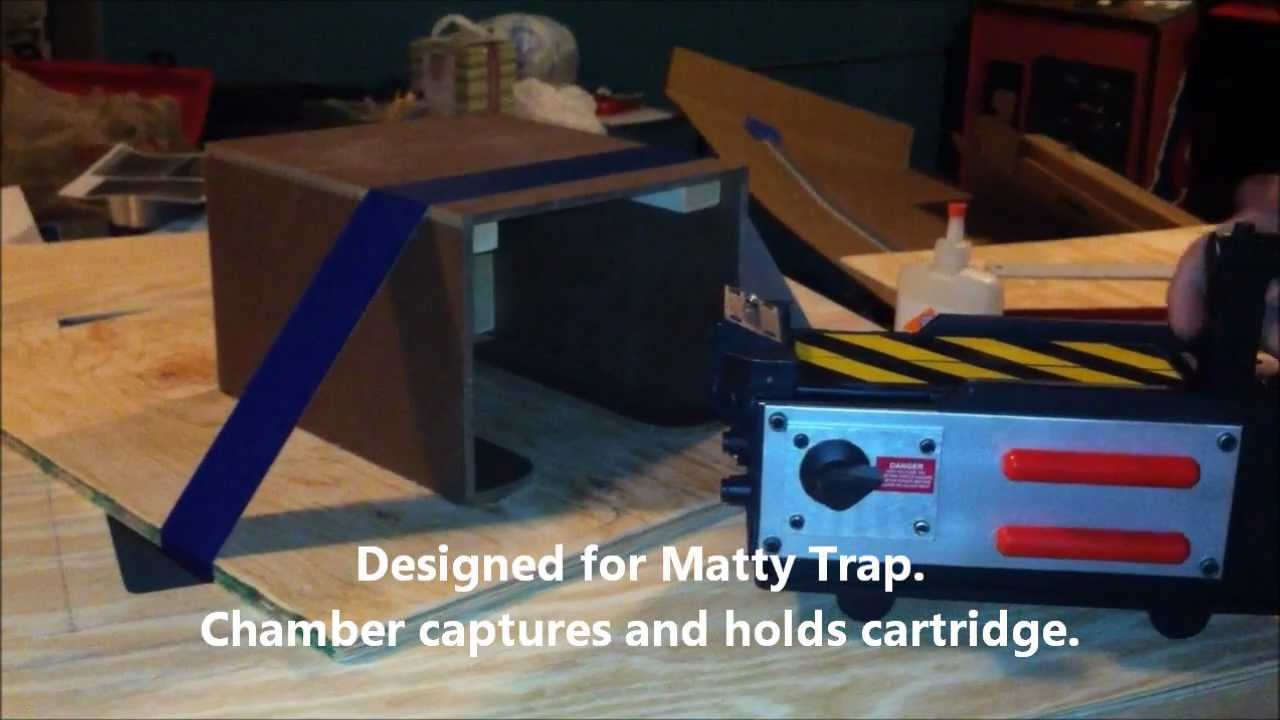
Update: Tonight, I worked on building the “chamber” inside the door of the ECU… and working on fabricating a proper handle for the door. I know lots of people don’t like the Matty Trap for one reason or another… but its availability has kind of made it the “standard” trap GB costumers will have with them. So, I decided to build my ECU’s “chamber” around the Matty Trap. Given this, I was determined to make my ECU capture and hold the cartridge, just like in the film. I devised a plan and executed it.

Here is a YouTube video of the “chamber” in action. (the duct tape is only there until the glue holding all the panels together cures.

Here are some photos of tonight’s progress, too.

Internals of the ECU “chamber.” The pin in the back activates the “cartridge release” button on the Matty Trap.

![image](http://www.gbfans.com/images/pb/coryalex/Ecto Containment Unit_IMG_1271.jpg)

Internals of the ECU “chamber.” The rail on top near the back applies pressure to the LED display portion of the Matty Trap to hold the cartridge in place, so the body of the Trap can be pulled free while the cartridge remains in the “chamber.”

![image](http://www.gbfans.com/images/pb/coryalex/Ecto Containment Unit_IMG_1274.jpg)

Internals of the ECU “chamber” with the top in place.

![image](http://www.gbfans.com/images/pb/coryalex/Ecto Containment Unit_IMG_1278.jpg)

I think I found the perfect ECU handle. This item was under $4 at ACE Hardware.

![image](http://www.gbfans.com/images/pb/coryalex/Ecto Containment Unit_IMG_1280.jpg)

I used a Dremel to get the basic shape of the handle (took about 10 minutes).

![image](http://www.gbfans.com/images/pb/coryalex/Ecto Containment Unit_IMG_1281.jpg)

I used Apoxie epoxy putty to get the rough shape of the final handle. Once this cures, I will grind/sand it into shape.

![image](http://www.gbfans.com/images/pb/coryalex/Ecto Containment Unit_IMG_1284.jpg)

For the utility light fixtures, I’m thinking of using the tall, plastic cups (without handles) that you can get with the Magic Bullet blender machine. They’re just about the right size, and they’re a LOT cheaper than vintage utility light fixtures. (just use a low wattage bulb, so as not to melt the plastic).

I’m open to recommendations. :slight_smile:

For all of you, the magic bullet cups seem to be the Best ones for Containment Unit projects. The Matty Unit’s lights are 5.4-5.6mm wide, and that times 12 makes the 3 inch wide MB cups just wide enough. I have ordered a set of these, thanks to pOOpTarT for the ebay link.

They will ship from Germany, and as soon as I get them, be prepared for update on The Hell’s Inc. Containment Unit as well. I will start doing the plans on it this weekend.

I got mine ordered, too! Cost was under $13 shipped for two of them. That’s sure cheaper than buying vintage glass & metal fixtures (plus, they’ll be lighter and a little harder to break when I transport this thing).

That is looking good!

Okay, here’s an update on my progress.

My pushbuttons arrived I ordered off of eBay for $12 total (including shipping):

![image](http://www.gbfans.com/images/pb/coryalex/Ecto Containment Unit_3-1.jpg)

For the big utility lights, I’m going to use Magic Bullet blender cups. They’re just about exactly the right size, and you can’t beat the total price from eBay of $12 (including shipping). When I build these up, I plan on using wire to fabricate the “cage” around each housing. I also want to rig super-bright white LEDs inside colored glass bulbs for the red and green lights.

![image](http://www.gbfans.com/images/pb/coryalex/Ecto Containment Unit_3-2.jpg)

Here’s a shot of the inside of the door assembly. The “gasket” is made from gray foam gym mats. I cut the mats with an electric knife and assembled the panels with Goop. The “lines” in the gasket were cut by hand to appear more “fluid” than hard and straight.

![image](http://www.gbfans.com/images/pb/coryalex/Ecto Containment Unit_3-3.jpg)

Here’s the chamber all primed.

![image](http://www.gbfans.com/images/pb/coryalex/Ecto Containment Unit_3-4a.jpg)

Here’s the primed door assembly with the painted “gasket” in place. I painted the gasket with Plasti-Dip spray paint to make it look more like black rubber… it came out nice.

![image](http://www.gbfans.com/images/pb/coryalex/Ecto Containment Unit_3-5.jpg)

Here is the body of the unit ready for patching, sanding, and painting. Before I do much more, I need to build and install the handle, cut holes for the instruments/buttons, and get it attached to the main plate, so I can cut holes for hooking everything up from the back.

![image](http://www.gbfans.com/images/pb/coryalex/Ecto Containment Unit_3-6.jpg)

Here is the main back plate primed and ready for patching, sanding, and painting.

![image](http://www.gbfans.com/images/pb/coryalex/Ecto Containment Unit_3-7.jpg)

Here is my (nearly) finished door handle. I am still working out a solution to attach it to the door in a manner I can still flip it out and twist for accuracy.

![image](http://www.gbfans.com/images/pb/coryalex/Ecto Containment Unit_3-8.jpg)

Wow that red is intense!

Keep up the updates!

Update…

Here’s the inside of the lower curved part. Sides are 1" x 6" pine, face is 3/16" Masonite board… it bends really well, but is firm.

![image](http://www.gbfans.com/images/pb/coryalex/Ecto Containment Unit_IMG_1311.jpg)

I made my “dump handle” from 3/4" curtain rod cut at 45 degree angle, hole drilled and countersunk for screw.

![image](http://www.gbfans.com/images/pb/coryalex/Ecto Containment Unit_IMG_1313.jpg)

![image](http://www.gbfans.com/images/pb/coryalex/Ecto Containment Unit_IMG_1314.jpg)

The body needed to be square, I used aluminum flashing to make the body… then I packed it with Apoxie. I also used Apoxie to transition from the rod shape to the square shape. I’ll sand smooth and paint.

![image](http://www.gbfans.com/images/pb/coryalex/Ecto Containment Unit_IMG_1315.jpg)

Apoxie ground and sanded smooth… turned out nice.

![image](http://www.gbfans.com/images/pb/coryalex/Ecto Containment Unit_IMG_1317.jpg)

Installed…

![image](http://www.gbfans.com/images/pb/coryalex/Ecto Containment Unit_IMG_1330.jpg)

For now, the dump handle is rigged with an elastic band to make it stay in the up position… I need to work on making it stay in either up or down position… but whatever.

![image](http://www.gbfans.com/images/pb/coryalex/Ecto Containment Unit_IMG_1332.jpg)

Painted dump handle… finished just like I wanted.

![image](http://www.gbfans.com/images/pb/coryalex/Ecto Containment Unit_IMG_1338.jpg)

I reworked the door handle to make it function properly. The gold bolt will fit flush inside the door (countersunk under a label). This allows the handle to flip out AND turn. YAY!

![image](http://www.gbfans.com/images/pb/coryalex/Ecto Containment Unit_IMG_1342.jpg)

Hinges for door. Glued to door with Goop, bolted to body.

![image](http://www.gbfans.com/images/pb/coryalex/Ecto Containment Unit_IMG_1333.jpg)

I added trim pieces to the door… and you can see the countersunk gold bolt that will hold the handle.

![image](http://www.gbfans.com/images/pb/coryalex/Ecto Containment Unit_IMG_1348.jpg)

Door installed. I couldn’t find or fabricate the kind of door holder rods I wanted, so chain will have to do for now. I might paint some tubing silver and slip it over the chain for a more accurate look, later.

![image](http://www.gbfans.com/images/pb/coryalex/Ecto Containment Unit_IMG_1352.jpg)

Mockup of the unit assembled. Ring around handle is 1" x 6" pine cut to shape with a scroll saw and rounded edges using a small router.

![image](http://www.gbfans.com/images/pb/coryalex/Ecto Containment Unit_IMG_1359.jpg)

Electrical gauge and 3 lighted buttons mocked up. These panels were a snap to make… went very quickly.

(I chose to use a 12v gauge, even though it’s not accurate, because, I can wire it into the systems running the lights… since I’m sticking to a 12v source.)

![image](http://www.gbfans.com/images/pb/coryalex/Ecto Containment Unit_IMG_1361.jpg)

I assembled all the parts with wood glue and finish nails. Feels very solid, but not too heavy.

![image](http://www.gbfans.com/images/pb/coryalex/Ecto Containment Unit_IMG_1363.jpg)

3 little panels and the ring around the door handle… ready for primer.

![image](http://www.gbfans.com/images/pb/coryalex/Ecto Containment Unit_IMG_1366.jpg)

Everything primed and waiting for hammered undercoat tomorrow. (I’m opting for the hammered finish to further hide the wood grain and other surface boogers associated with wood construction). Wish me luck!

![image](http://www.gbfans.com/images/pb/coryalex/Ecto Containment Unit_IMG_1368.jpg)

Looks great man! Good luck with the paint job, that one will look even better in red!

I cannot wait to see this baby finished. So far it looks awesome. I could see you getting requests to duplicate this thing for some of the larger franchises.

As far as the door closure rods have you tried looking up pnuematic(s) on the net? Just a thought.

Keep up the great work.

Yeah, I thought about using a pneumatic rod system for the door, but I couldn’t find one of a length I liked. :frowning: I’ll keep looking, though.

I realized I should probably fabricate the mounts for the big red & green lights before painting final coats. I’ll be hitting the hardware store for flanges and conduit fittings, as the lights will have to be (inaccurately) mounted to the top of the unit, since it won’t be permanently mounted to a wall. I plan on having conduit come out of the top of the unit then make a u-turn at the top, and fitting the light enclosures (and LEDs) to them in place.

Honestly, I could fabricate and install these later… we’ll see what direction I go. I’m just happy it’s coming together.

Here are the rigs I’ve constructed for the big red and green lights. Yes, they’re not accurate (Magic Bullet blender cups)… but they should work great. I’m going to get one red and one green light bulb, break off the glass part, and replace the “guts” with a super-bright LED, so I can stay with my 12v power source. Wish me luck.

![image](http://www.gbfans.com/images/pb/coryalex/Ecto Containment Unit_IMG_1371.jpg)

![image](http://www.gbfans.com/images/pb/coryalex/Ecto Containment Unit_IMG_1373.jpg)

Here are some various photos of my ECU being painted with red oil-based enamel paint. One coat isn’t covering the wood grain the way I hoped, so I will be applying a 2nd coat tomorrow night. The can says I can recoat within 24 hours, and this thing needs it. Once everything’s normalized, I’m going to top coat using a rattle-can for uniform coloring and further hiding of boogers in the paint. I want it to look great!

![image](http://www.gbfans.com/images/pb/coryalex/Ecto Containment Unit_IMG_1375.jpg)

![image](http://www.gbfans.com/images/pb/coryalex/Ecto Containment Unit_IMG_1378.jpg)

![image](http://www.gbfans.com/images/pb/coryalex/Ecto Containment Unit_IMG_1379.jpg)

![image](http://www.gbfans.com/images/pb/coryalex/Ecto Containment Unit_IMG_1380.jpg)

![image](http://www.gbfans.com/images/pb/coryalex/Ecto Containment Unit_IMG_1382.jpg)

![image](http://www.gbfans.com/images/pb/coryalex/Ecto Containment Unit_IMG_1385.jpg)

Looks great. Can’t wait to see the finished result.

I’m now glued to this thread.

oh wow!

I’m figuring out the lights now. I want the following…

  • white light inside the trap chamber

  • 3 buttons to light (red and yellow when you press them, and green to stay lit)

  • large “bulbs” to light depending on “dump” handle position

I may see about getting someone to program the entire sequence on an arduino, so I can wire all the lights and necessary switches to make it “work” properly… but for now, it will be a little more “static” and less interactive.

Oh, and I’m using an inaccurate electrical meter on the front panel for a reason. I’m going to use a 12v DC meter, so I can actually hook it up to the system to monitor power. The needle should jump a little when different lights/switches are activated. I hope it turns out as cool as I am hoping. :blush:

I’ve decided to use a 12v 2amp power adapter and not use a battery-based solution at all. I should only be using this prop at locations where power is available, anyway.

Okay, structurally, I’m done. Here’s what’s left to do…

  • decals/labels

  • electronics (lights)

  • trim pieces (inside door, angled box on right side, small box and ribbon cable near top, etc.)

Here are photos for this update:

Small panels anchored with Goop and socket head bolts, fake rivets (made from wooden plugs) added and secured, fake bolt heads (made from real nuts, washers, and Apoxie) added and secured.

![image](http://www.gbfans.com/images/pb/coryalex/Ecto Containment Unit_7-1.jpg)

Closeup of fake panels before trim added.

![image](http://www.gbfans.com/images/pb/coryalex/Ecto Containment Unit_7-2.jpg)

Closeup of fake bolt heads. For these, I combined a nut and a washer by packing them full of Apoxie epoxy, then sanding the top and bottom flat with an orbital sander. These are affixed with Goop adhesive and painted in place.

![image](http://www.gbfans.com/images/pb/coryalex/Ecto Containment Unit_7-3.jpg)

Closeup of fake rivets. I bought 3/4" wooden plugs, then I cut the bottoms of the plugs off, so I could affix just the top halves of the plugs with Goop adhesive. Worked great!

![image](http://www.gbfans.com/images/pb/coryalex/Ecto Containment Unit_7-4.jpg)

Here are my Magic Bullet tall cups. The “before” cup is on the left. The “after” cup has had all the extra tabs Dremel’d off. I kissed the rough areas left from cutting with a propane torch to make the plastic transparent again. Worked great (and these were only $3 each!)

![image](http://www.gbfans.com/images/pb/coryalex/Ecto Containment Unit_7-5.jpg)

Trim pieces affixed to small panels. The gauge is a 12v DC meter which I will hook up to my actual electrical system. The knobs turn, but they do nothing. The 3 buttons will light up. Green will be steady on while the red and yellow will light when pushed.

![image](http://www.gbfans.com/images/pb/coryalex/Ecto Containment Unit_7-6.jpg)

Here’s the assembly hung up on my wall. I hung it with two heavy screws in the studs. I was able to hang it by myself, so I’m guessing it’s under 35 pounds or so… as it was pretty easy to move around.

![image](http://www.gbfans.com/images/pb/coryalex/Ecto Containment Unit_7-7.jpg)

Here’s a shot of the unit with the white border added on the door. I used reflective safety tape… it only glows like this if a flash is used. (I used the same type of tape, but red, on my N-filter… it glows when a flash is used… makes for neat photos).

![image](http://www.gbfans.com/images/pb/coryalex/Ecto Containment Unit_7-8.jpg)

Here’s another shot of the front of the unit taken using no flash.

![image](http://www.gbfans.com/images/pb/coryalex/Ecto Containment Unit_7-9.jpg)

I can’t wait to finish out the remaining “to-do” items and get the electrical installed. I’ve got the button wiring done, but I don’t want to install until I have everything ready to go. It might be a few days until my next update, but I will post when I make some more progress.

:crunch: I have said this before and I will say it again… THIS IS SEXY! Can’t wait to see this in person, my friend.