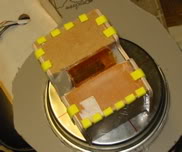
Was looking for alittle more information for constructing the upper portion of my proton pack, (Booster box, and such.) Pretty much every component at the top of the pack. I have looked at the plans on the sight and was just wondering if anyone has any advice or tricks of the trade that they could help me out with. Any input would be helpful, pictures and plans can only tell you so much. I am really looking for pictures of the pieces assembeled but not installed, if that makes any sense.
Yeah, it’s a bit hard to help you when we don’t know what you know, ya know?
Have you looked at the numerous build threads in this section? They should give you pretty much everything you need to know. If you have then what specific questions do you have or what are you having trouble with? Everything’s pretty straight forward, best thing to do is just jump in, worst that can happen is you get good at it and wind up making more than one.
All right so this is where I am at so far. I have a wood mother baord. The Cyclotron is made of high density foam (the pink stuff.) I had a Cyclotron band made from wood. I have a resin cast ion arm tower and a resin cast HGA. I was thinking of useing a studio creations upper portion vacum formed, $35.00, with that I was thinking the pros woul be hollow body, for light
kits and other stuff later on down the road, like a sound kit. My father in law is a jack of all trades fix-it-man. So I am working with my tool collection and his tool shop. Thats the only part that I got lucky with!
What do you guys think, good Idea or not. Anyone have any advice on studio creations’ vacum formed proton pack kits? I am hoping that it’s not made from the crappy plastic they used to make holloween masks with from back in the day.
I hate to say it but you probably aren’t going to find much help this way. All the questions that you have were answered throughout various threads. You really need to go Community > Equipment > Proton Packs and do a little searching. Hope that helps
I’m not entirely sure as your post was a bit of a wall of text but I think the question you asked was opinions on a studiocreations shell. Overall the best thing that can be said is it’s a cheap option. It won’t be the most accurate or the most detailed but it’s a decent enough option if you don’t want to scratchbuild and don’t want to pay big $ for accurate parts.
Yeah, I am not sure about the shell. It’s light weight, hollow, good for hiding any electronic extras. I not sure if it is strong enough for me to mount the other parts onto it though. I want to build the booster box and all the other stuff my self to get it as close to the the real deal. I am not close minded on this, I am seeking any advice for the upper prtion of the pack build. It’s hard working with my father in-law due ro not being able to show what this pieces look like assemble, just not installed.
Those are some awsome shots of the pieces. That will help me and Dave understand the shape and dimensions. to you have a shot of the piece between the ion tower and the booster box. I am pretty sure that is just a piece of pipe that sits between them and has a booster frame over it, right. your pics are the best as far as sections constructed and documented before mounting. If you have any others that would help me out. Also what did you use for the booster box detail trim the long peiced with squares at the edge. What was you approach to that part of the build. Thats the only part that makes me question my ability to construct the pieces accurately.
I will post a picture of what I am working on so far. I have to figure out what I am going to use for the pacer plating tha goes above the cyclotron and in between the upper parts of the pack.
There is a layer between the cyclotron, between the clippard and the ribbon cable. Actually, right in the middle of the pack. Look at the PPD sticker, then look left and down. I was think of using H/D pink foam to cut that pattern from the plans and using it. what do you think. Tried to produce a booster box today from a wood block. Didn’t work out to well. I made it by the measurements on the stephens plans (5" by 6" by 4.5") looks huge. The guy from Studio creations got back to me and told me that from his builds and others, he has not heard of a shell caving in yet. Said they are pretty strong and I should be able to mount all the other parts to it.
So as of right now I still don’t know if I want to build all my own parts or just use the upper shell to build off of. AHHHHHHH!
Yes, sorry. Still not good with all the terms, it’s very annoying for you I am sure. But yes, I was thinking of using the sheets of H.D foam board for that. You think thats a good idea?
I already have a motherbaord w/ cyclotron. I didn’t want to spend another 35$ on a part I already had. So it will be half shell, had scratch build. It’s a monster!
hey there! I’ve built scratch “junk” packs from this and that and resin packs. With a proton pack, it’s time and money. Spend more money (i.e. I just bought a proton pack on Ebay for $2000 and it makes coffee, too!) or scratch build it (Mom, we really don’t need this gas line behind the stove, do we?) So, if you have a jack of all trades guy willing to help you out, I’d look at ALL the plans, print pics from the reference section and go to town. We have all screwed up here. I doubt there is anyone who made a perfect pack the first time without any boo-boos (I put my motherboard on backwards and had everything glued down LOL). Sounds like you are off to a good start. If you are building light, you probably wouldn’t want to go with wood. I made my upper sections from scratch from old cigar boxes I got for free.
Thanks man, all info and stories help me out. Yeah I cut a booster box from a 5X5 post. That was def too heavy and made me realize that what ever I choice to use for the upper section of the pack had to be equal and balanced or it was going to make it lop-sided, and uncomfortable. So I think I am going to cut out all the parts from the wood they build remote controled airplans. It’s a little stronger then balsa, and with re-enforced points should be good.
I am tring to figure out at what point during this build would be a good time to install light kits. I am aim’n for a kit for the power cell, the cyclotron and the wand (a.k.a gun .) I want to wire them together to run off a single power source put I heard that they may not be a good Idea. But that is a ways a way. I really have to get some pictures up so people can se what I am working with.