The stitching on my LC1 straps are lopsided also. Trust me. No one will notice.
Ok, 2014 is in full swing and it’s time to start this bad boy.
Disclaimer: Many stupid questions soon to follow and many many photos will be added.
Many parts have come in and I will try to say who or where they came from but if I forget to mention, please feel free to ask. I’ll try to break up the posts that are pic heavy into smaller chunks.
First up is my Gbfans shell and mother board. They look pretty good! A few little chips in the (gel coat?) I think it’s called but nothing that can’t be filed in. I am a little bummed about this part though. I don’t know if the mold for the shell isn’t hold up well, or if this is normal warping or who knows what, but the shell and mobo don’t line up that well at the top. See the follow photos. Maybe this is just how it is.
When I line the bottom up it looks good.
The sides look good too.
Here is where it starts to go a little wonky.
Thoughts? I tried lining it up at the top and it’s worse on the bottom. I figure if I have to trim, the top will be easiest. The little tier thing at the top doesn’t look fun to trim down.
I’ve got a good 1/4" or 6mm for you fellow Canadians of overhang at the top.
So I lined up the shell to the best position I can and traced it out onto the mobo. Not sure how well the lines are visible in the photos.
I moved it up a little higher so the bottom has about 1/16" over lap.
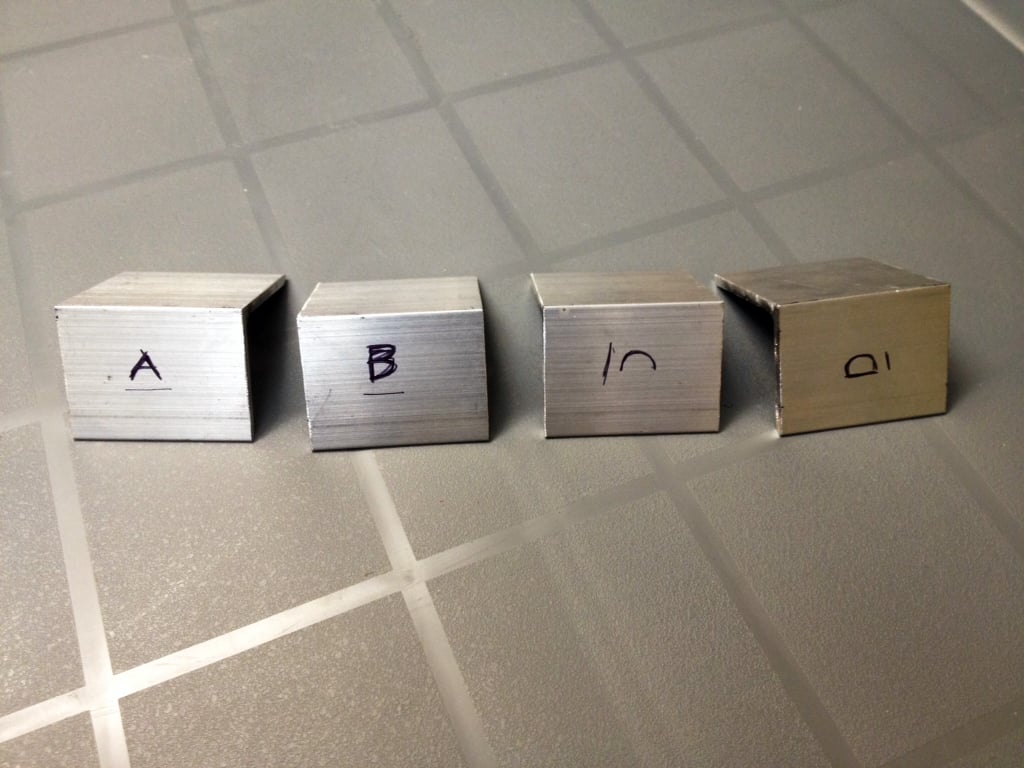
I picked up a set of L brackets from Eric (Ejgunth87) and they came in 2 days ago. That’s what finally got me off my butt to start something whilst I wait for Vin’s aluminum parts to arrive. I want to get the shell mounted and, make the spacer and get the mobo mounted to my frame and then I’ll at least feel like I’ve done something rather then just stare at the large pile of parts and boxes growing in my living room. Btw, basement too cold, and garage too cold so I’m building in my kitchen. Probably going to be a few nights of take out because I don’t feel like moving this out of the way. That’s ok, I wish I could find Chinese food in those little white box containers. It would just feel right if I could.
ANYWAY… So I placed the brackets down and taped them up really good and did a test fit. A little too low on the bottom 2 so I readjusted and (Video)Bob’s (hopefully NOT) your uncle and it fits great. Marked them off and labeled which bracket goes where because I’m OCD like that. Next the drilling and tapping which I’ve never done before. Or used a rivet gun before. Hopefully I don’t rivet my hand to the mobo…
Photos…
1 Like
Ah ■■■■!! I knew it would happen!
Just kidding!! Don’t worry, I’ll tell you when there is real blood. This was when I was making some fake blood for a photo shoot.
This isn’t from the shoot but I had lots of it so I decided to take a quick selfie!
Rivet guns aren’t that hard to use, just make sure you keep pressure on the rivet as you tighten it up.
The aluminum should tap easy, just go slow and use oil. If it binds up, back it off a little bit to clean the filings out of the threads. 
I can’t speak for anyone but myself, but the hardest part is always getting started.
mmm…blood. Finger wounds really bleed like that; don’t ask me how I know cough crushed a finger tip /cough :mrgreen:
I was going to drill and rivet the l brackets tonight but just in case I should need to trim the top of the mobo, I’ll leave them off until after. It may make it easier. Plus my drill battery is taking a long time to charge.
I need to drill out the holes at the bottom a bit to fit the MMM Alice frame mounting bolt through but I did notice the washer and the L bracket will hit so I’ll need to clip the corners on the L brackets first too.
A question about the mounting hardware. I did a test on the frame and is there supposed to be a gap between the frame and the first washer? The washer doesn’t fit around the square part of the bolt and I’m thinking it’s going to not be tight when I attach the mobo. Here is a phot of the gap.
Should the hole in the washer fit around the square part or is it supposed to have that 1/16" gap?
I can’t test until the morning once I drill out the hole on the mobo a bit.
I’ve seen a few myself. Luckily they were not attached to my hands.
The blood was tasty… Corn syrup, red food dye and the secret… Chocolate sauce. You have to have the chocolate to make it the right colour or it goes too pink. Plus, you can’t use regular red food colouring. I had to get industrial strength concentrated red food dye.
hey Jay, great thread bro, I’ll def. be watching this as I’m waiting on my shell/mobo to arrive so I can begin my build.
Before you mount that…
maybeeee see if you can source some of the proper L bracket metal…


It’s a lot thicker than the L brackets you are using but also cut thiner in width. The stuff you are using is whats been around for the longest time before more reference pictures came out showing what was used.. Some people like Vince and Venky are starting to offer the correct l brackets.
The problem with what’s currently mass available is it’s easier to strip your thread because of the thin thickness of the metal.
One suggestion if you were to use what you currently have would be to trim the excess width off them, measure the distance of 2 large flanged rivet heads held side my side then use that as a guide on how much metal you can trim away from your bracket…
Just food for thought.
Thanks Julz! Please don’t hesitate to stop me from doing something wrong, or dumb, or outrageous! That goes for everyone in this amazing community. I have no ■■■■■■ idea what I am actually doing and reading all the different threads and techniques and scrutinizing over placement of pieces or screw locations to the mm or 1/16" is making me mental.
No offence to Eric and his super fast and well priced brackets but I think I’ll try to get some thicker ones. Stripping the threads is something I was worrying about an if you’ve ever seen me when I’m working on my Jeep, I inevitably do strip at least one. I’m actually on my way to Home Depot now because I did that 2 days ago adding some lights to my bumper and I need to get a new one. Bolt not bumper…
I sent a pm to Venky so we will see if he is still making them. In the mean time I can work on mounting the motherboard to my frame and making a spacer.
Oh I don’t mean disrespect to Eric or anyone else for that matter, if current sellers sourced the L brackets then it would give people more choices. I think it’s more a thing that the proper info hasn’t been passed around as well as it could.
Because of the stripping issue I chose to fine steel brackets and cut them to a similar size. They look close enough for me, but it was a huge pain in the but to cut down to size.
On a side note the mounting screws for the motherboard to the alice frame are 1/4-20 Phillips Round Heads
The spacers surrounding them should be an inch and your washers look a bit too big for me…
They should also but up against the alice frame with no gaps
You can see how the hole in the alice frame isn’t completely taken up by a thicker screw…
1 step forward, 2 steps back. I don’t know how you can be negative 1 step, but hey, if anyone can do it I can! Haha!
Thanks for the tip. I’ll see what I can find at Home Depot and even maybe they will have something I could use for an L bracket instead of having to wait for new.
I did pick up a jigsaw and some metal blades to trim the top I the mobo so it’s not as big of an overlap. (Unless I shouldn’t?)
If I keep to the same line as the shell, the mobo wouldn’t be level at the top, or maybe I keep it level and it’s just tighter to the shell on the right than the left. I guess I better get the ol’ sharpie out and draw some more lines.
A few small updates.
I cut a hockey puck into a half moon spacer. It wasn’t perfect but I was able to sand it down and put a groove in it. I still need to drill the hole.
I also drilled the extra hole in my frame.
I also got some 1/4" hardware from Home Depot to mount the the mobo but I could find any aluminum tube small enough to make a spacer. I’ll check another store tomorrow.
Tapatalk is not letting me upload photos at the moment. I’ll try again.
Look at all the ref of the packs in the reference section to see the overhang of the mobo on the pack.
The murrary pack seemed to be quite flush-ish around the cyclotron area but around the powercell and top of the pack there is quite a reasonable overhang… so have a look and decide what you like before trimming.
All my photos disappeared from Tapatalk. Argh… need to fix that.