I was thinking this out the other night to help out builders wanting a better looking weld line. Since most are using some type of 2 part epoxy putty, I think this will really help out.
Lets start?!?
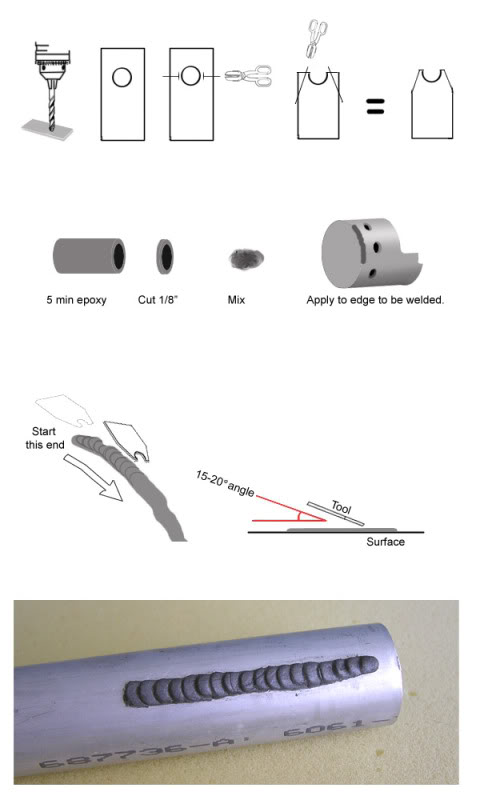
First you’ll have to make the tool. I used a little piece of aluminum I cut to about 2" x 3/4".
About a half inch from the end, drill a hole in the center line about the size of the bead you want the weld to have. I used a 3/16" bit for the bead around the n-filter. Smaller sizes for smaller beads like around gun handles. Then trim off the excess according to the image below.
Next you’ll cut a small section of the epoxy. I have the kind that comes rolled together and you just gut a section off and mix together. Work small because time is short with quick epoxy. About an 1/8" section is enough.
Roll a little snake about the same size as the hole (3/16") and press it onto the edge where you want the weld. Compress it down to about half its original diameter making sure it holds weld to the [clean] surface. Press down along both edges to almost flat with the surface. Wet finger to avoid lifting the epoxy.
Take the tool and quickly start at one end of the line and push down at an angle of about 15-20 degrees. Move up about 3-4 mm and press down for another bead. Evenly repeat all the way down the line. If the tool sticks to the epoxy and lifts it, just keep a little wet sponge to moisten the tool after each press.
As the epoxy is starting to harden, use a razor blade to trim excess epoxy from both sides and use your fingers to press down the edge to blend it into the surface on both sides of the line. Use the tool to retouch any of the beads if needed.
Make sure to work in small sections to avoid the epoxy hardening before you finish the process. About 2" lines.
i used hotglue to secure my rear handle to the gunbox!
it happened by accident!
because i used more hotglue than needed, the more of hotglue swelled out after i pushed it into the right position!
i mean, i was aware about the fact that it would happen, but the idea of using the “not needed” hotglue for the weld line came just before i wanted to clean it up!
Another thing that I had done (by accident at first) was I used gorilla glue to build a lot of my pieces. It expands and bubbles up nicely creating little weld marks. It certainly isnt as easy to control but it looks pretty good at the end.
The pic is not the greatest but hopefully it shows what im talking about. everyone who seen my pack thought it was welded up out of steel.
Just discovered the tutorials section you all have here and I’m LOVING these!
I’m in process of my very first scratchbuild and opted to use styrene for a majority of the build
I’m tackling the EDA this weekend then the ION Arm next but i’ve been racking my brain on techniques for how to make the weld lines. Then like god-rays after a heavy rain I come across this thread! Just what the Dr. ordered.
thanks CPU64 and evallded, I’m definetly going to test out both of these weld-line method to see what works best for me
SO after using Crayola foam clay it worked out PERFECT!!! It was easy to use and once i spray painted it it become twice as tough. The best part is since its black foam if it gets chipped its black underneath and easily fixable
I had a thought occur to me today. I’ve been trying to make weld lines with epoxy and mark it like posted in the beginning of this thread. Why don’t I try to make lines the same way welders do? Instead of a tig welder, I can try to use a syringe (no needle) with epoxy or bondo and work on my welding technique.
Of course, 5 minute epoxy is too dense to go through the syringe, but here is a pic of my first attempt using bondo. The one closest was the first line, farthest being last, and a little difficult as the bondo was starting to set already.
That is basically the hot glue technique. The problem is, Bondo is not a sculpting material. It will become brittle and chip very easy. It is meant to be used in very thin layers. 2 part epoxy is a lot stronger than bondo.



](http://s561.photobucket.com/user/Hudgensusaf/media/Mobile%20Uploads/20140203_234626_RichtoneHDR.jpg.html)