I recently bought a studio creations pack shell set, and was wondering what can I do to reinforce it. I noticed at Home Depot there are cans of resin fiberglass next to all purpose putty and bondo, as well as another form of fiberglass. With the pictures on the cans indicating these are for car use, would that make for a good reinforcing agent?
What are some ways to reinforce the pack, especially for the gun mount, and to keep it from cracking the inevitable moment I hit it against a wall?
You could scuff up the inside surface of the plastic then lay in some fiberglass, that would work. I would do maybe a “good enough” build up for most of the pack, a “hard-as-a-rock” build up for the areas that may see more stress (gun mount, for example), then layer in some spray on foam for added measure.
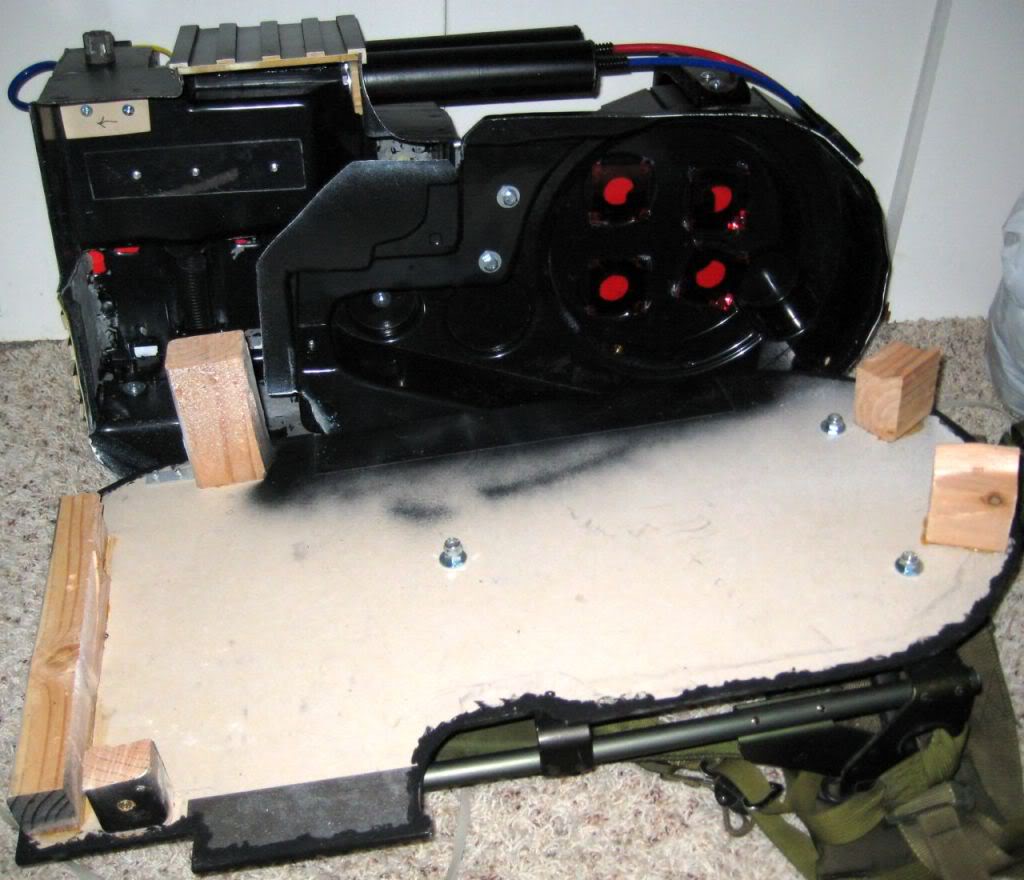
I’ve got the same shell but didn’t reinforce it at all because in my experience with vacuform products…the shell was very thick compared to other items i’ve seen vacuformed. For the gun mount section, I simply cut a block of wood that was mounted through the side of the shell which allows the gun mount to be screwed into something solid. I used other blocks around the shell as well so then I could just screw the motherboard down to the shell by putting screws through the motherboard into the wood.
Keep us posted on how your build goes. I am starting my first build with the same plastic shell and am wondering about the fiberglass renforcement. I thought I had seen a forum topic here talking about using plastic styreen(I know thats misspelled) that you cut and glue to the inside to the pack. The benifits from what I gather is that the plastic bonds to the pack making a much stronger pack. Has anyone heard of this and what are the pros/cons?
Yep. Had a buddy helping out with the same type of pack as well. He did some of the daring work of trying to figure out how to attach pieces, where to cut, etc and I just followed his lead.
The great part about shells is that you can screw or bolt pretty much every piece down from the inside instead of just gluing it on.
Something that will help immensely with the SC shell is to rivet the two shell pieces together (after you position them correctly with relation to each other, of course!), and then reinforcing that join with epoxy, where possible.
As far as mounting the shell, I added a wood block which spans the entire width of the motherboard along the top edge, which will be the primary shell support (having it the entire width of the motherboard will distribute the weight of the shell). The shell is rigid enough that I was able to use 4 wood blocks (with screw-in inserts) to basically recreate the 4-point mount that people use with fiberglass shells. The shell is held on with 4 socket head screws as in the originals.
I also made the mounting block taller on the side with the gun mount, so that I could secure the gun mount to it (with 2 additional threaded inserts).
When attaching items to the shell which are heavy or may be subject to getting caught on things and pulled (such as the booster tube, injector tubes, and ion arm), it helps to put a piece of MDF or thin acrylic on the inside of the shell to reinforce the area (you can see this in the picture above as well).
Wow, thank you! I’ll probably be using your tips in my build. It looks pretty cool on the inside. I’m just thinking about how I’m going to wire everything up.
Well, I got mine in today. Other than some excess plastic interfering with placement, it had no place to rivet. No worries, I think I have a good plan of using 1/8" plywood, rivets or bolts, and epoxy to get it together. After that, I’ll fill in some places with some form of filler and wood for support, then start on the rest of it.
Well, I must say, it is a beauty! Yes, it’s “soft” in some detail, but I think its endearing! It will be a good pack!