Wand Vibration, A.K.A. Dirty Sex Toys and Your Proton Pack

“We use a large, vibrating egg.”
And so does this tutorial, basically. Get ready to enter euphemismville.
So, you want your particle thrower to throw off more than fancy lights, eh? Looking for something special to really make that pack work for you? You’ve probably seen some folks with fancy vibration systems built into their wands and always wanted just such a deal for your own proton pack. Here’s a quick and dirty (REALLY dirty) way to achieve your every hope and dream in this particular arena, mostly on the cheap.
What do you need?
-
A front handle assembly, or at least the front handle tubing for your thrower
-
A 3PDT pushbutton switch. Here’s one from Digikey (runs for about $13.50)
-
A pushbutton cap for your 3PDT button. Here’s one, also from Digikey (only 88 cents)
-
A small, vibrating egg. Yeah, seriously. Here’s a cheap one ($2.60, free shipping) from DealExtreme.com. They call it a “Body Massager,” so feel free to run with that if it makes you feel better or less dirty. Deep down, you know what it’s all about. Just remember, God is always watching you. By the way, I didn’t find this thing on my own - someone here on the forums posted this link somewhere, but I don’t know where or who. Thank you, mystery sex egg toy finder, whomever you are.
-
Wires to rewire some stuff
-
9V battery and 9V battery snap. Here’s a snap connector at Radio Shack($2.99), but this is easily available at any RS store (and cheaper there, too, I believe)
-
Electrical tape
-
OPTIONAL: a 5-10k potentiometer. Here’s one on the RS website ($3.19), but again, also easy to find in the stores, and also probably cheaper in store
-
I’d suggest using a soldering iron for this as well, but it’s up to you how you make the connections
-
I’d also suggest a healthy dose of perversion
And that’s it. Here we go.
(I did this in real life already, so I know it works, but I didn’t take pictures as I went - I’ll be using the magic of computers to illustrate the major bits for your personal edification.)
First, if you haven’t wired up your lighting/sound system for your thrower via Burkit’s fantastically badass tutorial, go read this, and do what he says to do, first. Except for one thing - instead of using the DPDT pushbutton momentary switch as recommended, use the 3PDT switch I posted the link to above. If you already have a DPDT switch in place, remove it so that you can replace the wiring. Here’s a quick, simplified diagram of what you’re about to do (more details below):
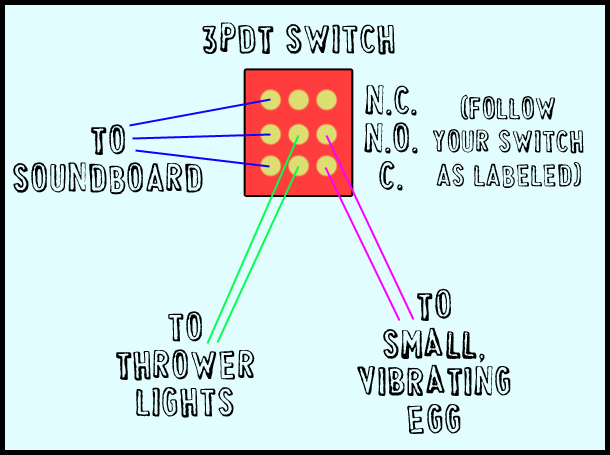
Basically, as per Burkit’s instructions, for the soundboard, wire the “C” lug (or whatever ground/center labeling it has) to your ground for the soundboard power, the “NO” to the thrower firing sound, and the “NC” to the thrower power down sound. For the thrower lights, wire the “C” lug to “-” or ground of your lights, and the “NO” lug to the “+” of your lights.
That should get you where you were already, if you had lights/sound already set up. Now you need to prep your egg.
When you get the egg, it will look alarmingly similar to this:
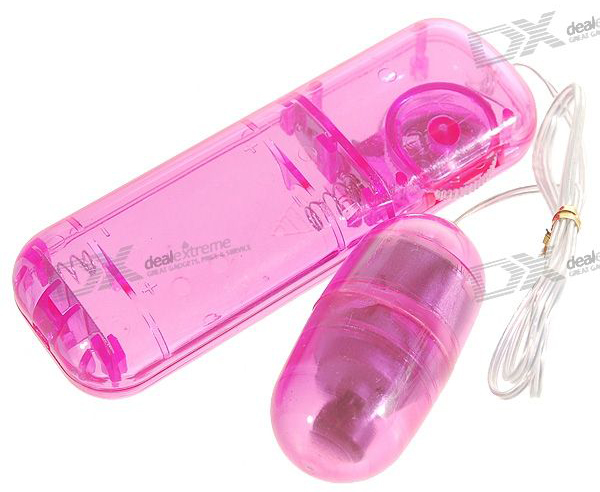
Pink and all. The ■■■■■■■■ egg thingy will come with a “controller” that has a dial to turn it off and on, as well as to choose the vibration speed. This is also the housing for the 2 AA batteries that power it up. The egg itself is on a wire coming from the controller. You’re going to want to isolate just the egg for our purposes, and hook it up to a new power supply.
Go ahead and use some wire cutters to cut the egg off entirely from the controller unit. There should be a small red LED inside the controller that you might want to salvage, as it’s a perfectly good LED you can reuse for something else (but probably not for this project). Leave as much of the wiring as you can, since it will be eventually traveling from your gun body through to the forward handle. You can trim it down later if needed. As far as I can tell, the egg isn’t polarized, so you don’t have to worry about which wire goes positive or negative.
Now you’ve got a free range sexy egg. Good work. Hang onto it for a bit.
Snap that 9V battery connector onto the 9V battery and wire/solder in the black lead from the connector onto the 3PDT switch, on the remaining “C” lug. Grab that egg (unless you never let go of it to begin with, you freaky ■■■■■■■), and separate the two wires a bit by pulling them apart. Use some wire strippers to expose some of the wire inside and wire/solder in one of the egg wires to the remaining “NO” lug on the 3PDT switch. Now take the red lead off of the 9V snap connector, and wire/solder it to the other egg wire. Your connection is complete.
If you wired in everything just right, when you press the switch button on the 3PDT, three things should happen - your lights should go off, your sound should go off, and you should have one crazy vibrating egg rattling around somewhere… anywhere…
Optional step: wiring in a 5k potentiometer dial to regulate/power on/off the vibration.
What it looks like, if you live in a 2-dimensional world:
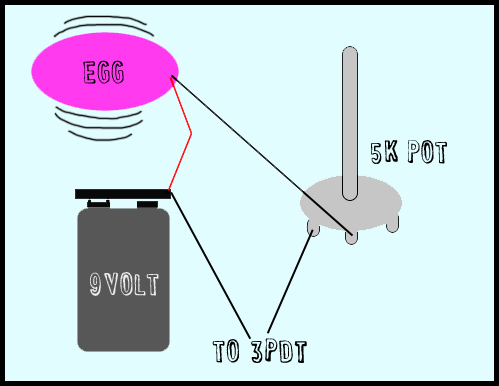
The dial on the egg controller gave me an idea to wire in a controller for the wand vibration itself, and a 5k linear potentiometer will do the trick. This is pretty simple - go back to the step where you wired one of the egg wires to the “NO” lug on the 3PDT switch - instead of going directly to the switch, wire the egg wire to the center lug on the 5k pot. Get a new wire (again, preferably black), and connect one of the outer lugs on the 5K pot to the “NO” lug on the 3PDT. Wire the rest as noted above.
Now you should be able to use the pot dial to both control the amount of vibration as well as turning it completely off if you turn it all the way. This is nice, because you may not want it to vibrate at times, or maybe you’d like it to vibrate less (hooking it up to a 9V from the 6V provided by the 2 AA batteries will give it more of a kick for sure).
What to do with the pot, now? I’m going to mount it in the gun body to be controlled by one of the side knobs. I had mine customized (thanks, Franchesky) to be used as a dial by having the knob drilled through the side to allow for a small screw to hold down the potentiometer shaft. I can then turn one of the side knobs to control the amount of vibration. You can do what you’d like, as there are certainly a number of places where a potentiometer can be mounted on either the gun body or even the pack itself. Use your imagination, dude. Geez.
Depending on the type of potentiometer you get, you may need to trim down the length of the pot shaft. Some folks have really big shafts, you know. A Dremel will do the trick.
OK NOW GET YOUR WAND TO VIBRATE
You’ve probably noticed in your constant fondling of the egg that it’s just about the right size to fit in the front handle. You’re a very astute person, and you’re correct. But it’s not quite the right size. The easy way to fix this is to start to wrap around its diameter with some electrical tape. I can’t tell you exactly how much, but you need to get it to stick on its own. My egg is 15/16", and most handles have an inner diameter of 1", so it won’t take too much. Sounds like around 1/16", but I’m no math geek over here. Start wrapping and try to get it in there. Once it wedges pretty well on its own, you’re all set to go. Now that it’s tight against the inside of the wand, the vibration should be pretty effective. Get it as far in there as you can, and you’re ready to rock.
Naturally, if your handle is attached to the gun box, you’ll need to feed the egg through to the handle via the box. But you knew that already.
Get it all together, and you should be in business, you little vixen, you.
I’m all ears for suggestions otherwise, if you have them. Enjoy your new feature, in as many ways as you can, sicko.

