Can I get some tips on constructing spacers out of wood? I want to know which method is the most effective.
How accurate do you want to make it?will you be making the part under the cosmetic plating round or in seperate panels?
Its easier to make it one single strip of flexible material, but it you want the panels its a little harder.
I have made about 12 spacer’s overall. All depends on how accurate you want it really…
Lawrence
Use 1/2 and 3/4" MDF. (Medium Density Fiberboard. Wood dust held together with resin. Hard, dense, heavy, perfectly smooth.)
Get yourself a respirator. You don’t want to breathe MDF dust, and there will be TONS of it. Do this outdoors.
Get yourself some sawhorses and a electric jigsaw. And an electric sander, either the loud vibrating “finisher” kind or the orbital kind which I believe is quite a bit quieter.
Get one or two of those quick clamps with the big pads that you close by squeezing the handle.
Follow the plans someone posted here for building the spacer from five layers of the stuff. (The 1" layer is made from two 1/2" layers of MDF.)
Cut the 3/4" piece out out first and use the rest of that as your table.
Cut it with a jigsaw as close to your outline as you can get without going inside the line constantly. Buy the roughest sandpaper you can get for your sander, then sand it the rest of the way down to the line.
Count on being at this for three days at least.
Save time by cutting out one of your pieces, and then using it as a template to draw the outlines for your other layers. You don’t want to be calculating all those angles for the cylcotron five times, and you’ll never get them to match up anyway. Fix errors by leaving a little extra material which you can sand down at the end.
Get some wood screws. Some short ones 3/4" long to join the two 1/2" layers, and some longer ones to join all the layers together. Get some extras, you’ll probably strip a few of them if you screw them in with a power drill and then have to back them out and use new ones. Don’t try to make it the rest of the way in if you start to strip them, you won’t make it and you won’t be able to get them back out which you will likely want to do.
(Actually, you don’t need to draw outlines for all the layers. If you do things in the right order, you can simply affix one layer you’ve cut out to another, with screws, and then jigsaw around it. Just make sure you work from the bottom up, cause you can’t add material once you’ve cut it off and the bottom layers have more bits that stick out.)
Hollow your layers out. Don’t get to less than an inch of the edge. Around the bottom of the cyclotron you will have almost exactly an inch. Leave a notch of wood there that’s a bit thicker. The reason is MDF will split like crazy if you put wood screws in it near the edge. I learned this the hard way after the screws I put in the middle to joing the layers went in smoothly. You will however need to get real close to the edge with the screws, so make sure you clamp everything down tight, and don’t drill the screws in slowly, that only makes it worse.
Alternatively, use glue to hold the layers together. But glue doesn’t let you jigsaw around the layers right away. And if you make a mistkae aligning the layers, or forget to cut out some of the material in the middle (to make things lighter and/or make room for a cake pan) you can’t just back off the screws and try again. Glue might leave smaller cracks around the edges to fill though. The cracks won’t be a big issue with MDF though.
Speaking of cracks, get Zar wood filler. Do NOT get Minwax. Minwax is very dry and powdery doesn’t stick to the wood well. Zar is latext based and very sticky and smooths nicely. You’ll need to sand a lot less with Zar and get the job done a lot faster. (True-Value sells Zar, Home Depot does not. I don’t know about Lowes or Ace.) Also don’tuse Bondo. Bondo sucks. Nasty, really thick and tough to smooth and you only get a couple minutes before it hardens.
Also get some “filler primer” from an auto store. That should cut down on the amount of filler you need to apply to just one quick coat to the sides and the holes from any screws on top. Filler primer supposedly will fill in wood grain and should do the job for any scratches on the side of the MDF from the sanding.
And… that’s all I can think of to tell ya. See the progress thread on the first page that I posted for pics of what this all looks like.
I was thinking if you have a table saw you could cut the angled pieces and form a wall around the whole thing to do the sides.
It just so happens, I DO have a table saw. I just wonder what would be the correct angle to cut the pieces at. That’s how I would like to do it.
I will do the math for you when I have time.
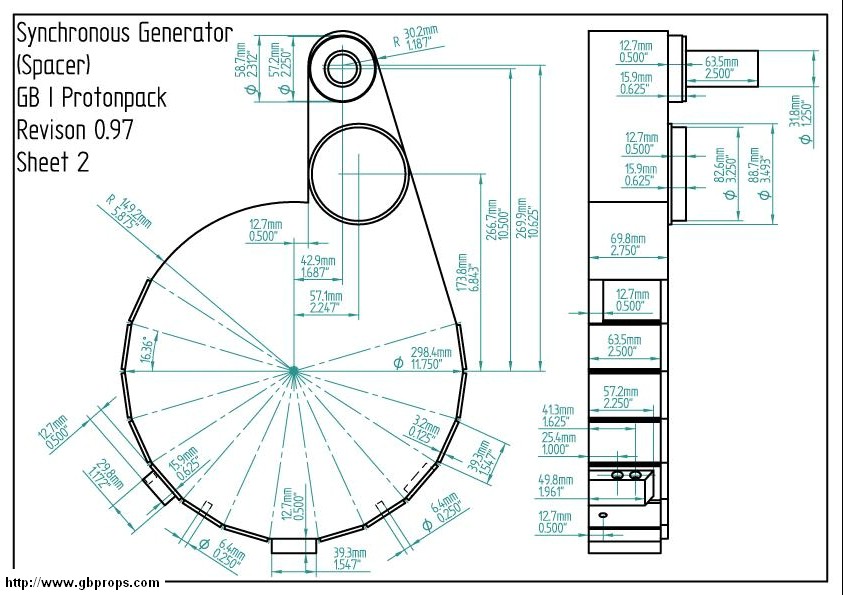
Because the angle you need to cut two peices at isn’t on the blueprint? Ofcourse it could be that angle divided by 2.. but I’d rather make sure.
So . . . 14 blocks with dimensions of 0.750" x 2.500" (subtracting 0.250" to compensate for the top cover) x 1.172" with one end of each block having an angled cut of **approximately **16 degrees.
I’ll figure it out for myself eventually. Trial and error. “We learn by doing” “Save the rain forest” “I like Ike”
Here is how you need to do it. The 1.672 is a little short and leaves room for glue.
That’ll work. Thanks. It’s been a while since geometry. :sigh:
I made my sync generator out of insulation foam.. after a few coats of latex house paint, it’s perfect, inexpensive, and easy to make.
Make a pattern, and cut two identical layers, glue them together, and then sand the edges. use wood filler on the edges if you want, for a smoother finish.
It’s very lightweight, and ours hold all the various parts onto it fine.
I am making my spacer walls out of 1/8" hardboard. I just out the rectangles then glued square dowels to the back of them to help keep them straight. Then a couple thicker pieces of wood to act as pillars and take some of the stress away from the outer walls. For Sale sign for the bendy part towards the top of the big circle, and some PVC tubing for the very top round part. Good luck.