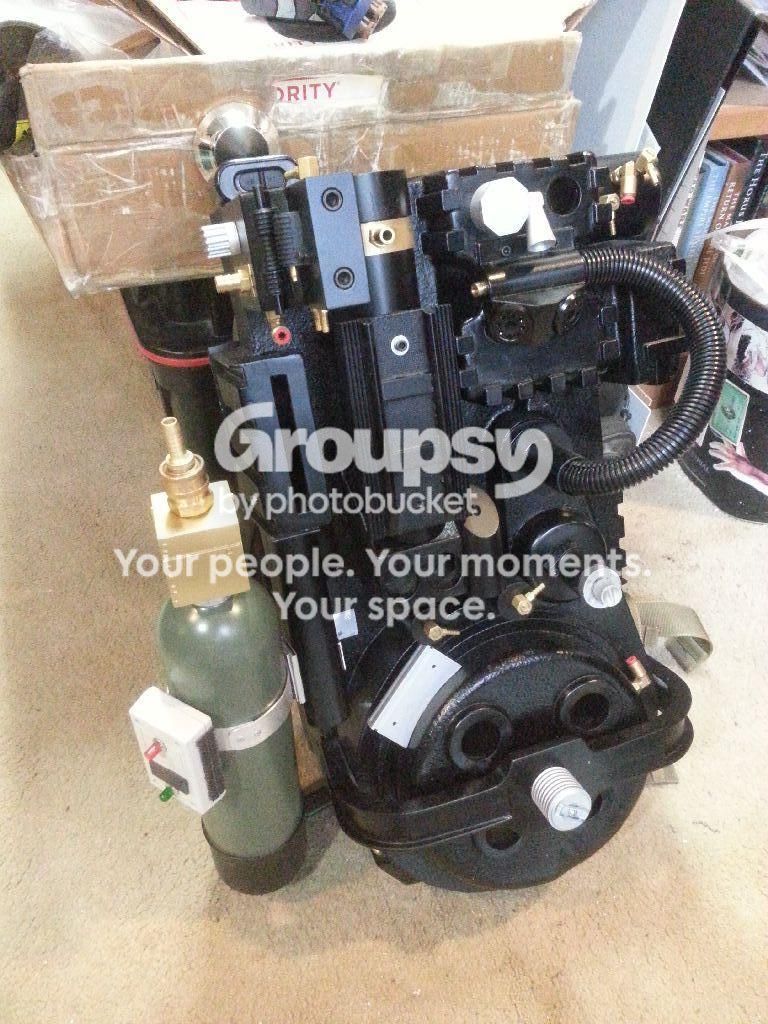
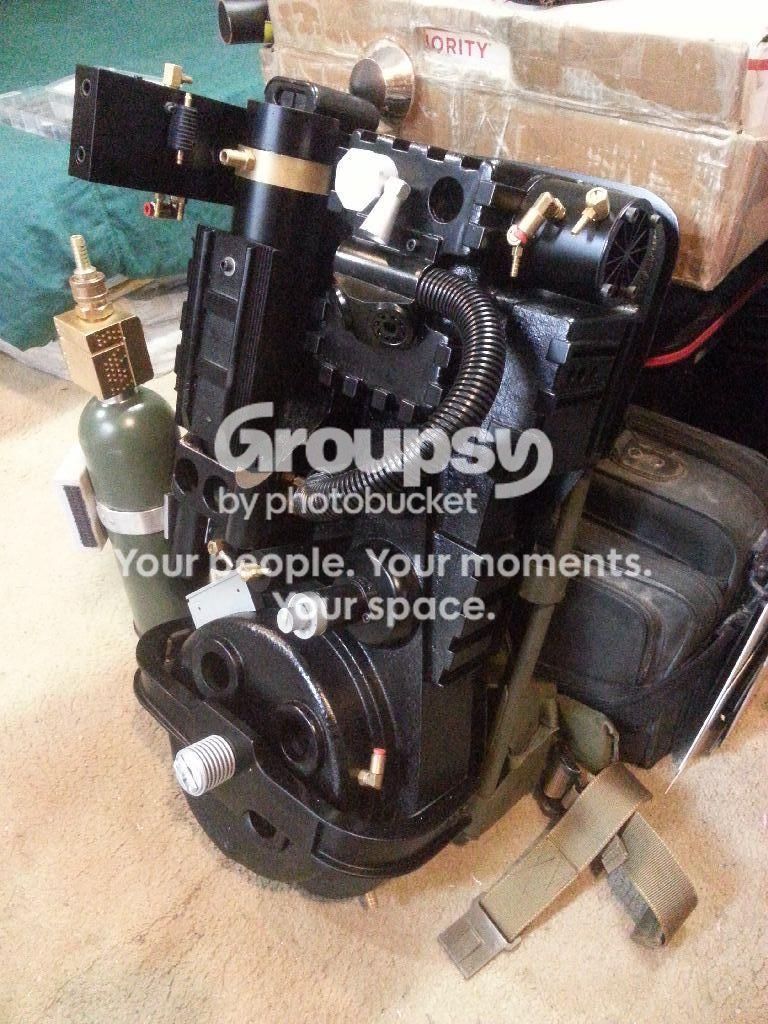
jackdoud's GBTVG Pack Build

Since September of 2013 I’ve been helping mburkit with his GBTVG pack build. If you haven’t seen it yet, where the hell have you been? Go read his build thread and be amazed! I’ll wait…

…pretty neat huh? He’s set the bar high and isn’t done yet as he still intends to add motion to various parts of his build. All along as we made masters and cast pieces I’ve been saving parts for my own build. Since Matt had a deadline (Dragoncon 2014) I kept putting off working on my stuff to help him get all the parts he needed ready in time. Around June 2014 we got the last of the major parts cast up and I could start working on my own build.

I’ve waited until now to post my build thread both because I didn’t want to steal Matt’s thunder and because much of my build is similar to his. The main difference being, while Matt’s wussing out and only making two of the four pack modes “functional”, I intend to go as far as physically possible to bring a game pack into reality. The only things I’m not going to do other then physically firing something out of the barrels is the moving ion arm rods for the meson pack and the Jacob’s Ladder. The moving rods would require a machine shop and precision engineering to accomplish and the Jacob’s Ladder is just a bit more dangerous then I’d care to be liable for. Technically I’m also skipping the slight bump out motion the cyclotron does when venting. I don’t feel like making another mold for a taller cyclotron just to accomplish something most people don’t realize happens anyway and it’d make the venting process even more complicated then it already is with a moving bumper and n-filter. This also means I won’t be doing the boson emergency venting motion which would require a major machine shop, precision engineering and potentially breaking the laws of physics.

I guess that could be considered four things I’m not doing, three of which are technically possible. So sue me. :whatever:

So here’s our modified game pack shell, fresh out of the mold:

image

Except when I cast mine, I went a little different. Remember that spare cyclotron we cast up so Matt could plug his n-filter hole?

image

Instead of waiting and glueing a chunk into a finished shell like he did I decided to cast a piece directly into my shell while laying it up:

image image

Turns out the cyclotron isn’t perfectly round (no surprise there) so the piece didn’t fit exactly in place but it was close enough. The area would need to be filled, sanded and cut to hinge the n-filter anyway so I’d just as soon have it all as one solid piece.

Remember all that work I did cleaning up the ribs on the master?

image

Well since I want functioning stasis ribs they all had to be cut off again. This was the first point where I questioned my sanity in regards to this project, that has now become a regular occurance as work has progressed. In-game the outer edges of the powercell, crankgen and side box are flush when the ribs are open. Through the magic of 3D game physics the ribs pass through the shell and sit halfway into the pack in their normal “closed” positions.

image

Since that’s not physically possible in the real world it meant I needed to not only remove the ribs but install a recessed pocket into the shell for each rib to sit in. Since the ribs will be moving as a group each recess needed to be the same depth, otherwise they would not look right when closed, and as close to parallel as possible or else they would bind when closing. I used styrene to build identical slots that I could then glue into the pack shell.

image image

Once all the recesses were installed I secured them in with plumbers putty, blended the exterior edges with the shell and cut the central slots in for the rib arms.

image image image image

With that done I could then go about building replacement ribs. I quickly realized that building each rib individually would be way too time consuming so I built a single master that was the longest length rib I’d need and made a mold of it. I could then cut casts down to whatever length I needed and cap the ends.

image image image

As it turns out this was an even better idea then I’d originally hoped. After looking at Matt’s pack with his electronics installed I wasn’t entirely happy with how his overheat and health bars came out in his gun mount box. The edges of his cutouts were fine but the varying thickness of the shell and lack of baffles between the segments made the whole effect look not quite as clean as I want. I also want to install clear lenses flush with my shell to enclose the lights to make them look that more professional and replicate what they look like in-game. At that point I realized that the overheat bars are essentially exactly the same as the ribs with the health bar being a scaled down version of the same. I cast up two more ribs and built two smaller versions for the health bar and installed them in the gun mount box.

image image

I now had uniform, enclosed recesses with a built in mount for lenses. I’m planning on using the same technique for the blue LEDs on the thrower.
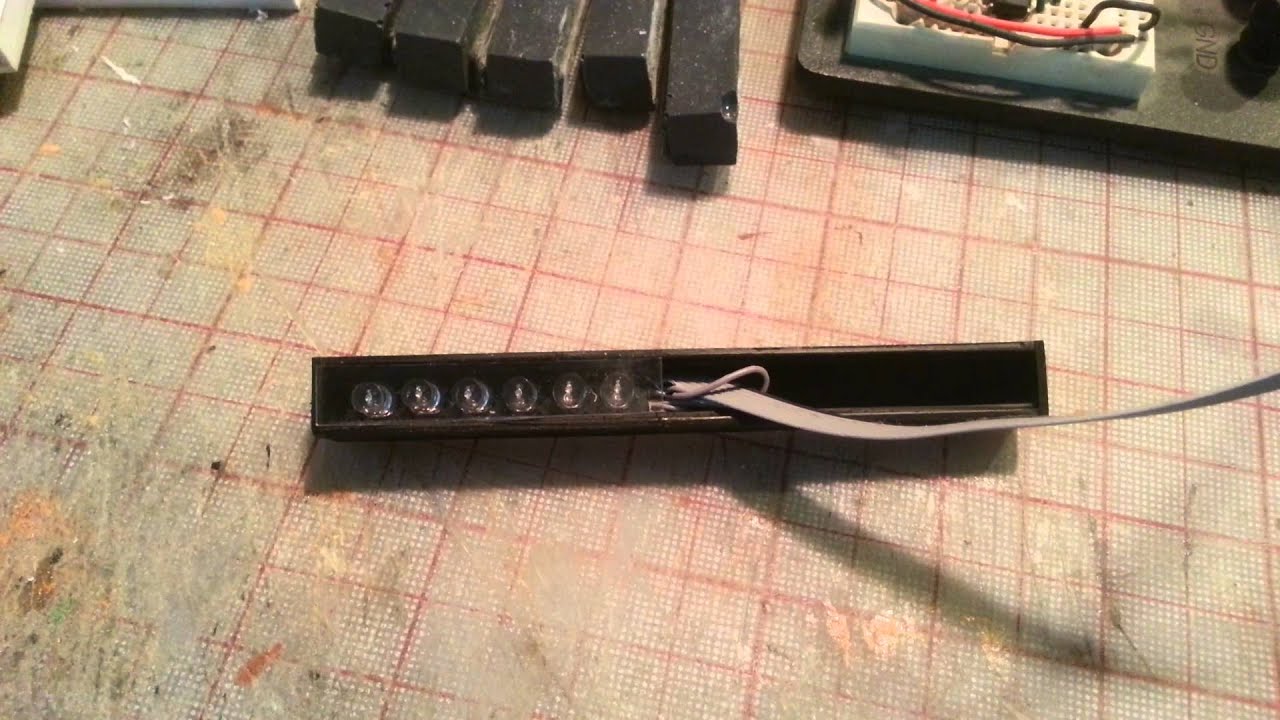

With my rib shells ready my next step was to determine if it was even possible to fit LEDs inside them. I found an ebay lot of 5mm flat top, wide angle, ultrabrite blue LEDs with decent power ratings that looked like they’d fit my height requirements. I wanted to use 5mm LEDs because that’s what it looks like the game modeled their textures after. If they were too tall though I’d either have to file them down, which would change their appearance and viewing angle, or use surface mount LEDs which wouldn’t have the right shape and would require custom PCBs for each rib. When they arrived I soldered up six for the largest rib, hacked an existing circuit I had breadboarded already and shoved them into a cast with an acrylic lens on top:

And just to see what it’d look like here it is balanced over the crankgen:

![image](http://www.gbfans.com/images/pb/jackdoud/Ghostbusters_TVG Pack_th_20140520_202156.jpg)

It’s tight but workable. The main issue I’ve found is fitting the wires in, I’m using 26awg ribbon cable and trimming it down to as minimal a size as necessary with an automatic wire stripper. If I’m careful in how I position everything I should have just enough space.

Of course five of the ribs have a blinking light on the end reminiscent of Ray’s “powercell lights” error in the first movie. I couldn’t do what Matt did and put acrylic end caps on to shine through the fiberglass, there’s not enough space. My solution was to purchase square LED blocks:

![image](http://www.gbfans.com/images/pb/jackdoud/Ghostbusters_TVG Pack_th_20140523_211409.jpg)

I couldn’t get them in white but I think yellow is close enough. They’re six pin blocks, four cathodes and two anodes essentially housing four LEDs that when lit look like a single illuminated surface. They’re just slightly smaller then the size of the ribs so I boxed them in styrene to make them flush.

![image](http://www.gbfans.com/images/pb/jackdoud/Ghostbusters_TVG Pack_th_20140916_110531.jpg) ![image](http://www.gbfans.com/images/pb/jackdoud/Ghostbusters_TVG Pack_th_20140730_141259.jpg) ![image](http://www.gbfans.com/images/pb/jackdoud/Ghostbusters_TVG Pack_th_20140915_200048.jpg)

I coated the lenses in brushable latex, now I can paint the ribs then peel off the latex when I’m done to reveal the lens.

So it was around this time that I realized I had a major problem. The ribs, rib lights, standoff arms and motion system are all interconnected and integral to each other. I have to have all the parts assembled, wired and painted before I can install them as once they’re attached together it’s impossible to remove them from the pack. That’s fine in and of itself but means that the pack side of the setup needs to be painted before assembly as well. So before I could do any more major work on the ribs I had to paint the pack shell. That can’t happen until I have all the holes necessary for all the other parts cut, drilled, sanded, puttied and prepped. I essentially had to make or purchase all the other bolt on parts, fit and attach them before I could proceed with anything else.

Setting the ribs aside I started working my way through the rest of the pack shell. Things like the injectors, beam line, filler tube, powercell and cyclotron holes, cyclotron elbow and EDA straights were simple. I attached the resin cast angled piece that the vacuume tubes come out of to the crankgen.

![image](http://www.gbfans.com/images/pb/jackdoud/Ghostbusters_TVG Pack_th_20140520_134653.jpg)

Fortunately at this point Matt was already working on a lot of the little details so things like the vent nozzle and overheat light on the crank gen, sockets for the vacuume tubes and hose barbs for the PDS tubing had already been sourced and I just had to drill the right sized holes. It was during this time that I realised the outer edge of the EDA has a big dip in it that would interfere with the Meson rods so I had to completely rebuild it.

![image](http://www.gbfans.com/images/pb/jackdoud/Ghostbusters_TVG Pack_th_20140730_171621.jpg) ![image](http://www.gbfans.com/images/pb/jackdoud/Ghostbusters_TVG Pack_th_20141020_125534.jpg)

Matt had also worked out a good setup using a cut down drawer slide to mount the bumper on rails that I copied.

![image](http://www.gbfans.com/images/pb/jackdoud/Ghostbusters_TVG Pack_th_20140829_114616.jpg) ![image](http://www.gbfans.com/images/pb/jackdoud/Ghostbusters_TVG Pack_th_IMG_8089.jpg) ![image](http://www.gbfans.com/images/pb/jackdoud/Ghostbusters_TVG Pack_th_IMG_8090.jpg) ![image](http://www.gbfans.com/images/pb/jackdoud/Ghostbusters_TVG Pack_th_IMG_8092.jpg)

I built a custom ion arm out of styrene since the game version doesn’t have an actual cap on it but instead has it integrated as a single part.

![image](http://www.gbfans.com/images/pb/jackdoud/Ghostbusters_TVG Pack_th_20141014_153556.jpg)

That then let me position and mount the booster tube along with the HGA.

![image](http://www.gbfans.com/images/pb/jackdoud/Ghostbusters_TVG Pack_th_20140917_194144.jpg) ![image](http://www.gbfans.com/images/pb/jackdoud/Ghostbusters_TVG Pack_th_20141020_122014.jpg) ![image](http://www.gbfans.com/images/pb/jackdoud/Ghostbusters_TVG Pack_th_20140925_110641.jpg)

I built the wierd ribbon cable plate out of styrene and drilled the mounting holes in the cyclotron for it.

![image](http://www.gbfans.com/images/pb/jackdoud/Ghostbusters_TVG Pack_th_20140825_174234.jpg) ![image](http://www.gbfans.com/images/pb/jackdoud/Ghostbusters_TVG Pack_th_20140828_135303.jpg)

I also had to drill the mounting points for the motherboard so I traced the shell out, cut a custom board out of 6061 aluminum, attached angle brackets and drilled and tapped the holes.

![image](http://www.gbfans.com/images/pb/jackdoud/Ghostbusters_TVG Pack_th_20140805_154220.jpg)

Finally after weeks of off and on work fitting, trimming, filling, sanding and smoothing I was finally able to get an initial coat of primer on yesterday.

![image](http://www.gbfans.com/images/pb/jackdoud/Ghostbusters_TVG Pack_th_20141021_104353.jpg)

This of course only pointed out all the little pin holes and imperfections I still need to fill and smooth out. I’m trying to get the shell cleaned up and have final paint applied before it gets too cold here in the northeast. That way I can begin attaching parts and working out the rib mechanisms over the winter.

image

No words…should have sent a poet.

This is beyond epic…I can’t wait to see this pack in it’s final form! You’ve set a new and impossibly high standard, sir!

Stop making me like game packs!!

And subscribe.

I’m so glad you finally posted this. Now others can bask in the glory that is your build.

Oh yissss, let the Beast of Doud be born.

I feel the need to follow this.

Yep, following… :wink:

OH this is too good…

ohhhh gorgeous :smiley:

I got a couple passes of filling and sanding done today:

image image

I’m hoping it’ll be warm enough tomorrow that I can texture the pack and at least get a final primer coat on it.

I also did some work on the n-filter, namely cleaning up a fiberglass cast, attaching a lock hinge with plumbers putty and drilling out the attachment point for it.

image image image image image

In between all that I finished up my styrene ion arm and fitted all the brass to it.

image

That was a quick way to add over a pound of weight to the pack. :sigh:

I thought that ion arm was the entire proton pack! Just kidding :smiley: Man, still on the first page and is a heart thumper already! Excellent work, for real

So with unseasonably warm temperatures in the northeast US the last few days and the threat of cold and rain for the next few days I’ve been working like crazy to get as many parts painted as possible.

First I finished up the N-filter by drilling the holes in it. I had to experiment with sizes a bit and wound up going with 7/8".

![image](http://www.gbfans.com/images/pb/jackdoud/Ghostbusters_TVG Pack_th_20141025_122526.jpg) ![image](http://www.gbfans.com/images/pb/jackdoud/Ghostbusters_TVG Pack_th_20141025_123141.jpg)

I retextured the top half of the pack where I had to rebuild the EDA and where I’d been sanding around the ribs.

![image](http://www.gbfans.com/images/pb/jackdoud/Ghostbusters_TVG Pack_th_20141024_155411.jpg)

Another coat of primer then I gave the pack its final coat of satin black.

![image](http://www.gbfans.com/images/pb/jackdoud/Ghostbusters_TVG Pack_th_20141025_164533.jpg)

With the pack shell finished I went nuts fitting, drilling, attaching, then removing and painting a ton of other parts. I got final paint on the Ion Arm, Bumper, N-Filter, PPD, Beam Line, Filler Tube, Sync-gen Tube, Injectors, Motherboard, Slime Pump Box, Ribbon Cable Slot, Shock KNob, Clippard Valve, Booster Frame and Booster Tube. I also got primer on the Booster Tube Top, HGA, HGA Endcap and the Pump Box Heatsink.

Of course since the shell is essentially “finished” now I could start attaching parts. I got the alice frame mounted to the motherboard and screwed on as many parts as were ready.

![image](http://www.gbfans.com/images/pb/jackdoud/Ghostbusters_TVG Pack_th_IMG_8144.jpg) ![image](http://www.gbfans.com/images/pb/jackdoud/Ghostbusters_TVG Pack_th_IMG_8146.jpg) ![image](http://www.gbfans.com/images/pb/jackdoud/Ghostbusters_TVG Pack_th_IMG_8152.jpg)

We’re not supposed to get rain until tomorrow afternoon so hopefully I can finish painting the primed parts and have most of the parts for the pack ready for assembly. It’s nice to have this thing finally starting to look like something though it’s already around 17 pounds.

And stuff just got REAL. Looks great Jack! I can’t wait for blinkin’ lights!

I feel like this word is now a total cliche, but there has never been a more proper time to say it: E P I C

This is so beautiful. Literally the butterfly story. I think I’m most interested in seeing what becomes of the mechanical portions; electronics, pneumatics, hydraulics, lighting, sounds, etc…whatever you plan on doing. My brain cannot fathom the custom work yet to be done. I know Twilight’s work was really nice, but this is literally an unfolding WIP. Bravo, eccellente!

It’s amazing how fast this thing is going together now that I’ve got a bunch of the parts “finished”.

image

Way back in June I built my slime tank using the same design as mburkit.

image image

I followed his lead and attached the tank to the injector tubes with a v-hook. That way the tank is still removable if necessary but more secure then just hanging it with bungee cords.

Here’s more or less all the “easy” parts attached to the shell:

I’m waiting for my ribbon cable p-clamp to show up and I still need to order all the tubing. Since all the electronics are going to be attached to the shell and not the motherboard I’ll probably be removing most of these parts again to make it easier to work on but I needed to make sure everything fit first.

I’m expecting everything else from this point to take a lot more time. I’ll leave this here as a teaser though:

I have not had a chance to go through this thread yet with Halloween so close.

This is incredible! You two fellows have really impressed me with these game packs. I think I need to go to a corner and have a cry and think about what I’m doing with my life. Amazing!