Proton gun: Switch, button, and light reference

Has anyone put together a reference for how the proton gun’s lights and buttons interact and function as per the movie hero packs? The pack lights were pretty straight forward, but the gun looks more involved in terms of the functional permutations involved between the various switch/button states and the numerous lights. I’ve looked all over the forums and couldn’t find a solid reference on the subject, aside from static HD screen captures and individual gun kit installs. Given the number of completed packs out there I’d imagine there is data scattered about somewhere on this subject and think it would be useful to compile a reference if there’s not already something out there.

Mike

As you say there’s no difinitive guide anywhere. This thread’s pretty much got all the info though: Electronics Questions and Storage - Proton Packs - GBFans.com

As Jack said, there is not definitive answer. But I’ll try to give you a run down.

First, lets number the buttons/switches on the gun to make this easier.

1 - “Intensify” Button

2 - “Activate” Switch

3 - Top switch on the face of the gun (next to the bargraph)

4 - Bottom switch on the face of the gun (next to the bargraph)

5 - red push button at the tip of the gun

Switch “2” is used to turn on the lights of the at least the gun, if not the pack as well; as seen in the court room scene in GB2.

Switch “4” is used to turn on the vent light, as seen in the “heat 'em up” scene in GB1. Also in that scene, you see switch “3” in the up position. I would say this could be a safe bet as to the switch that controls the pack lights.

Now as to which push button makes the gun fire. I believe it is button “1”, the intensify button. Why I think this is because while Venkman and Egon are trapping slimer, Venkman takes his hand off the front grip but the flash bulb at the end of the barrel keeps going. So I assume that it is button “1” and not button “5” that fires the gun.

So to sum up what you can reasonably can deduce from the movies:

1 - “Intensify” Button - Fires the gun

2 - “Activate” Switch - turns on at least the gun lights

3 - Top switch on the face of the gun (next to the bargraph) - either not used or controls the pack lights

4 - Bottom switch on the face of the gun (next to the bargraph) - controls the vent light

5 - red push button at the tip of the gun - either not used or possibly controls the orange top hat light at the end of the gun.

Now I personally have all my lights turn on with one switch, as do others. So it comes down to how you WANT the lights to work.

Hopefully this helps you out.
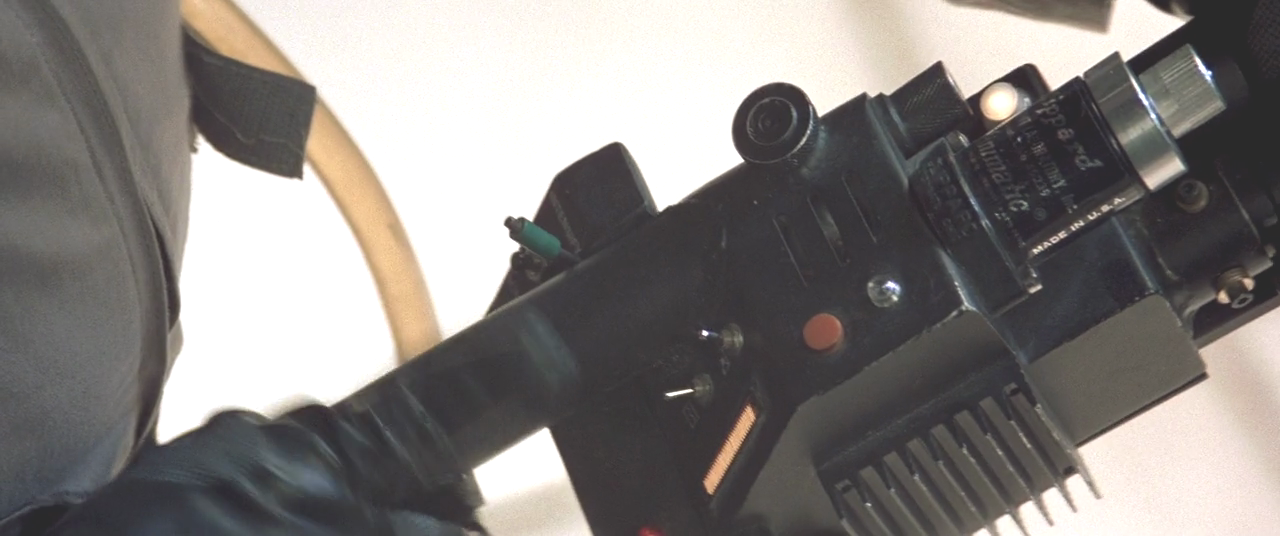
Thanks for the info gents. I’m going to put together a simple state diagram of this for a visual reference of the button press cause and effect sequence. I’m also going to have to revisit the films and see if I can get a better feel for how the lights turn on and the rate at which they blink (if at all) including the various bar graph sequences.

i was thinking the very same thing but my question is

which coloured leds go where on the gun?

sometimes thers 2 white ones on the top next to the vent and sometimes thers a1 red and 1 white

what is the accurate led placement on the gun?

The answer to this is it changes from pack to pack. In GB1, some of the packs (The “Omni” Pack) had an orange top hat light cap embedded on the top of the gun, while others had a white one up there. This would be the large, flat light cap on the gun next to the vent on top.

Orange

White

So take your pick.

Hey Matt, just came across your post on the Replica Props soundboard and was wondering about consensus on the screen accurate switches and buttons. Are those you referenced considered 100% screen accurate? Some people post “close enough” parts lists and others post “exact” parts and am trying to determine how specific these are and if that detail is really even known at this point. I checked out the master parts list thread but it doesn’t appear to get this specific yet.

Correct me if I’m wrong but it seems like the best switch to use if looking to be flexible enough up front for just lights or for a complete sound and pack/wand light solution is to use DPDT (Dual Pole, Dual Throw) On-On sub-miniature switches. The Dual Pole being important for the ability to operate two disparate circuits

Btw, I know there are a number of threads out there that have bits and pieces of information along the lines of lights/buttons/switches on the gun but the titles weren’t specifically titled as such (if I missed something in searching, my up front apologies) so I posted in this thread again.

Numerous Relevant References:

http://www.gbfans.com/community/viewtopic.php?f=2&t=18223

http://www.gbfans.com/community/viewtopic.php?f=2&t=18358

http://www.gbfans.com/community/viewtopic.php?f=2&t=11379&p=111854&hilit=toggle+switch#p111854

http://www.gbfans.com/community/viewtopic.php?f=2&t=11184&p=110024&hilit=toggle+switch#p110024

http://www.gbfans.com/community/viewtopic.php?f=2&t=7668&start=0&hilit=toggle+switch

http://www.gbfans.com/community/viewtopic.php?f=2&t=971&hilit=toggle+switch

mine were done differently matt. but i mean anyone can reprogram them so that isnt really an issue…

First, for the physical switches I have listed in the replica props tutorial, all the DPDT switches look fine but a compromise you have to make with accuracy is the DPDT black push button. I was unable to find a DPDT push button with the same plunger as the ones used on the hero packs.

Second, the lighting sequences of the switches I listed earlier in this thread can be argued but that is what I came to conclude from what you see in the movies. The point I’m making here is you can make any of the switches do whatever you want and most people would not know either way anyway.

I hope that answers your questions.