Here is my basic light tutorial for the proton pack. It uses Allelectronics.com led chasers which are very reasonably priced. http://www.allelectronics.com/make-a-store/item/AEC/LED-CHASER-KIT//1.html
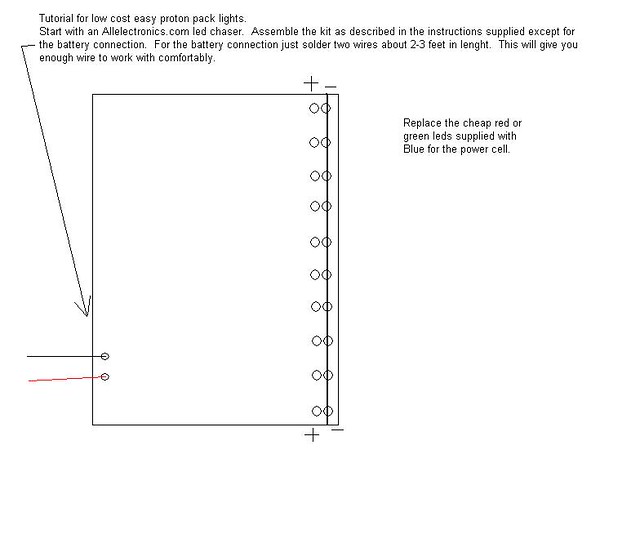
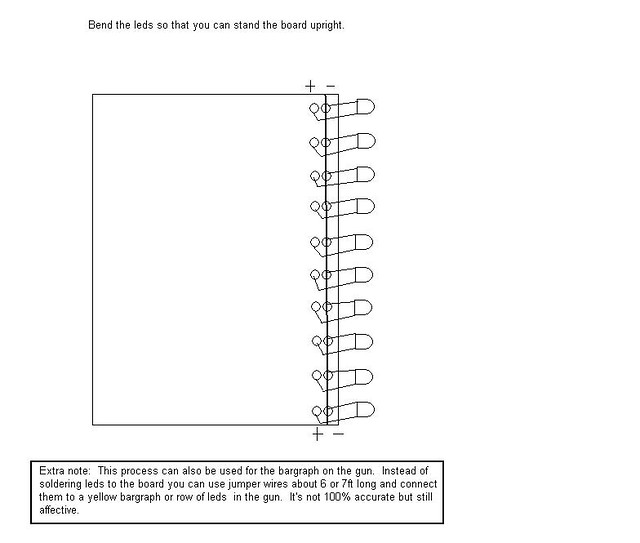
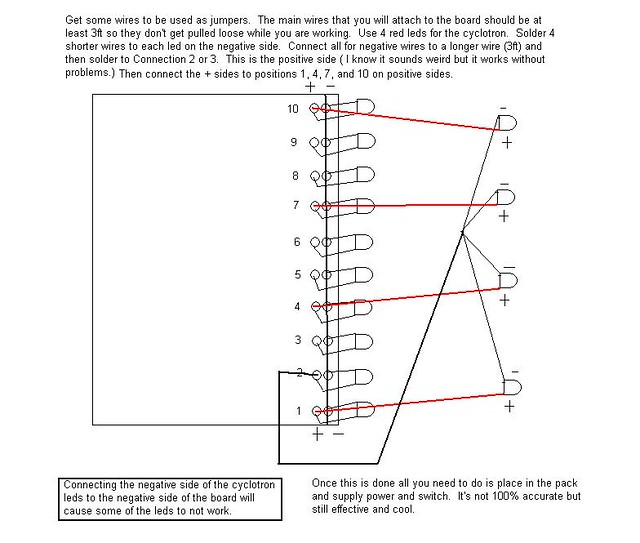
Here is my basic light tutorial for the proton pack. It uses Allelectronics.com led chasers which are very reasonably priced. http://www.allelectronics.com/make-a-store/item/AEC/LED-CHASER-KIT//1.html
Very clever! Simple reasonably accurate lights using one readily available board!
Wow, so it’s possible to get powercell, cyclotron, and gun bargraph leds all out of one light kit board? I learn something new every day (especially since I know next to nothing about electronics). Would it be pushing it to wire in a few more led’s like you did the cyclotron led’s to act as a few simple blinking gun lights? Also, what do you suggest for a battery source?
Great job you did with this!
I dunno what the chase sequence is like on that, but THIS kit you can actually get with the proper sequence for the blue bar on the pack, so you could do like the 3rd pic for the 4 LEDs for the cyclotron..
I’ve always wondered how tough it would be to make a circuit for the cyclotron that, whenever you “trigger” it, would power the next light, and have it hooked up to the top LED of the bar graph..
One kit can run the powercell and cyclotron. It would take another kit to do the bargraph and yes you can have the gun lights blink with this chaser as well but I prefer to use static leds and one blinking led. These can be wired to the chaser battery leads so all come on at once. I don’t recomend trying to use one kit to run all the lights on a pack though(powercell, cyclotron, bargraph, and gun.) This would cause some lights not to work. So two chasers should be used to ensure that the pack and gun work properly. I have tried in the past to integrate all lights in one kit and it is not worth the trouble so that is why I use two. Its cheap and easy so two kits really doesn’t matter. It sure beats shelling out $100 for one kit produced by others. The kit does not make the pack 100% accurate but still gives the pack the light chasing affect that everone loves. I will get a video posted of this tutorial soon to better demonstrate the setup and how to integrate it with power and switches. Oh, I almost forgot, the kit uses a 9V battery. It will last for several hours too. So there is no need to constantly replace them while you are at a party or convention. Hope this helps and be looking for the video in a few days.
Or, if you’re going to solder a kit together anyway you can just spend $15 and build an accurate circuit. 
True. Just trying to help out. I know there are more accurate kits out there but the allelectronics kit I have worked with before and know more about it than the others. I’m sure that you are refering to any number of pack light tutorials that will produce movie accurate lights. Those work well but if you are building it youself it will take some time and alot of jumper wires. Or you will have to get the board with the circuits imprinted on it making it cost more. Not sure of the actual pricing on those. I just wanted to post this for those gbfans who do not want to spend alot of time soldering complex circuits. The kits I spoke of are cheap and easy to use. Anyone can have a pack wired up within an hour with these kits. Thanks for the input.
And that’s why I love it. The pack I’m working on right now is horribly inaccurate (read: pretty much custom) so some quick, cheap, and easy to do lights are exactly what I’m looking for until I get a nice shiny shell to work from. Plus this will help out those last-minute Halloween guys.
That’s the whole reason I posted this. Glad to hear someone appreciates it.
Most people don’t know electronics, and how to put a circuit board together from scratch. This offers a simple inexpensive solution.
The initial kit did, yes. But then the discussion transitioned into how to make it do more which is why I suggested at that point to just make an accurate circuit: How to create your own Proton Pack lights, from scratch! - Tutorials & Guides - GBFans.com
AJ’s tutorial is no harder than buying the correct components (very inexpensive), and laying everything out thoughtfully on a breadboard (simple). You also learn the basics of a very valuable skill.
Hell, spend $20 on a book like this, and you’ll learn more than everything you need to know.
Or if a proton pack is the only thing you’re ever gonna build, don’t bother learning anything about electronics and use this tutorial.
Links in this post may be affiliate links. Purchases made through them help support this site at no additional cost to you.
if you can follow a diagram, and place plugs into the correct hole on a breadboard. CONGRATS!
It’s pretty simple, schematics are just maps of where things go. a breadboard makes it easier since there’s no traces like on a PCB.
I could probably figure out how to place everything on a breadboard for an accurate circuit, but I’ve seen many, many people say to NOT use a breadboard because any one of the dozens of connections could come loose. Then you’re screwed unless you pop open the whole pack to troubleshoot it.
I’m sure someone will also comment that you can use hot glue on the bread boards. I have done that myself and believe me that does not prevent all wires from coming loose. The glue just does not stick very well to some boards.
And whats worse is that you will have more than one wire together in a gob of glue that you will either have to throw away or try not to destroy the wires while getting the glue off the wires. Bread boards are nice and convenient but can cause alot of headaches as well. Either way people can build thier kits anyway they want. I just wanted to give some extra info for those not willing to enter the jumper wire jungle.
there’s a reason the REAL name for a breadboard is PROTOboard
I am full aware of the real name and would never place one in my pack. A prototype setup should never be used in a pack. It would look embarassing and foolish if your pack quit working because a wire came loose. My suggestion to anyone wanting to make “movie accurate” lights is to buy a PCB or printed circuit board. This will prevent wires from falling out or coming loose easily. Or just buy a complete setup from R2DEVO or someone elseand call it a day. He sells them for around $60 thats very reasonable. I just posted this tutorial so people can save money and still have cool lights. Not everyone cares about being 100% accurate. Nobody can build a 100% accurate pack because there will always be some little detail missed. Most fan made props look and function better than the originals anyway. So who really cares about the so called “movie accurate” theme. The general public doesn’t know what an accurate pack is supposed to be. If out in public at Halloween or at a convention who would be willing to point out the intricate details of thier pack that makes it “movie accurate”. I’ll bet that anyone who did that would sound like a jerk or ■■■■■ trying to imprint knowledge on someone who doesn’t even care. All people care about is that the pack looks cool and has flashing lights and sounds. If someone building a pack wants to stress about every little detail to make it accurate then thay are taking the fun out of prop building.
If anyone does not like this tutorial thats fine. If anyone wants to bash this tutorial thats fine too. All I ask is make your own tutorial or guide to prove your superior knowledge of the subject. Don’t rely on someone elses tutorial either. That would be too easy. Make your own and make it better than mine. Don’t copy ideas but come up with your own like I did. That is my challenge to all of those who like to run their mouths. Help make this site better by helping others with your ideas and not bashing those who are willing to help. Be a light and not a shadow.
This light kit tutorial is actually easier to make sense of than yours is, and it’s much more accurate, oh and it costs approximately the same price. It’s also been available for something like 6 years.
I do appreciate you trying to help the community with a tutorial, but trying to say that the only people who care about accuracy are people who don’t have fun with this hobby is rather insulting.
I did not mean to insult anyone at all. I also did not say that everyone attempting a 100% accuate pack would not have fun. I said stressing about 100% accurate packs takes the fun out of it.
Lets just leave it at that. I posted the tutorial, some like it, some don’t, thats life.
Here is a demo of this tutorial at work. It is a kit I make and placed in my daughter’s proton pack. Not 100% accurate but effective. She loves it and the kits I put in adult sized packs were also liked very well by others.
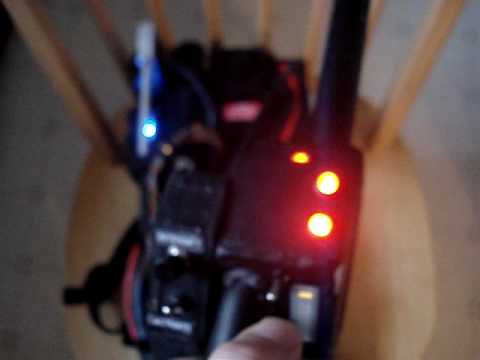
Hope everyone likes it.
I’ve seen adults with worse packs, nice job. 